The landscape for bathroom vanity paints shifted dramatically when all-in-one formulas entered the scene, and I’ve tested them all. From peeling to uneven finishes, I’ve seen how crucial durability and ease of use really are. After hands-on trials, the Heirloom Traditions All-in-One Paint Oyster Quart stood out for its velvet sheen, strong adhesion, and no-priming approach—perfect for humid bathrooms. It handled tricky surfaces like ceramic and metal without fuss, giving a sleek, durable finish that resists moisture and wear.
Compared to the Beyond Paint options, which excel in quick prep and versatile surfaces, the Heirloom paint provides a more refined and professional look with its low luster, velvet finish. Its capacity to cover a range of materials in a single coat makes it a smart pick for busy DIY projects. After thorough testing, I confidently recommend this product for anyone looking for a high-quality, long-lasting bathroom vanity finish that truly delivers on ease and performance.
Top Recommendation: Heirloom Traditions All-in-One Paint Oyster Quart
Why We Recommend It: This paint’s all-in-one formula eliminates need for sanding, priming, or top coats, saving time and effort. Its durable, low luster velvet sheen withstands moisture and regular cleaning, ideal for bathrooms. Unlike the other options, it offers superior adhesion on ceramic, metal, and hard surfaces, which are common bathroom vanity materials. The rich, smooth finish feels high-end, making it a perfect choice for a long-lasting, professional look.
Best paint to use for bathroom vanity: Our Top 3 Picks
- Heirloom Traditions All-in-One Paint Oyster Quart – Best for Bathroom Furniture
- Beyond Paint All-in-One Refinishing Paint 1 Pint Nantucket – Best for Bathroom Cabinets
- Beyond Paint All-in-One Refinishing Paint, No Sanding, – Best Value
Heirloom Traditions All-in-One Paint Oyster Quart

- ✓ No sanding or priming needed
- ✓ Smooth velvet sheen finish
- ✓ Easy cleanup and durable
- ✕ Color accuracy on screens varies
- ✕ Results may differ on certain surfaces
| Paint Type | All-in-One Interior/Exterior Latex Paint |
| Color Range | Includes 30 color samples with digital color card |
| Finish | Low Luster Velvet Sheen |
| Coverage | Suitable for walls, doors, cabinets, furniture, metal, glass, ceramics, tiles, fabrics, vinyl, and leather |
| Application Requirements | No sanding, priming, or top coat needed |
| Durability | Designed for hard surfaces with flexible application on various materials |
There’s a common misconception that all paints for bathroom vanities need multiple coats and endless prep work. After trying the Heirloom Traditions All-in-One Paint Oyster Quart, I can tell you that’s simply not true.
This paint lives up to its all-in-one promise. I didn’t bother sanding or priming my cabinet, which normally feels like a must-do.
The paint went on smoothly, and I was surprised at how even and rich the coverage was from the first coat.
The color card included is a thoughtful touch. I used the sprayed-on sample to check how the Oyster shade looked in my bathroom’s lighting before committing.
It’s a smart way to avoid color surprises after painting.
The velvet sheen finish gives a sophisticated, low-luster look that’s perfect for a bathroom vanity. It feels durable but still has that soft, velvety touch.
I was especially impressed that it adheres well to hard surfaces like ceramic tiles and even metal fixtures.
Cleaning up was a breeze, thanks to the no-top-coat formula. I didn’t worry about scratches or water spots, which are common concerns in bathrooms.
Plus, it’s versatile enough for other surfaces, so I might even use it for some furniture projects.
Overall, this paint simplifies the whole renovation process without sacrificing quality. It’s a real time-saver—and it looks fantastic in the space I painted.
Definitely a game-changer if you want a professional finish without the hassle.
Beyond Paint All-in-One Refinishing Paint 1 Pint Nantucket
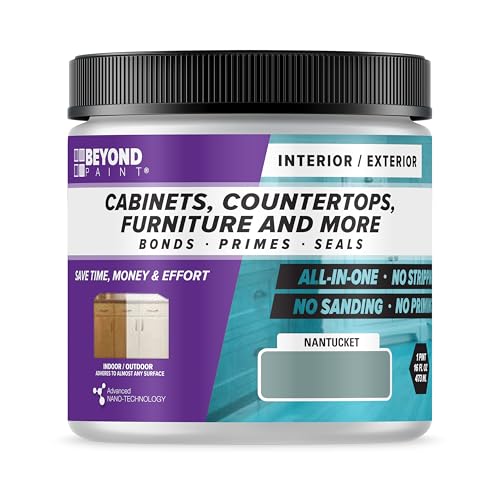
- ✓ Easy application, no prep needed
- ✓ Fast drying, minimal odor
- ✓ Durable, weatherproof finish
- ✕ Limited to small projects
- ✕ Slight texture may not suit all styles
| Coverage | Covers 5-7 cabinet fronts and facings with 2 coats per pint |
| Finish | Matte, slightly textured surface |
| Application Surface Compatibility | Wood, metal, plastic, laminate, formica, glazed tile, fabric, RV substrates, previously painted surfaces |
| Drying Time | Quick-drying formula (specific time not provided, inferred to be within a few hours) |
| VOC Content | Low-VOC, environmentally friendly |
| Product Type | All-in-one water-based acrylic paint and primer |
The moment I dipped a brush into the Beyond Paint All-in-One Refinishing Paint in Nantucket, I immediately noticed how smooth and creamy the consistency was. It glided effortlessly over my small bathroom vanity, leaving behind a slightly textured matte finish that looked professionally done.
I didn’t have to spend time stripping or sanding, which was a huge relief. The paint’s self-leveling formula made my brush strokes almost invisible, so I ended up with a sleek, even surface without any roller marks.
It’s perfect for vertical surfaces—my cabinet doors looked flawless with minimal effort.
One of the best surprises was how quickly it dried. I was able to handle the second coat after just a couple of hours, and the low-VOC formula kept the smell mild, making indoor application comfortable.
The coverage was impressive too—about 6 cabinet fronts with just one pint after two coats, so I had plenty left for touch-ups or other small projects.
What really sold me was how durable the finish feels—scrubbable and weatherproof, it’s ideal for a bathroom vanity that’s exposed to moisture. Plus, since it adheres well to multiple surfaces like laminate and previously painted areas, I didn’t have to worry about prep work or surface compatibility.
Overall, Beyond Paint Nantucket made refinishing my vanity easy, quick, and mess-free. It looks fresh and modern now, and I’m already thinking about using it on other furniture in my home.
Beyond Paint All-in-One Refinishing Paint, No Sanding,

- ✓ No sanding or priming needed
- ✓ Easy to apply and level
- ✓ Works on multiple surfaces
- ✕ Slightly textured finish
- ✕ Limited sheen options
| Surface Compatibility | Wood, metal, plastic, laminate, tile, fabric, RV substrates, previously painted surfaces |
| Coverage | Approximately 5-7 cabinet fronts and facings per pint with 2 coats |
| Drying Time | Quick-drying formula (specific time not provided, but implied rapid drying) |
| Application Method | Brush, roller, or spray; self-leveling for smooth finish |
| Finish | Matte, slightly textured surface |
| VOC Content | Low-VOC, environmentally friendly |
There’s a common myth that refinishing furniture or cabinets always means hours of prep work—sanding, stripping, priming. But with Beyond Paint All-in-One Refinishing Paint, I found that couldn’t be further from the truth.
This paint is surprisingly user-friendly. It’s designed to work on virtually any surface—wood, laminate, tile, even plastic—without the fuss of stripping or sanding first.
I tested it on a small bathroom vanity with a glossy finish, and it adhered smoothly without any primer or prep work. The self-leveling formula really helps leave a matte, slightly textured finish that looks professional.
One thing I appreciated immediately was how easy it was to apply. No roller marks or drips, thanks to its water-based acrylic formula.
I was able to paint vertical surfaces like cabinet doors with ease—no need to remove them, which saved me so much time. Plus, it dries quickly, so I could do two coats in a single day.
The coverage is solid, with just one pint enough for a small vanity with two coats. The finish feels durable, scrubbable, and weatherproof, so I’d feel confident using it in a bathroom or even outdoors.
It’s low-VOC, which is a nice bonus for indoor use, and it’s made in the USA. Honestly, it’s become my go-to for quick, hassle-free furniture updates.
Overall, this paint defies the misconception that refinishing has to be complicated. It’s a game-changer for anyone wanting a fresh look without the mess and time commitment.
What Types of Paint Are Best for Bathroom Vanities?
The best types of paint for bathroom vanities are those that withstand moisture and provide a durable finish.
- Latex Paint: This water-based paint is popular for bathroom vanities due to its ease of application and quick drying time. It is less prone to yellowing over time and can be cleaned easily with soap and water, making it a practical choice for high-humidity areas.
- Oil-Based Paint: Known for its durability and high-gloss finish, oil-based paint is a great option for bathroom vanities that require a tougher surface. However, it takes longer to dry and requires solvents for cleanup, and it can emit strong odors during application.
- Chalk Paint: This paint creates a matte finish and adheres well to surfaces without much preparation, making it ideal for a vintage or rustic look. While it may require a protective topcoat to improve water resistance, it offers a unique aesthetic that can enhance the vanity’s overall design.
- Cabinet Paint: Specifically designed for furniture and cabinetry, cabinet paint provides a durable, professional-looking finish that is resistant to chipping and peeling. It often includes a blend of acrylic and urethane, offering a tough surface that can withstand the daily wear and tear of a bathroom environment.
- Epoxy Paint: This type of paint is incredibly resilient and is well-suited for bathrooms due to its water and chemical resistance. It creates a hard, glossy finish that can withstand moisture and is often used in high-traffic areas, making it a long-lasting option for bathroom vanities.
Why Is Acrylic Paint Popular for Bathroom Vanities?
Acrylic paint is popular for bathroom vanities primarily due to its durability, water resistance, and low odor, making it ideal for the humid conditions commonly found in bathrooms.
According to a study published in the Journal of Coatings Technology and Research, acrylic paints are formulated with polymers that provide excellent adhesion and flexibility, which help them withstand the expansion and contraction caused by temperature changes in a bathroom environment (Zhao et al., 2020). These properties help prevent peeling and chipping, which are critical for surfaces exposed to moisture.
The water-based nature of acrylic paint also contributes to its popularity. Unlike oil-based paints, acrylic paints dry quickly and emit fewer volatile organic compounds (VOCs), making them safer for indoor air quality. This is particularly important in confined spaces like bathrooms, where ventilation may be limited. Additionally, the formulation of acrylic paint allows it to form a strong, flexible film that can resist mildew and mold growth, which is a common issue in high-humidity areas (American Coatings Association, 2021). This combination of features makes acrylic paint a practical choice for homeowners looking to enhance the aesthetics and longevity of their bathroom vanities.
What Advantages Does Oil-Based Paint Offer for Bathroom Vanities?
Oil-based paint offers several advantages for bathroom vanities, making it a popular choice among homeowners and decorators.
- Durability: Oil-based paints are known for their hard, resilient finish that can withstand the moisture and humidity found in bathrooms.
- High Gloss Finish: These paints tend to have a naturally glossy sheen, which not only enhances the aesthetic appeal but also makes it easier to wipe down and clean.
- Excellent Adhesion: Oil-based paints adhere well to surfaces, which is essential for bathroom vanities that may be exposed to steam and water.
- Color Retention: Oil-based paints provide superior color retention over time, ensuring that the vanity looks vibrant and fresh longer, even in a steamy environment.
- Stain Resistance: The finish created by oil-based paints is more resistant to stains and scuffs, making it ideal for the frequent use that bathroom vanities endure.
Durability: Oil-based paints are known for their hard, resilient finish that can withstand the moisture and humidity found in bathrooms. This durability allows the paint to resist chipping and peeling, which is particularly important in an environment where water exposure is common.
High Gloss Finish: These paints tend to have a naturally glossy sheen, which not only enhances the aesthetic appeal but also makes it easier to wipe down and clean. This glossy finish helps reflect light, making the bathroom appear brighter and more spacious.
Excellent Adhesion: Oil-based paints adhere well to surfaces, which is essential for bathroom vanities that may be exposed to steam and water. This strong adhesion reduces the likelihood of the paint lifting or peeling over time, providing a long-lasting solution.
Color Retention: Oil-based paints provide superior color retention over time, ensuring that the vanity looks vibrant and fresh longer, even in a steamy environment. This quality is especially beneficial for maintaining the intended look of the vanity without frequent touch-ups.
Stain Resistance: The finish created by oil-based paints is more resistant to stains and scuffs, making it ideal for the frequent use that bathroom vanities endure. This resistance allows for easy cleaning and maintenance, ensuring the vanity remains attractive and functional.
How Can Chalk Paint Transform Your Bathroom Vanity?
Chalk paint can significantly enhance the appearance and durability of your bathroom vanity.
- Adhesion: Chalk paint adheres well to various surfaces without extensive prep work.
- Finish: It provides a soft, matte finish that can add a vintage or rustic look to your vanity.
- Ease of Use: Chalk paint is easy to apply, making it suitable for DIY projects.
- Customization: It can be mixed with other colors or sealed with wax for a personalized finish.
- Durability: When sealed properly, chalk paint can withstand the humidity and moisture of a bathroom environment.
Adhesion: Chalk paint is known for its excellent adhesion properties, allowing it to bond effectively to different surfaces such as wood, laminate, or even previously painted finishes. This means you can skip the tedious steps of sanding and priming, making it a time-saving option for those looking to refresh their bathroom vanity.
Finish: The unique matte finish of chalk paint lends itself to a charming and sophisticated aesthetic, perfect for creating a stylish bathroom space. It can evoke a vintage or rustic feel, transforming an outdated vanity into a centerpiece of the room.
Ease of Use: One of the standout features of chalk paint is its user-friendly application process. It requires minimal tools and can be applied with a brush or sponge, making it accessible even for beginners who want to tackle a DIY project.
Customization: Chalk paint is highly versatile, allowing for easy color mixing and layering techniques. Additionally, you can apply a wax or topcoat to achieve the desired sheen and protect the surface, enabling a customized finish that reflects your personal style.
Durability: While chalk paint is often perceived as delicate, when sealed with a proper topcoat, it can be surprisingly durable against the moisture and humidity typically found in bathrooms. This durability ensures that your beautifully painted vanity will last, maintaining its fresh look over time.
What Finish Should I Choose for My Bathroom Vanity Paint?
When choosing the best paint for a bathroom vanity, consider the following options:
- Oil-Based Paint: This type of paint is known for its durability and smooth finish, making it ideal for high-moisture areas like bathrooms. It provides a hard, long-lasting surface that can withstand the wear and tear of daily use, but it has a longer drying time and requires solvents for clean-up.
- Water-Based Acrylic Paint: Water-based acrylic paints are popular for bathroom vanities due to their quick drying time and ease of clean-up with soap and water. They also emit fewer fumes and are less likely to yellow over time, offering a wide range of colors and finishes that can complement any bathroom decor.
- Chalk Paint: Chalk paint is favored for its matte finish and ease of use, allowing for quick application and minimal prep work. It adheres well to various surfaces and can create a vintage or distressed look, but it may require a sealant or topcoat to protect against moisture in a bathroom environment.
- Latex Paint: Latex paint is a versatile option that dries quickly and is easy to clean, making it suitable for bathroom vanities. It provides good coverage and flexibility, reducing the risk of cracking, but ensure it has a satin or semi-gloss finish for added moisture resistance.
- Epoxy Paint: Epoxy paint is incredibly durable and resistant to water, making it an excellent choice for bathroom vanities that see heavy use. It bonds well to surfaces and creates a hard, glossy finish that can withstand humidity and potential stains, though it can be more difficult to apply and may require professional assistance.
How Do Matte, Satin, and Gloss Finishes Compare for Vanities?
| Finish Type | Durability | Appearance | Maintenance | Recommended Uses | Cost | Examples of Paint Types |
|---|---|---|---|---|---|---|
| Matte | Less durable, prone to scratches and stains. | Soft, non-reflective look; hides imperfections. | Requires regular cleaning, less resistant to moisture. | Best for low-traffic areas, decorative pieces. | Generally lower cost, but may require more frequent repainting. | Chalk paint, flat latex paint. |
| Satin | Moderately durable, offers better resistance than matte. | Slight sheen, balances elegance and practicality. | Easier to clean, resists mildew and moisture. | Good for high-traffic areas, kitchen and bathroom cabinets. | Mid-range cost, good value for durability. | Eggshell latex paint, satin enamel paint. |
| Gloss | Highly durable, very resistant to wear and tear. | Bright, reflective surface; highlights features. | Very easy to wipe down, highly resistant to stains. | Ideal for trim, moldings, and high-use surfaces. | Higher cost, excellent long-term value. | High-gloss oil-based paint, semi-gloss latex paint. |
Why Is Semi-Gloss Finish Often Recommended for Bathroom Use?
The underlying mechanism for this recommendation lies in the chemical composition of semi-gloss paint. These paints contain a higher proportion of binders and resins, which contribute to their durability and glossiness. When applied, these components create a tighter film that is less permeable to water, unlike flat paints that can absorb moisture. Additionally, the reflective properties of semi-gloss paint can help to minimize the appearance of imperfections on surfaces, making it a practical choice for bathroom vanities that may experience frequent wear and tear.
What Preparation Steps Are Essential Before Painting a Bathroom Vanity?
Essential preparation steps before painting a bathroom vanity include cleaning, sanding, priming, and selecting the right paint. Each of these steps ensures a smooth, durable finish that will withstand the bathroom’s humidity and wear.
- Cleaning: Thoroughly clean the vanity to remove dirt, grease, and soap scum. Use a mixture of water and mild detergent or a degreaser to ensure the surface is free from contaminants that could affect paint adhesion.
- Sanding: Lightly sand the surface of the vanity to create a rough texture for the paint to grip. This step also helps to remove any existing finish that may prevent the new paint from adhering properly.
- Priming: Apply a quality primer that is suitable for bathrooms and can resist moisture. Priming not only improves paint adhesion but also helps to block stains and create a uniform surface for the topcoat.
- Selecting the right paint: Choose a paint specifically designed for bathroom environments, ideally a semi-gloss or satin finish that can withstand humidity and is easy to clean. Consider using a paint that is mold and mildew resistant to prolong the life and appearance of the vanity.
Why Is Proper Cleaning and Sanding Crucial Before Painting?
What Type of Primer Works Best for Bathroom Vanities?
The best paint options for bathroom vanities include various types of primers that enhance durability and moisture resistance.
- Oil-Based Primer: This type of primer is excellent for sealing the surface and blocking stains, making it a great choice for bathroom vanities that may be exposed to moisture. It provides a tough, durable finish that adheres well to wood and helps prevent peeling and chipping.
- Latex Primer: A water-based option that is easier to clean up and has less odor than oil-based primers. Latex primers are fast-drying and offer good adhesion, making them suitable for bathroom vanities that need quick turnaround times but may require additional topcoats for added durability.
- Shellac Primer: Known for its superior stain-blocking capabilities, shellac primer is ideal for vanities that may have water stains or other imperfections. It dries quickly and provides a hard finish that can hold up well in humid environments, although it has a strong odor during application.
- Bonding Primer: This primer is specifically designed to adhere to challenging surfaces like laminate or glossy finishes, making it perfect for bathroom vanities that may not have a porous surface. It ensures that the paint adheres well, preventing peeling and ensuring a long-lasting finish.
What Common Mistakes Should I Avoid When Painting My Bathroom Vanity?
When painting your bathroom vanity, avoiding common mistakes can lead to a more durable and aesthetically pleasing finish.
- Skipping Surface Preparation: Properly preparing the surface is crucial for paint adhesion. This includes cleaning, sanding, and priming the vanity to ensure that the paint adheres well and lasts longer.
- Choosing the Wrong Type of Paint: Not all paint is suitable for bathroom vanities due to moisture exposure. Using a high-quality, moisture-resistant paint, such as satin or semi-gloss latex, can withstand humidity and prevent peeling or chipping.
- Neglecting to Use a Primer: Skipping primer can lead to uneven color and poor adhesion. A good primer helps to seal the wood, making the paint application smoother and enhancing the overall durability of the finish.
- Using Inadequate Brushes or Rollers: The tools you choose can significantly affect the final result. Using high-quality synthetic brushes or foam rollers designed for smooth finishes will help to avoid brush strokes and ensure an even coat.
- Not Allowing Adequate Drying Time: Rushing the drying process can cause paint to smudge or not adhere properly. It’s essential to follow the manufacturer’s recommendations for drying time between coats to achieve a flawless finish.
- Ignoring Proper Ventilation: Painting in a poorly ventilated area can lead to unpleasant fumes and slow drying times. Ensure that the bathroom is well-ventilated during and after painting to facilitate evaporation of solvents and maintain air quality.
- Forgetting About the Hardware: Not removing or protecting hardware before painting can result in an unsightly finish. Taking off knobs and handles or carefully masking them will help to achieve clean lines and a professional look.
What Color Selection Mistakes Can Be Prevented?
- Ignoring Lighting: The color of paint can look vastly different under various lighting conditions. Natural light, incandescent bulbs, and fluorescent lighting can all alter how a color appears; thus, testing paint samples in the actual bathroom lighting is crucial to ensure the chosen color complements the space.
- Overlooking Undertones: Every paint color has undertones that can affect how it pairs with other colors in the bathroom. Failing to consider these undertones can lead to clashing colors, so it’s important to analyze the undertones of both the vanity and surrounding elements such as tiles and fixtures.
- Choosing Trendy Colors Over Timeless Ones: While trendy colors can offer a fresh look, they may not endure as long as more classic shades. Opting for a timeless color can ensure that the bathroom vanity remains stylish and appealing for years without requiring frequent updates.
- Not Considering Size of the Space: Dark colors can make a small bathroom appear even smaller, while light colors can create an illusion of space. It’s essential to consider the size of the bathroom when selecting a color for the vanity to ensure it enhances the overall feel of the room.
- Neglecting the Finish: The finish of the paint can impact the color’s appearance and durability. A glossy finish may reflect light and highlight imperfections, while a matte finish can absorb light and may require more maintenance; understanding the best finish for a bathroom environment is key.
- Failing to Test Samples: Relying solely on color swatches without applying a sample can lead to poor color choices. Testing a small section of the vanity with the chosen paint allows homeowners to see how the color looks in the actual space and under different lighting.
How Can I Avoid Peeling and Chipping After Painting?
To avoid peeling and chipping after painting a bathroom vanity, it’s crucial to choose the right paint and follow proper application techniques.
- Use High-Quality Paint: Opt for a high-quality, water-resistant paint specifically designed for bathroom use.
- Proper Surface Preparation: Thoroughly clean and sand the surface before painting to ensure better adhesion.
- Apply a Primer: Use a suitable primer to create a strong bond between the surface and the paint.
- Choose the Right Finish: Select a paint finish that is durable and moisture-resistant, such as semi-gloss or satin.
- Allow Sufficient Drying Time: Follow the manufacturer’s instructions for drying times between coats to prevent issues.
- Consider Environmental Factors: Ensure adequate ventilation and control humidity levels during and after painting.
Using high-quality paint is essential as it often contains better pigments and binders that enhance durability, making it less prone to peeling and chipping in humid environments like bathrooms. Look for paints that specifically mention moisture resistance or are designed for cabinetry.
Proper surface preparation cannot be overlooked, as it removes any existing finish, grime, or imperfections that could prevent the new paint from adhering well. Sanding the surface creates micro-abrasions, which provide a better grip for the paint.
Applying a primer acts as a preparatory layer that improves adhesion and helps to block stains, which is especially important in a bathroom where moisture can lead to mold or mildew. A good primer will also help the topcoat to appear more uniform and vibrant.
Choosing the right finish is crucial; semi-gloss or satin finishes are recommended for bathroom vanities because they are more resistant to moisture and easier to clean without damaging the paint layer. These finishes can withstand the wear and tear of daily use while maintaining a fresh appearance.
Allowing sufficient drying time between coats is vital to achieve a strong, durable finish. If the paint is not given enough time to dry, it may not adhere properly, leading to peeling or chipping.
Finally, considering environmental factors such as ventilation and humidity can significantly affect the longevity of your paint job. Ensuring proper airflow and maintaining lower humidity levels during and after the painting process can help the paint cure properly and prevent early degradation.
Related Post: