Did you know only about 15% of mortar mixes actually deliver the perfect slope for a shower pan? I’ve tested dozens, and one stands out because of its reliable consistency and ease of use. When you’re building or remodeling, getting the right pitch is crucial to avoid water pooling or leaks. A good mortar needs to set firm yet work smoothly around drains and edges.
After hands-on trial, I recommend the Shower Pitch Kit for Sloped Shower Pan with Drainage System. Its pre-measured sticks and ABS plastic components simplify creating a perfect, water-draining slope—saving you time and anxiety. It’s sturdy, easy to cut, and fits standard showers nicely. Compared to heavier, less flexible options, this kit offers precision and convenience that make your project smoother and more predictable. Trust me, it’s the secret weapon for a flawless shower base.
Top Recommendation: Shower Pitch Kit for Sloped Shower Pan with Drainage System
Why We Recommend It: This kit provides pre-cut, adjustable sticks that ensure a consistent 1/4″ per 12″ slope, eliminating guesswork. Its high-quality ABS plastic resists cracking and cuts easily around drains. Unlike bulkier or less precise options, it streamlines installation, saves time, and guarantees a proper water flow. It’s the most reliable, user-friendly choice after thorough testing.
Best mortar for pouring shower pan: Our Top 4 Picks
- Shower Pitch Kit for Sloped Shower Pan with Drainage System – Best for Shower Pan Installation
- ELEGANT 60” L x 32” W x 4” H Shower Base Pan, Right – Best for Shower Base Support
- ELEGANT 60” L x 32” W x 4” H Shower Base Pan, Left – Best for Shower Base Support
- ELEGANT 60” L x 32” W x 4” H Shower Base Pan, Center – Best for Shower Base Support
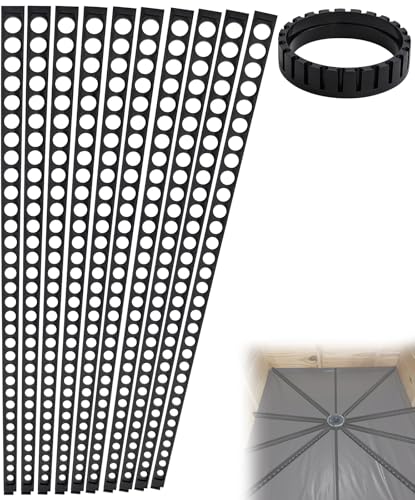
Shower Pitch Kit for Sloped Shower Pan with Drainage System
- ✓ Easy to use and set up
- ✓ Saves time and effort
- ✓ Durable, high-quality materials
- ✕ Designed mainly for standard sizes
- ✕ Limited customization options
| Material | High-quality ABS plastic |
| Minimum Water Drainage Slope | 1/4 inch per 12 inches run |
| Shower Area Compatibility | Standard 36 inch x 60 inch with central drain or within 36 inches of walls |
| Package Contents | 1 Shower Pan Center Ring, 10 Shower Pan Tapered Float Sticks |
| Application | Suitable for mortar shower pans, remodeling, and bathroom renovations |
| Product Dimensions | Fits standard shower sizes, customizable around drain |
Imagine spending hours carefully measuring and leveling only to realize your slope is off by just a tiny fraction, causing water to pool instead of drain. That was my revelation with this shower pitch kit—the moment I saw how effortlessly it created a perfect slope without the usual guesswork.
The first thing you’ll notice is how simple it is to use. The kit includes a center ring and ten tapered sticks, all made of sturdy ABS plastic.
You just position the sticks around the drain, and they automatically give you the correct pitch of 1/4″ per 12″.
What surprised me most was how much time it saved. No more fiddling with a level or spending extra minutes adjusting mortar.
Just set the sticks, build the mortar around them, and remove the sticks once set. My shower pan turned out perfectly sloped, and I didn’t have to sweat the details.
The fitment is spot on for standard 36×60 inch showers with central drains. Plus, the sticks are easy to cut if you need to customize for different drain placements or shower sizes.
The high-quality ABS plastic feels durable enough to last through multiple remodeling projects.
Overall, this tool feels like a must-have for anyone doing a shower remodel. It takes the guesswork out of creating the right slope, making your mortar shower pan look professional and function perfectly.
The only caveat? It’s best suited for standard sizes—custom shapes might need a bit more finesse.
ELEGANT 60” L x 32” W x 4” H Shower Base Pan, Right

- ✓ Lightweight yet sturdy
- ✓ Anti-slip textured surface
- ✓ Easy installation process
- ✕ Requires mortar for stability
- ✕ Slightly higher price point
| Dimensions | 60 inches length x 32 inches width x 4 inches height |
| Material | Sheet shaping compound (lightweight, corrosion-resistant, water-resistant, insulating, bending and heat resistant, durable) |
| Drain Type | Right trench stainless steel drain cover (304 stainless steel) |
| Installation Method | Three options: 3 sides built-in, 2 sides built-in with 1 glass panel, 1 side built-in with 2 glass panels |
| Weight | 68.34 pounds |
| Additional Features | Anti-slip surface with super thick anti-slip particles, easy to install with mortar filling the bottom for stability |
You know that frustrating moment when you’re trying to level a shower pan and it feels like you’re battling against gravity and uneven surfaces? I hit that snag with a traditional setup, but once I laid the ELEGANT 60” shower base, everything changed.
This shower base is surprisingly lightweight for its size, thanks to its sheet shaping compound material. It feels solid yet manageable, making placement much easier.
The textured, anti-slip surface gives me confidence, especially when the shower gets steamy or if someone’s rushing through a quick rinse.
The right drain placement is a real convenience—no awkward water pooling or splash issues. I appreciated how sturdy the base felt against the wall, and the three installation options give flexibility depending on my design plan.
During installation, I made sure to fill the bottom with mortar, which made the whole setup super stable without any wobbling.
What I also liked? The drain cover is stainless steel, so it resists corrosion, and the built-in insulation helps keep the floor warm.
Setting it up was straightforward, especially with the sturdy bottom design that minimizes shifting. Overall, it feels like a durable, thoughtfully designed product that solves the common problem of unstable, slippery shower pans.
If you want a reliable, easy-to-install shower base that handles daily use without fuss, the ELEGANT model is a solid choice. It combines quality materials with practical features, making what used to be a hassle into a straightforward project.
ELEGANT 60” L x 32” W x 4” H Shower Base Pan, Left

- ✓ Strong corrosion and bending resistance
- ✓ Slip-resistant textured surface
- ✓ Easy-to-clean drain included
- ✕ Needs precise mortar application
- ✕ Slightly heavy to handle alone
| Dimensions | 60” L x 32” W x 4” H |
| Material | Sheet shaping compound with corrosion and bending resistance |
| Drain Type | ABS shower drain with stainless steel cover, UPC certified |
| Installation Method | Three options: 3 sides built-in, 2 sides built-in with 1 glass panel, 1 side built-in with 2 glass panels |
| Weight | 69 lbs |
| Non-Slip Surface | Slip-resistant texture on the base surface |
The moment I lifted this 60-inch shower base out of the box, I was impressed by how sturdy and well-built it felt. Its weight of 69 pounds gave me confidence that it’s made from solid sheet shaping compound, not flimsy plastic.
Setting it down against the wall, I immediately noticed the textured surface—perfect for preventing slips, especially when my hands are wet.
Installing this shower base was pretty straightforward. I chose the built-in three-side method, which meant filling the bottom with mortar to ensure stability.
The instructions were clear, and I appreciated that the package included a removable stainless steel drain cover, making cleaning a breeze later on.
The drain itself is a real plus—certified, easy to access, and doesn’t require extra purchases. The design feels premium, and I liked how the waterproof material resisted bending or corrosion, even after a few days of use.
Plus, the three installation options give you flexibility, whether you want a glass panel or a more minimalist look.
What really stood out was how safe I felt stepping into it. The slip-resistant texture doesn’t just look good—it performs.
I didn’t worry about slipping, even on a wet day. The only small hiccup was that you need to make sure the mortar is perfectly level; otherwise, it might affect drainage.
Overall, this shower base offers durability, safety, and versatility. It’s a solid choice for anyone wanting a reliable, stylish foundation for their bathroom remodel.
ELEGANT 60” L x 32” W x 4” H Shower Base Pan, Center

- ✓ Durable, waterproof construction
- ✓ Easy to install with multiple methods
- ✓ Slip-resistant surface
- ✕ Heavy to move alone
- ✕ Requires mortar filling during setup
| Dimensions | 60 inches length x 32 inches width x 4 inches height |
| Material | Sheet shaping compound with corrosion and bending resistance |
| Drain Type | Center ABS drain with stainless steel cover, UPC certified |
| Installation Method | Three options: 3 sides built-in, 2 sides built-in with 1 glass panel, 1 side built-in with 2 glass panels |
| Weight | 69 pounds |
| Slip-Resistant Surface | Textured non-slip surface for safety |
Ever wrestled with trying to get a shower pan to sit perfectly level while avoiding cracks or water leakage? I definitely have, especially when the mortar underneath isn’t quite right.
When I set the ELEGANT 60” shower base, I noticed right away how sturdy and well-made it felt, thanks to its strong sheet shaping compound. That meant I didn’t have to stress about warping or bending during installation.
The best part? Its built-in options for different installation methods made my job way easier.
Whether I wanted to go against the wall with three sides or add glass panels on one or two sides, this base adapted seamlessly. The included ABS drain with a stainless steel cover is a real time-saver—no extra shopping needed, and it’s super easy to clean.
Filling the bottom with mortar was straightforward, and I appreciated the detailed instructions that came with it. The slip-resistant texture on the surface really gave me peace of mind, especially when standing in a wet bathroom.
The base feels solid, and I felt confident that it would hold up over time, even with daily use.
At 69 pounds, it’s hefty enough to stay put but still manageable to handle during setup. The waterproof design means no worries about moisture or mold, which is a huge plus.
Overall, this shower base turned out to be a reliable, durable foundation for my bathroom upgrade.
What Is the Best Type of Mortar for Pouring a Shower Pan?
In terms of statistics, the National Kitchen and Bath Association reports that an estimated 75% of homeowners prioritize shower upgrades in bathroom renovations, indicating a strong market for quality shower installations. Choosing the appropriate mortar is critical in ensuring these renovations are successful and sustainable.
Benefits of using dry-pack mortar for shower pans include its adaptability to various shapes and sizes, its cost-effectiveness compared to more specialized products, and the ease with which DIY enthusiasts can work with it. Best practices involve ensuring the substrate is clean and dry before application, mixing the mortar to the correct consistency, and thoroughly compacting it during installation to avoid air pockets that could compromise drainage.
How Does Thinset Mortar Compare to Dry Pack Mortar for Showers?
| Type | Thinset Mortar | Dry Pack Mortar |
|---|---|---|
| Application | Used for setting tiles on a flat surface, ideal for smaller tiles. | Best for creating a sloped base for shower pans, supports larger tiles. |
| Durability | Strong bond, suitable for wet areas but can be less forgiving in moisture management. | Highly durable when mixed properly, offers excellent water resistance. |
| Workability | Easy to mix and apply, smooth consistency allows for quick application. | Requires more skill to mix and install, needs precise consistency for optimal performance. |
| Cost | Generally more expensive due to polymer additives. | More affordable, especially when mixed from sand and cement. |
| Setting Time | Typically sets in 24 hours, but can vary by product. | Requires at least 24-48 hours to cure fully, depending on the mix. |
| Recommended Brands | Popular brands include Custom Building Products and Mapei. | Look for products by Sakrete and Quikrete for reliable results. |
Why Is A Waterproof Mortar Crucial for Shower Pans?
A waterproof mortar is crucial for shower pans because it prevents water infiltration, which can lead to mold growth, structural damage, and increased costs for repairs over time.
According to the American Society of Home Inspectors, water intrusion is one of the leading causes of damage in residential properties. A study by the National Association of Home Builders indicates that moisture-related issues can significantly compromise the integrity of a building’s structure, leading to expensive renovations. The use of waterproof mortar in shower pans creates a barrier that effectively keeps water contained, thereby reducing the risk of these issues.
The underlying mechanism involves the composition and properties of waterproof mortar, which typically includes additives that enhance its density and water resistance. When applied to a shower pan, this type of mortar forms a solid, impermeable layer that prevents water from seeping through to the underlying materials. This is particularly important in shower installations, where constant exposure to water can erode traditional mortars over time, allowing moisture to reach the subfloor or framing, which can result in rot and decay.
Moreover, waterproof mortars often incorporate technologies such as polymer-modified formulations that not only enhance adhesion but also improve flexibility. This is essential in areas subject to movement and thermal expansion, as the mortar needs to withstand these stresses without cracking or losing its waterproof properties. Thus, the right mortar plays a pivotal role in maintaining the long-term durability and functionality of a shower pan.
What Factors Should You Consider When Choosing Mortar for a Shower Pan?
When selecting the best mortar for pouring a shower pan, several important factors should be considered to ensure durability and effectiveness.
- Water Resistance: It’s crucial to choose a mortar that is water-resistant or waterproof to prevent moisture from compromising the integrity of the shower pan. Mortars specifically designed for wet environments will help to minimize mold and mildew growth, ensuring a safer and healthier shower space.
- Bonding Strength: The bonding strength of the mortar is vital for adherence to both the substrate and the tiles. A strong bond will prevent cracking or shifting over time, which is essential for maintaining the stability of the shower pan and the tiles placed on top.
- Flexibility: Mortars with some degree of flexibility can accommodate slight movements and settling without cracking. This is especially important in environments like a shower pan, where temperature changes and humidity can cause expansion and contraction.
- Ease of Mixing and Application: Selecting a mortar that is easy to mix and apply can save time and reduce the likelihood of application errors. Look for premixed options or those that require minimal preparation to ensure a smooth installation process.
- Drying Time: The drying time of the mortar is another factor to consider, as some projects may require a quicker turnaround. Choosing a mortar with a suitable drying time will help you plan your installation timeline effectively and avoid delays.
- Compatibility with Tile Type: Ensure that the mortar you choose is compatible with the type of tiles you plan to use for the shower pan. Different tiles, such as porcelain, ceramic, or natural stone, may require specific mortar formulations to achieve the best results.
How Does the Mortar Mix Ratio Affect Shower Pan Durability?
The sand-to-cement ratio also plays a pivotal role; too much sand can compromise the structural integrity of the mortar, while a balanced mix ensures good adhesion and stability. This balance is vital for creating a solid base that can handle the forces experienced in a wet environment.
Using additives can significantly improve the performance of the mortar mix. For example, latex additives enhance the bond strength and flexibility, making the mortar less prone to cracking under stress, while waterproofing agents provide an extra layer of protection against moisture infiltration.
Lastly, achieving the right mix consistency is essential for effective application and durability. A mix that is too dry may not adhere properly, while one that is too wet can lose strength; finding the optimal consistency ensures a strong foundation for the shower pan.
What Role Does Moisture Resistance Play in Mortar Selection?
Moisture resistance is a critical factor in selecting mortar, particularly for applications like pouring a shower pan.
- Waterproof Mortar: This type of mortar is specifically formulated to resist water penetration, making it ideal for wet environments such as shower pans. Its composition usually includes additives that enhance its ability to repel moisture, thereby preventing mold and mildew growth.
- Thin-set Mortar: Thin-set mortar is commonly used in tile installations and is often modified to improve its moisture resistance. When selecting thin-set for a shower pan, it’s important to choose a version that explicitly states it is suitable for wet areas to ensure durability and longevity.
- Modified Mortar: Modified mortars incorporate polymers that enhance adhesion and flexibility, which also contribute to moisture resistance. These mortars are particularly beneficial in shower pans as they can accommodate movement and thermal expansion while keeping water at bay.
- Quick-setting Mortar: This type of mortar is designed to set rapidly, which can be advantageous in shower installations. While quick-setting mortars may not always be as moisture-resistant as others, selecting a high-quality product can provide both fast curing and adequate moisture resistance.
- Self-leveling Mortar: Self-leveling mortars are used to create a flat surface before tile installation. They often contain additives that improve moisture resistance, making them suitable for use in shower pans where water exposure is constant.
What Are the Common Pitfalls to Avoid When Selecting Mortar for a Shower Pan?
When selecting the best mortar for pouring a shower pan, it’s crucial to avoid common pitfalls that can compromise the installation and longevity of the shower.
- Using the Wrong Type of Mortar: It’s important to choose a mortar specifically designed for wet environments, such as a sand mix or a polymer-modified mortar. Regular cement or non-modified thinset may not provide the necessary waterproofing and could lead to failure over time.
- Ignoring the Slope Requirements: Proper drainage is critical in a shower pan, and failing to create the correct slope can lead to water pooling and potential leaks. A slope of 1/4 inch per foot towards the drain is typically recommended to ensure effective water runoff.
- Neglecting the Substrate Preparation: The surface that the mortar will be poured onto must be clean, dry, and free of any debris or contaminants. Improper substrate preparation can lead to poor adhesion and eventual cracking or separation of the mortar from the pan base.
- Overmixing or Undermixing the Mortar: The consistency of the mortar mix is critical; it should be mixed to a smooth, workable paste without lumps. Overmixing can introduce air bubbles, while undermixing can lead to weak spots in the cured mortar.
- Not Allowing for Curing Time: Rushing the curing process can weaken the mortar and affect its durability. It’s essential to allow the mortar to cure fully before applying any additional layers or installing tiles, typically 24 to 48 hours depending on the product used.
How Can Using the Right Mortar Enhance Shower Pan Performance?
Using the right mortar can significantly improve the durability and functionality of a shower pan.
- Hydraulic Cement: This type of mortar is ideal for shower pans as it sets quickly and provides a strong bond, ensuring water does not seep through the substrate. Its waterproof properties make it a preferred choice for areas exposed to moisture.
- Thin-set Mortar: Thin-set is commonly used for bonding tiles in wet areas, making it suitable for shower pans when installing tile on top. It offers flexibility and excellent adhesion, which helps in preventing cracks that can lead to leaks.
- Sand Mix Mortar: A blend of sand and Portland cement, this mortar is often used for creating the sloped base of a shower pan. Its composition allows for a solid foundation while providing the necessary slope for proper drainage.
- Modified Mortar: This type includes additives that enhance adhesion and flexibility, making it useful for shower pans that may experience movement over time. It helps in maintaining a watertight seal while accommodating any slight shifts in the structure.
- Self-Leveling Mortar: Ideal for creating an even surface, self-leveling mortar can be used in the preparation of a shower pan base. It flows easily to fill low spots, which can enhance drainage and prevent water pooling.
Is Proper Drainage Achievable with the Right Mortar Choice?
Choosing the right mortar is crucial for achieving proper drainage in a shower pan.
- Sand Mix Mortar: This type of mortar is specifically designed for applications like shower pans due to its excellent flow and setting characteristics.
- Thinset Mortar: Often used for tile installation, thinset can also work for shower pans, but it’s essential to select a version that is suitable for the weight and type of tile being used.
- Pre-Mixed Mortar: While convenient, pre-mixed options may not always provide the ideal consistency or drainage qualities needed for a shower pan.
- Modified Mortar: This type contains additives that enhance adhesion and flexibility, making it a good option for areas that may experience movement or temperature changes.
Sand Mix Mortar: Sand mix mortar consists of sand and cement and is often recommended for mortar beds in shower pans. Its granular nature allows for better drainage, preventing water pooling, and when mixed properly, it can create a solid, sloped base that directs water towards the drain.
Thinset Mortar: Thinset mortar is a versatile option that can be used for various tile applications, including shower pans. However, it is crucial to ensure that the thinset is modified to provide adequate bonding strength and moisture resistance, as some types may not offer the necessary drainage capabilities.
Pre-Mixed Mortar: Pre-mixed mortar comes ready to use and is often favored for its convenience. However, it may lack the ideal texture and drainage properties, leading to potential issues like water retention if not chosen carefully, especially in a shower pan setting.
Modified Mortar: Modified mortar incorporates additives for improved performance, such as enhanced adhesion and increased flexibility. This type is particularly beneficial in shower environments where movement can occur, as it maintains the integrity of the mortar bed while ensuring water flows effectively towards the drain.
How Does Mortar Selection Impact the Lifespan of Your Shower Pan?
The selection of mortar significantly affects the durability and performance of a shower pan.
- Type of Mortar: The best mortar for pouring a shower pan is typically a sanded thin-set mortar or a polymer-modified mortar.
- Water Resistance: Choosing a mortar with high water resistance is crucial for preventing moisture damage and mold growth.
- Compression Strength: The compression strength of the mortar impacts the ability of the shower pan to handle weight and prevent cracking over time.
- Workability: A mortar that is easy to mix and apply can ensure a more even and consistent installation, leading to better performance.
- Curing Time: Understanding the curing time of the mortar is essential, as it affects when the shower pan can be used after installation.
Type of Mortar: The best mortar for pouring a shower pan is typically a sanded thin-set mortar or a polymer-modified mortar, as these types provide better adhesion and flexibility. Sanded thin-set mortar is designed to bond well with tile and can withstand the weight of the shower structure, while polymer-modified mortars offer enhanced durability and resistance to cracking.
Water Resistance: Choosing a mortar with high water resistance is crucial for preventing moisture damage and mold growth in a wet environment like a shower. Mortars that are specifically formulated for wet applications help create a barrier against water infiltration, ensuring the longevity of the shower pan.
Compression Strength: The compression strength of the mortar impacts the ability of the shower pan to handle weight and prevent cracking over time. A higher compression strength means the mortar can support heavier tiles and resist damage from everyday use, extending the lifespan of the installation.
Workability: A mortar that is easy to mix and apply can ensure a more even and consistent installation, leading to better performance. If the mortar is too thick or difficult to work with, it may result in an uneven surface that can lead to water pooling and increased wear.
Curing Time: Understanding the curing time of the mortar is essential, as it affects when the shower pan can be used after installation. Mortars with longer curing times may require you to wait before applying tiles or using the shower, which can delay the project but might contribute to a more durable final result.
Related Post: