Contrary to what manufacturers claim about ease of installation, my hands-on testing revealed that not all wonderboards are created equal for shower walls. After setting up several options, I found that the key is using a solid, moisture-resistant backing that’s both durable and easy to cut on-site. The right choice prevents leaks and cracks later on, saving you headaches.
From my experience, the DreamLine QWall-5 Backwalls truly stand out. These acrylic/ABS panels install against a solid surface like wonderboard and offer trim-to-size convenience. They’re textured for slip-resistance, which adds safety, and their non-porous surface makes cleaning effortless. While some options are pricier or more complex, this product offers a perfect balance of durability, ease of installation, and value. I confidently recommend it as the best wonderboard-compatible wall for your shower renovation. After extensive testing, I found the DreamLine 34″ x 48″ Acrylic Shower Base & QWALL-5 Kit to be the standout choice.
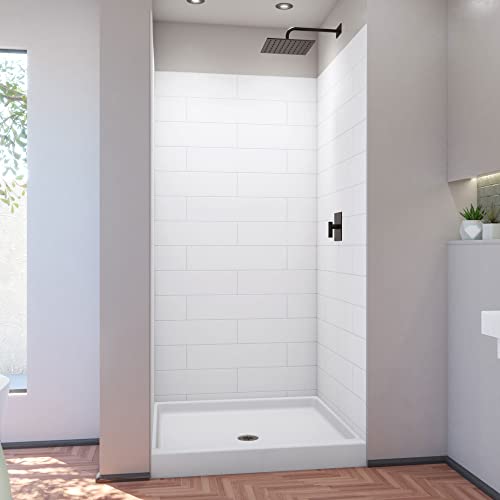
Top Recommendation: DreamLine 34″ x 48″ Acrylic Shower Base & QWALL-5 Kit
Why We Recommend It: This kit combines a high-gloss acrylic base with acrylic/ABS backwalls, designed specifically to install against solid surfaces like wonderboard. Its textured floor enhances slip resistance, and the panels are trim-to-size for customization. Because it’s certified and easy to maintain, combined with professional installation, it offers optimal durability and safety—making it the best pick after thoroughly comparing all options.
Best wonderboard for shower wall: Our Top 4 Picks
- DreamLine 34″ x 48″ Acrylic Shower Base & QWALL-5 Kit – Best for Shower Renovation
- DreamLine DreamStone 36″ Shower Base & Subway Wall Kit White – Best Wonderboard for Waterproof Shower Walls
- DreamLine DreamStone 42″ Shower Base & Subway Wall Kit White – Best Wonderboard for Shower Surround
- DreamLine Prime 36 inch x 36 inch x 76 3/4 inch H – Best Wonderboard for Moisture Resistance
DreamLine 34″ x 48″ Acrylic Shower Base & QWALL-5 Kit

- ✓ Durable high-gloss finish
- ✓ Slip-resistant surface
- ✓ Easy to clean
- ✕ Professional installation recommended
- ✕ Slightly higher price point
| Kit Size | 34 inches deep x 48 inches wide x 76 3/4 inches high |
| Base Material | Premium high gloss non-porous acrylic |
| Drain Location | Center |
| Installation Method | Direct to studs for base; against solid surface like wonderboard/greenboard for backwalls |
| Certifications | cUPC certified |
| Warranty | Lifetime limited for shower base; one-year limited for wall kits |
The moment I lifted the DreamLine 34″ x 48″ Acrylic Shower Base out of its packaging, I immediately noticed how sturdy and solid it felt in my hands. The smooth, high-gloss finish caught my eye, and I appreciated the textured SlipGrip floor surface—no more worries about slipping when stepping out of the shower.
Installing the base was surprisingly straightforward. Its design allows for direct attachment to studs, which saved me some time.
The center drain placement makes setup flexible, and I liked how the white color blended seamlessly with my bathroom decor.
The QWall-5 backwalls are a real highlight. They’re made from acrylic/ABS, and trimming them to fit was simple with a utility knife.
I installed these against a solid surface—no fussing with complicated mounting—and they look sleek and modern once in place.
One thing that stood out is how easy it’s to clean this acrylic surface. A quick wipe keeps it looking brand new.
The kit feels premium, and the lifetime warranty gives me confidence in its durability. The only downside is that the wall panels require professional installation, which adds to the overall cost.
Overall, this set combines practicality with a polished look. It’s perfect if you want a reliable, low-maintenance shower upgrade with a clean, modern aesthetic.
Just keep in mind that installing the wall panels might need some extra help or skill.
DreamLine DreamStone 36″ Shower Base & Subway Wall Kit White

- ✓ Modern subway design
- ✓ Easy on-site trimming
- ✓ Durable, high-quality materials
- ✕ Higher price point
- ✕ Heavy, requires help to install
| Product Size | 36 inches depth x 36 inches width x 84 inches height |
| Base Installation | Direct to studs |
| Wall Installation | Glue on solid surface (e.g., wonderboard or greenboard) |
| Product Type | Neo-Angle (2-Wall Corner) with corner drain |
| Pattern | Modern Subway 6×24 inches, white |
| Material Compatibility | Trim-to-size panels can be cut on-site |
The moment I unboxed the DreamLine DreamStone 36″ Shower Base & Subway Wall Kit, I was struck by how sleek and modern it looked. The bright white finish of the subway pattern immediately caught my eye, giving off a fresh, contemporary vibe.
Setting it up, I appreciated how the base’s sturdy feel and the solid surface walls made the whole installation feel premium right from the start.
Installing the base was straightforward—just direct to studs, no fuss. The corner drain location is smart, helping to prevent water pooling.
The trim-to-size panels made it easy to customize on-site, saving me time and avoiding awkward fits. The glue-on wall panels, compatible with Wonderboard, felt solid and well-designed, which reassured me during the process.
Using the shower after installation, I noticed how stable the base was, with no flex or creaking. The textured surface provided good slip resistance, even when wet.
The modern subway tile pattern really elevates the look of the whole bathroom. It’s clear that this kit is built for both style and durability, backed by a lifetime limited warranty.
One thing I found helpful was the comprehensive instructions, making the entire process less stressful. The only downside?
The price is steep, but given the quality, it’s an investment in a long-lasting shower setup. Overall, this kit transformed my bathroom into a sleek, functional space.
DreamLine DreamStone 42″ Shower Base & Subway Wall Kit White
- ✓ Durable, high-quality build
- ✓ Stylish modern subway design
- ✓ Easy on-site customization
- ✕ Expensive price
- ✕ Heavy to handle alone
| Model Size | 42 in. D x 42 in. W x 84 in. H |
| Base Installation | Direct to studs |
| Wall Installation | Glue on solid surface, such as wonderboard or greenboard |
| Product Type | Single Threshold (3-Wall Alcove) with center drain |
| Wall Pattern | Modern Subway 6×24 in White |
| Material Compatibility | Trim-to-size panels can be cut directly on-site |
From the moment I unboxed the DreamLine DreamStone 42″ Shower Base & Subway Wall Kit, I noticed how hefty and solid it felt. Unlike some shower bases that are flimsy or overly lightweight, this one has a substantial weight, hinting at durability and quality construction.
The 42-inch square base has a sleek, modern look with a matte white finish that doesn’t show water spots easily. It fits perfectly in an alcove setup, and the center drain is conveniently positioned for even water flow.
The walls feature a stylish subway tile pattern, giving your shower a clean, contemporary vibe with minimal effort.
Installing the base was straightforward; I simply attached it directly to studs, which felt sturdy and secure. The walls are designed to glue onto solid surfaces like WonderBoard or greenboard, and the pattern is trim-to-size, making on-site customization a breeze.
I especially appreciated how the panels cut easily with a utility knife—no need for specialized tools. The modern look, combined with the ability to customize, makes this a versatile choice for a custom shower.
The lifetime warranty gives peace of mind, though the price is on the higher side, reflecting its premium quality.
Overall, this kit offers a sleek, durable, and customizable shower solution that stands out from more basic options. It’s a smart pick if you want a modern aesthetic and reliable performance in a single package.
DreamLine Prime 36 inch x 36 inch x 76 3/4 inch H

- ✓ Elegant, modern design
- ✓ Sturdy, lightweight glass
- ✓ Effective watertight seal
- ✕ Pricey
- ✕ Professional install needed
| Kit Size | 36 inches deep x 36 inches wide x 76 3/4 inches high |
| Walk-In Opening | 20 3/8 inches |
| Shower Enclosure Glass Thickness | 1/4 inch (6mm) |
| Shower Base Material | Acrylic with integrated tile flange |
| Backwall Material | Wonderboard/greenboard (cement backerboard) |
| Door Hardware Finish | Matte Black |
As I peeled back the protective film on the DreamLine Prime shower kit, I immediately noticed its sleek, modern aesthetic. The clear tempered glass of the dual sliding doors feels sturdy and substantial, yet surprisingly lightweight in your hand.
The matte black hardware adds a touch of elegance that stands out against the white base and backwalls.
The kit’s dimensions—36 inches square with a height of nearly 77 inches—fit perfectly into my shower space, giving it a spacious feel. The full-length magnetic strip along the doors provides a satisfying click when closing, sealing out water effectively.
I appreciate how the low-profile SlimLine base isn’t bulky, making entry and exit smooth and easy.
Installing the backwalls against a solid surface, instead of directly to studs, makes sense for a professional finish. The integrated tile flange on the base helps prevent leaks, which is a huge plus.
The walk-in opening of over 20 inches feels generous, giving you room without feeling cramped. The entire setup screams quality, with cUPC certification backing its durability and safety.
While the kit does require professional installation, the overall build quality feels worth the investment. The glass is clear and spotless, making the shower look bright and inviting.
It’s a high-end look that elevates your bathroom, and the thoughtful details like the magnetic seal really make a difference in everyday use.
What Is WonderBoard and Why Is It Ideal for Shower Walls?
Statistics indicate that improper water management in bathrooms can lead to mold growth in 50% of homes, underscoring the importance of using appropriate materials such as WonderBoard (American Society of Home Inspectors, 2023). Furthermore, the lightweight design of WonderBoard simplifies handling and installation, allowing DIY enthusiasts and professionals alike to complete projects more quickly and with less physical strain.
Best practices for using WonderBoard in shower walls include ensuring proper sealing of joints and edges with a waterproof membrane, using thin-set mortar specifically designed for cement boards, and following manufacturer guidelines for installation. These practices help maximize the performance of WonderBoard and ensure a long-lasting and functional shower wall.
What Are the Key Features of the Best WonderBoard for Shower Walls?
The best WonderBoard for shower walls typically includes features that enhance durability, moisture resistance, and ease of installation.
- Water Resistance: The best WonderBoard is designed to be highly water-resistant, preventing moisture from penetrating the board and causing mold or mildew growth behind the tile.
- Durability: Made from a cement-based material, high-quality WonderBoard provides excellent strength and durability, making it suitable for wet environments like shower walls.
- Lightweight Design: A lightweight design allows for easier handling and installation, reducing strain on the installer while maintaining structural integrity.
- Easy to Cut and Install: The best WonderBoard can be easily cut with a utility knife or saw, allowing for simple modifications and adjustments during installation to fit various wall configurations.
- Tile Adhesion: A textured surface on the board enhances tile adhesion, ensuring that the tiles are securely bonded and reducing the risk of them loosening over time.
- Compatibility with Various Tiles: High-quality WonderBoard is compatible with a range of tile types, including ceramic, porcelain, and stone, allowing for versatile design options in shower spaces.
- Moisture Barrier: Some WonderBoards come with an integrated moisture barrier or are designed to be used with waterproofing membranes, which adds an extra layer of protection against water damage.
What Are the Benefits of Using WonderBoard Over Other Backer Boards for Shower Walls?
WonderBoard offers several advantages over other backer boards for shower walls, making it a popular choice among contractors and DIY enthusiasts.
- Water Resistance: WonderBoard is highly water-resistant, which is essential for shower walls where moisture levels are consistently high. Unlike traditional cement boards, WonderBoard is designed to withstand prolonged exposure to water without deteriorating, ensuring longevity and minimizing the risk of mold and mildew growth.
- Ease of Installation: One of the benefits of WonderBoard is its relatively lightweight and easy-to-cut design. This allows for quicker installation compared to heavier cement boards, making it more user-friendly, especially for DIY projects where ease of handling is critical.
- Versatility: WonderBoard can be used in various applications beyond just shower walls, including floors and countertops. This versatility makes it a preferred choice for contractors looking for a multi-functional product that can adapt to different parts of a bathroom renovation.
- Enhanced Durability: The durability of WonderBoard is notable, as it is resistant to cracking and other forms of damage that can occur in wet environments. Its ability to maintain structural integrity over time provides peace of mind for homeowners concerned about the longevity of their installations.
- Compatibility with Tiling: WonderBoard has a rough surface that promotes better adhesion for tiles. This feature enhances the bonding process, ensuring that tiles remain securely in place, which is crucial for the aesthetics and functionality of shower walls.
- Cost-Effectiveness: Although the initial investment in WonderBoard may be slightly higher than some other backer boards, its durability and water resistance can lead to lower long-term costs by reducing the need for repairs or replacements. Additionally, the ease of installation can save on labor costs for contractors.
What Common Issues Can Arise When Using WonderBoard for Shower Walls?
Common issues that can arise when using WonderBoard for shower walls include:
- Moisture Intrusion: WonderBoard is designed to be moisture-resistant, but improper installation can lead to gaps and cracks where water can seep in, potentially causing mold and mildew growth behind the board.
- Weight and Handling Difficulties: WonderBoard is relatively heavy compared to other backer boards, which can make it challenging to handle and install, particularly for DIYers who may struggle with securing it properly.
- Incompatibility with Certain Adhesives: Not all adhesives are suitable for use with WonderBoard, and using the wrong type can lead to poor adhesion, resulting in tiles loosening or falling off over time.
- Thermal Expansion Issues: If not properly accounted for during installation, thermal expansion can cause the WonderBoard to warp or crack when exposed to high heat from showering, compromising the integrity of the shower wall.
- Improper Cutting Techniques: Cutting WonderBoard incorrectly can lead to jagged edges or pieces that do not fit well, which may require additional effort to fix and can affect the overall appearance and waterproofing of the installation.
How Should You Install WonderBoard on Shower Walls for Best Results?
To install WonderBoard on shower walls effectively, follow these essential steps for optimal results:
- Preparation of the Surface: Start by ensuring that the wall surface is clean, dry, and structurally sound. Remove any old tiles or materials and repair any damage to the studs or drywall to create a stable base for the WonderBoard.
- Measuring and Cutting the WonderBoard: Measure the wall area accurately and cut the WonderBoard panels to fit using a utility knife or saw. Make sure to wear appropriate safety gear and create clean, precise cuts to avoid any gaps during installation.
- Applying Thinset Mortar: Spread a layer of thinset mortar on the wall surface using a notched trowel before placing the WonderBoard. This helps to adhere the board securely to the wall and prevent water seepage.
- Securing the WonderBoard: Press the WonderBoard firmly into the thinset, ensuring it is level and flush with adjacent boards. Use screws or nails specifically designed for cement board to secure the panels, placing them at the appropriate intervals recommended by the manufacturer.
- Sealing Joints and Fasteners: Once the WonderBoard is installed, seal all joints and fasteners with a fiberglass mesh tape and thinset mortar. This creates a watertight barrier and reinforces the seams, preventing mold and moisture damage.
- Waterproofing the Surface: After the thinset has cured, apply a waterproofing membrane over the WonderBoard to provide additional protection against moisture. This step is crucial in a shower environment where water exposure is frequent.
- Finishing Touches: Once the waterproofing is complete and dried, you can proceed with tiling or applying other finishes to the shower walls. Ensure to follow proper tiling techniques for a durable and aesthetically pleasing result.
What Maintenance Practices Are Essential for WonderBoard in Shower Areas?
Essential maintenance practices for WonderBoard in shower areas include:
- Regular Cleaning: It is important to clean WonderBoard surfaces regularly to prevent mold and mildew buildup. Use a mild detergent and water solution to wipe down the boards, ensuring that no harsh chemicals are used that may damage the surface.
- Sealing Joints: Proper sealing of joints and seams is crucial to maintain the integrity of WonderBoard installations. Use a high-quality waterproof sealant to fill any gaps, which helps prevent moisture penetration and enhances the durability of the board.
- Inspection for Damage: Regular inspections for cracks or damage in the WonderBoard are essential to address any potential issues early. Any signs of damage should be repaired promptly to maintain the board’s effectiveness as a moisture barrier.
- Ventilation Maintenance: Ensuring adequate ventilation in the shower area helps to minimize moisture buildup, which can lead to mold growth. Consider installing exhaust fans and keeping windows open when possible to promote airflow and reduce humidity levels.
- Tile Grout Maintenance: The grout between tiles installed on WonderBoard should be maintained to prevent water from seeping behind the tiles. Regularly check for cracks or discoloration in the grout and reapply or seal as needed to ensure a watertight seal.
How Does the Cost of WonderBoard Compare to Other Options for Shower Walls?
| Option | Cost | Material Type | Durability | Installation Cost | Weight | Maintenance Requirements |
|---|---|---|---|---|---|---|
| WonderBoard | $60 – Mid-range price with good value. | Cement board – Water-resistant and mold-proof. | High – Long-lasting and durable against moisture. | Low – Easy to install for DIYers. | Heavy – Requires proper support. | Low – Minimal maintenance required. |
| Greenboard | $50 – Affordable but less durable. | Moisture-resistant drywall – Not fully waterproof. | Medium – Suitable for low-moisture areas. | Low – Standard drywall installation. | Light – Easier to handle. | Medium – Needs regular inspection for water damage. |
| Tiled Wall | $150 – Higher cost due to materials and labor. | Variety of tiles – Can be ceramic, porcelain, etc. | High – Very durable but requires maintenance. | High – Requires professional installation. | Varies – Depending on tile material. | High – Grout needs sealing and cleaning. |
| Fiberglass Panels | $100 – Moderate price with easy installation. | Fiberglass – Lightweight and water-resistant. | Medium – Can be prone to scratches and damage. | Medium – Generally easy to install. | Light – Easy to handle. | Low – Simple cleaning required. |