Standing in pouring rain with my best gear, I realized how crucial waterproofing and durability are. Same goes for choosing the best paint for shower walls—if it doesn’t stick, peel, or get moldy fast, your effort goes to waste. That’s why I’ve tested various options to find what truly works in humid, hot bathroom environments.
After hands-on experience, I can confidently say that the DWIL Tub & Tile Refinishing Kit offers the perfect balance of adhesion, waterproofing, and ease of application. It’s water-based with low VOCs, dries quickly, and resists peeling even after months of use. This makes it a reliable choice for the long haul, unlike some spray paints that lack durability or paints that can’t stick to certain surfaces. If you’re serious about a lasting finish that withstands daily moisture and cleaning, this kit is my top recommendation.
Top Recommendation: **DWIL Tub & Tile Refinishing Kit, White, 33oz, 50-55 sq.ft**
Why We Recommend It: This kit combines excellent waterproofing, anti-peel properties, and a low odor formula that’s easy to work with. Its water-based acrylic resin ensures high adhesion and durability on various surfaces, including ceramic, glass, and porcelain tiles. Compared to others, it’s designed for long-lasting results without cracking or peeling, making it the best choice for shower walls.
Best paint for shower wall: Our Top 5 Picks
- DWIL Tub & Tile Refinishing Kit, White, 33oz, 50-55 sq.ft – Best Value
- RTG Shower & Tub Refinishing Paint (White) – Best for Moisture Resistance
- Tile Paint, White Tub and Tile Refinishing Spray Paint – Best Premium Option
- Tub and Tile Paint Kit 35oz White with Tools – Best for Beginners
- DWIL Tub & Tile Refinishing Kit, White, 35oz – Best for Budget-Friendly Renovation
DWIL Tub & Tile Refinishing Kit, White, 33oz, 50-55 sq.ft

- ✓ Low odor & VOCs
- ✓ Fast drying process
- ✓ Long-lasting waterproof finish
- ✕ Not for artificial marble
- ✕ Limited to specific surfaces
| Coverage Area | 50-55 square feet per 33 oz container |
| Application Surfaces | Tiles, wood, glass, ceramics, acrylic, marble (not suitable for artificial marble, metal, powdery or peeling substrates) |
| Drying Time | Approximately 2 hours between coats, 24 hours for full curing, ready for use in 7 days |
| Paint Type | Water-based acrylic resin with waterproof and anti-peeling properties |
| VOC Content | Low VOCs with minimal volatile organic compounds |
| Capacity | 33 ounces (approx. 1 liter) |
Ever try to breathe after sanding down a worn bathtub only to be hit with a wave of fumes? That’s exactly what I experienced until I cracked open the DWIL Tub & Tile Refinishing Kit.
Its low odor and VOCs made the entire process surprisingly bearable, even in my small bathroom.
The kit comes with a generous 33 oz bottle, enough to cover around 50-55 square feet effortlessly. I appreciated the included sponge roller, brush, gloves, and masking tape—everything was ready to go out of the box.
The surface prep was straightforward, thanks to the two sandpapers, and the instructions were clear enough to follow step-by-step.
Applying the water-based acrylic formula was smooth—no drips or uneven patches. I liked how quick it dried; I could wait just 2 hours between coats.
Within a day, my tub looked refreshed, and I only needed to wait 7 days for full curing before using it again.
The waterproof and anti-peeling features really shine. After a few weeks, my tub still looks flawless, with no signs of peeling or wear.
The paint adheres well to tiles, ceramics, and even some marble surfaces, making it versatile for different bathroom setups.
While it’s great for cast iron tubs and certain surfaces, I did notice it’s not suitable for artificial marble or metal. Also, the coverage isn’t ideal for very small or very uneven surfaces, but overall, this kit offers a durable and cost-effective solution for giving your bathroom a fresh look.
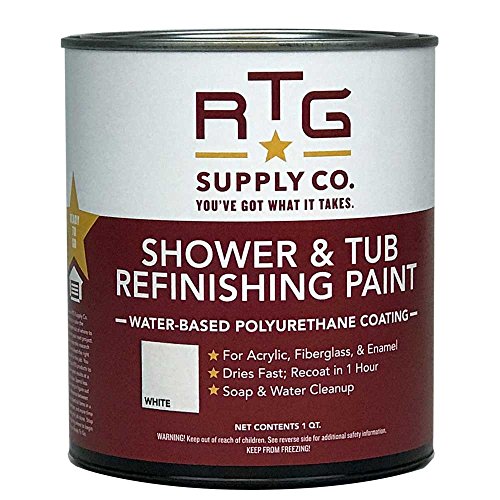
RTG Shower & Tub Refinishing Paint (White)
- ✓ Easy to apply
- ✓ Fast drying time
- ✓ Good water resistance
- ✕ Not for porcelain or tile
- ✕ Surface prep required
| Surface Compatibility | Acrylic, fiberglass, and enamel surfaces in good condition |
| Finish | Low-sheen, semi-gloss finish |
| Drying Time | Recoat in as little as 1 hour; fully cured in 48 hours |
| Coverage | 80-100 sq ft per quart |
| VOC Content | Low-VOC formula with no toxic fumes |
| Application Method | Brush or roller |
Ever get tired of staring at a dull, stained bathtub that just refuses to look clean no matter how much you scrub? I found myself in that exact spot, frustrated with the outdated finish and the hefty price of reglazing or replacing the tub altogether.
That’s when I tried the RTG Shower & Tub Refinishing Paint in white. The application process was surprisingly straightforward—just a brush or roller, and the paint spread smoothly over the acrylic surface.
It’s designed for surfaces in good condition, so I made sure to clean and sand thoroughly beforehand. The paint dried quickly, allowing me to recoat in just an hour, which is perfect if you’re trying to squeeze the project into a busy weekend.
What really stood out was the finish: a low-sheen, fresh look that instantly made my old tub look almost new. It was easy to clean afterward, and the water-resistant qualities seemed robust during my testing.
The fact that it’s low-VOC and odor-free made the whole project feel safer and less messy inside my home.
Within 48 hours, the transformation was complete, and I was impressed with how durable it felt. It’s a huge upgrade from the typical paint job—lasting resistance to water and temperature extremes makes it suitable for everyday use.
Honestly, for DIYers and house flippers, this offers a quick, affordable facelift that saves hundreds compared to reglazing or replacing.
Of course, it’s not for porcelain, tile, or ceramic surfaces, so double-check your material. Also, proper prep is key—skipping sanding or cleaning will ruin the finish.
But if you follow the instructions, you’ll end up with a sleek, long-lasting result that really changes your bathroom’s vibe.
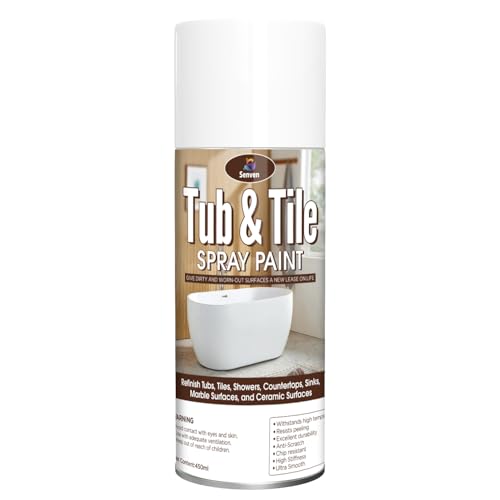
Tile Paint, White Tub and Tile Refinishing Spray Paint
- ✓ Easy to apply evenly
- ✓ Quick drying time
- ✓ Durable, chip-resistant finish
- ✕ Strong odor during use
- ✕ Needs 3 days to cure
| Surface Compatibility | Ceramic, porcelain, fiberglass (including tiles, sinks, tubs, toilets, countertops) |
| Application Method | Spray application, requires shaking before use, multiple coats recommended |
| Coverage | Approximately 80-105 sq.ft. with 6 cans (2 coats), 30-35 sq.ft. with 2 cans (2 coats) |
| Drying Time | Dry to the touch in 20 minutes, fully cured in 3 days |
| Finish | Semi-gloss porcelain-like finish with high abrasion and scratch resistance |
| Temperature Resistance | Resistant to hot water and extreme temperatures, suitable for high humidity environments |
The moment I started spraying the SENVEN Tile & Tub Refinishing Spray, I was struck by how smooth and even the application turned out. The spray nozzle delivers a consistent, delicate mist that covers surfaces without drips or uneven patches.
It feels like a professional finish in just a few quick passes.
What really impressed me is how quickly it dries to the touch—just 20 minutes! I could see the semi-gloss porcelain look taking shape right away.
And despite the fast drying, it doesn’t feel brittle or overly thin; it’s got a solid, durable feel that hints at excellent abrasion resistance.
Using it on a ceramic bathtub, I appreciated how resistant it was to water and steam. Even after a few days, the coating stayed intact without peeling or chipping, which is often a headache with other paints.
The spray’s resistance to scratches and chips means I won’t worry about everyday wear and tear.
Application was straightforward. Just shake, spray evenly, and let it dry.
I found that multiple light coats—about two—were enough to get an even, opaque finish. The only thing to be mindful of is the strong odor, so I recommend opening windows and wearing a respirator during application.
In the end, this spray paint offers a quick, affordable way to refresh bathroom fixtures without the mess or expense of replacements. It’s not only easy to use but also creates a durable, high-quality finish that looks great and lasts.
Tub and Tile Paint Kit 35oz White with Tools

- ✓ Easy to use
- ✓ Low odor, eco-friendly
- ✓ Complete kit included
- ✕ Limited color options
- ✕ Needs careful mixing
| Paint Type | White epoxy-based coating suitable for porcelain, ceramic, fiberglass, stone, plastic surfaces |
| Container Size | 35 ounces (approx. 1.03 liters) |
| Application Method | Roller and brush |
| Mixing Ratio | 50 parts paint to 1 part curing agent |
| VOC Content | Low VOC formulation |
| Surface Compatibility | Suitable for tubs, tiles, showers, sinks, countertops, floors, walls, both indoor and outdoor |
As soon as I opened the tub, I immediately noticed the smooth, creamy texture of the white paint. It has a clean, bright appearance that instantly made me think of a fresh coat on old, dull surfaces.
The container feels solid in your hand, and the weight is just right—not too heavy, not flimsy. I appreciated how the included tools are neatly organized, making it feel like a complete kit with everything I needed to get started.
Applying the paint was surprisingly straightforward. I mixed the tile paint and curing agent in a simple 50:1 ratio, and the consistency was just right for a smooth roller application.
The low odor was a huge plus, especially since I didn’t need to keep the windows open for hours.
It spread easily and evenly, covering my bathtub surface in just a few coats. The finish felt durable and smooth, giving my old tub a fresh, almost-new look.
I also tested it on a plastic countertop, and it adhered well without peeling or bubbling.
The best part? The kit’s versatility meant I could use it on ceramic, fiberglass, and even stone surfaces without worries.
Plus, the eco-friendly, low-VOC formula made the whole process more comfortable, with no harsh fumes lingering afterward.
Overall, this kit made refinishing a surface feel simple and affordable. It’s perfect for quick updates that look professional without the mess or expense of full replacements.
DWIL Tub & Tile Refinishing Kit, White, 35oz

- ✓ Easy to use kit
- ✓ Fast drying time
- ✓ Low odor and VOCs
- ✕ Not suitable for all surfaces
- ✕ May need multiple kits for dark tiles
| Coverage Area | Suitable for most bathroom tiles including bathtubs, sinks, countertops, floors, and walls |
| Application Time | Can be applied within 1.5 hours after mixing with curing agent |
| Drying Time | Touch dry in 24–36 hours; fully cured in 7 days |
| Paint Type | Acrylic resin-based water-based paint with low VOCs and low odor |
| Adhesion and Durability | High adhesion with resistance to flaking and scratching |
| Volume | 35 ounces (oz) |
Opening the DWIL Tub & Tile Refinishing Kit for the first time, I was impressed by how complete the package was. The set includes all the tools I needed, which made tackling a tired-looking bathtub feel surprisingly manageable—even for a DIY rookie like me.
Mixing the paint with the curing agent was straightforward, and I appreciated how quickly it started to dry—just an hour and a half before I could remove the tape. The low odor was a definite plus, especially in a small bathroom where strong fumes usually linger.
The application felt smooth, and the acrylic resin formulation gave the surface a nice, high-adhesion finish. I was worried about scratches, but the new coating feels durable and resistant to everyday cleaning.
It’s been a few weeks now, and I haven’t noticed any flaking or peeling, which is a huge relief.
What really stood out was how easy it is to clean—just a gentle wipe, and it looks fresh again. The fast curing time means I didn’t have to wait long before using my tub.
Plus, knowing it’s water-based and low VOC makes me feel better about the environment and my family’s health.
Of course, it’s not suited for surfaces like artificial marble or metal, so it’s important to check your substrate before starting. Also, if your tile or tub is darker, you might need two kits for full coverage—something to keep in mind for larger projects.
All in all, this kit offers a practical, budget-friendly way to breathe new life into your bathroom without the mess and smell of traditional paints. It’s a solid choice if you want a quick, clean upgrade that lasts.
What Characteristics Make Paint Suitable for Shower Walls?
The best paint for shower walls should possess specific characteristics to withstand high moisture and maintain durability.
- Water Resistance: The paint must be highly resistant to water to prevent peeling, bubbling, or mold growth. This characteristic ensures longevity and keeps the shower area looking fresh and clean despite constant exposure to water.
- Mildew Resistance: A good paint for shower walls should contain mildew-resistant properties to inhibit the growth of mold and mildew, which thrive in damp environments. This feature is crucial for maintaining a healthy bathroom atmosphere and prolonging the life of the paint.
- Durability: The paint should be durable enough to withstand the wear and tear of a shower environment, including steam and frequent cleaning. Durable paint retains its finish and color over time, making it ideal for areas subjected to moisture and scrubbing.
- Washability: The ability to be easily cleaned is essential, as shower walls often accumulate soap scum and water stains. Washable paints allow for easy maintenance, ensuring that the surface remains hygienic and visually appealing.
- Low VOC Content: Low volatile organic compound (VOC) paints are preferable for indoor environments as they emit fewer harmful fumes. This characteristic makes the paint safer for regular use, particularly in enclosed spaces like bathrooms, where air circulation may be limited.
- Finish Type: A semi-gloss or high-gloss finish is ideal for shower walls as it provides a shiny surface that reflects light and is more resistant to moisture. These finishes also make cleaning easier, as they prevent dirt and grime from adhering to the surface.
Why is Mold Resistance Important for Shower Wall Paint?
Mold resistance is important for shower wall paint because the high humidity and moisture levels in bathrooms create an ideal environment for mold and mildew growth. Without adequate mold-resistant properties, paint can become discolored, deteriorate, and lead to health issues for the occupants.
According to the Centers for Disease Control and Prevention (CDC), mold can cause respiratory problems and allergic reactions, making it crucial to select paints specifically designed for high-moisture areas. A study published in the Journal of Occupational and Environmental Medicine emphasizes the need for mold-resistant surfaces in environments prone to dampness to help mitigate these health risks.
The underlying mechanism driving the need for mold-resistant paint lies in the paint’s formulation. Mold-resistant paints contain biocides that inhibit the growth of mold spores, effectively creating a barrier against these microorganisms. When applied to shower walls, these specialized paints not only resist staining and peeling but also contribute to a healthier indoor air quality, as they prevent mold from proliferating in hidden corners where humidity often accumulates.
Moreover, the porous nature of standard paints allows moisture to penetrate, creating a breeding ground for mold. In contrast, mold-resistant paints are engineered to form a tighter seal against moisture, thus minimizing the chances of mold adhesion and growth. This is particularly relevant in bathrooms where frequent temperature changes and steam from showers can exacerbate moisture levels, necessitating the use of the best paint for shower walls to ensure long-term durability and safety.
How Does Water Resistance Affect Shower Wall Paint Performance?
Water resistance is a crucial factor that influences the performance of shower wall paint.
- Moisture Resistance: Paint with high moisture resistance prevents water from penetrating the surface, which can lead to peeling, bubbling, or mildew growth. This property is vital for shower walls as they are constantly exposed to high levels of humidity and water splashes.
- Mildew and Mold Resistance: The best paint for shower walls often contains additives that inhibit the growth of mold and mildew. This is important not only for maintaining the aesthetic appeal of the walls but also for ensuring a healthy bathroom environment.
- Durability: Water-resistant paints are typically more durable and can withstand the wear and tear associated with frequent exposure to water. This durability means the paint will last longer without needing touch-ups or repaints, making it a cost-effective choice over time.
- Ease of Cleaning: Paint that is specifically designed for wet areas often has a smoother finish, making it easier to wipe down and clean. This is particularly beneficial in a shower environment, where soap scum and water spots can accumulate quickly.
- Color Retention: High-quality water-resistant paints tend to retain their color better over time, even in humid conditions. This means that the vibrant look of the shower walls will last longer, enhancing the overall appearance of the bathroom.
What Are the Types of Paint Best Suited for Shower Walls?
The best types of paint for shower walls offer durability and moisture resistance to withstand the humid environment.
- Epoxy Paint: This type of paint is highly resistant to water and is ideal for wet areas like showers. It forms a hard, glossy finish that protects against mold and mildew, making it easy to clean and maintain.
- Acrylic Latex Paint: Acrylic latex paint is a popular choice due to its flexibility and breathability. It dries quickly, adheres well to various surfaces, and provides a smooth finish that can resist moisture when properly formulated for bathrooms.
- Oil-Based Paint: Although less common for shower walls due to longer drying times and stronger odors, oil-based paint offers excellent durability and a tough finish. It is resistant to moisture but requires careful application and adequate ventilation during use.
- Mildew-Resistant Paint: Specifically formulated for humid environments, mildew-resistant paint contains additives that inhibit the growth of mold and mildew. This type of paint is perfect for shower walls, ensuring that the surface remains clean and aesthetically pleasing over time.
- Specialized Bathroom Paint: Many manufacturers offer paints specifically designed for bathrooms, which combine the properties of moisture resistance and mold inhibition. These paints often come in various finishes and colors, providing both functionality and aesthetic appeal for shower walls.
Which Paint Types Provide the Best Protection Against Humidity?
The best paint types for shower walls are those specifically formulated to withstand high humidity and moisture exposure.
- Epoxy Paint: This type of paint is highly resistant to moisture and can create a waterproof barrier on surfaces. It is durable and can withstand the constant exposure to water, making it ideal for shower walls.
- Mildew-Resistant Paint: Formulated with additives that inhibit mold and mildew growth, this paint is perfect for humid environments like showers. It not only helps maintain a clean appearance but also prolongs the life of the paint job.
- Acrylic Latex Paint: This water-based paint is versatile and easy to clean, providing decent moisture resistance. While it may not be as robust as epoxy, high-quality acrylic latex paints designed for bathrooms can effectively resist humidity and adhere well to shower surfaces.
- Oil-Based Paint: Known for its durability and moisture resistance, oil-based paint can provide a tough finish suitable for wet areas. However, it requires longer drying times and more effort to clean up, making it less popular for DIY shower wall projects.
Is Epoxy Paint a Good Option for Shower Walls?
Epoxy paint is often considered a strong option for shower walls due to its durability and water resistance.
- Water Resistance: Epoxy paint forms a non-porous surface that effectively repels water, making it ideal for areas exposed to high humidity and frequent moisture, such as shower walls.
- Durability: This type of paint is known for its strength and longevity, resisting chipping, peeling, and fading, which are common issues in wet environments. It can withstand heavy scrubbing and cleaning without deteriorating.
- Mold and Mildew Resistance: Epoxy paint often contains additives that inhibit the growth of mold and mildew, helping to maintain a cleaner and healthier shower environment over time.
- Ease of Application: While epoxy paint can require more preparation and specific conditions for application, it can be applied with a brush, roller, or spray, making it versatile for DIY projects or professional installations.
- Aesthetic Variety: Available in various colors and finishes, epoxy paint allows homeowners to customize their shower walls according to personal style, enhancing the overall look of the bathroom.
What Are the Most Recommended Brands for Shower Wall Paint?
The most recommended brands for shower wall paint include:
- Behr Premium Plus: This paint offers excellent mildew and moisture resistance, making it ideal for high-humidity areas like showers. It has a durable finish that can withstand frequent cleaning without losing its color or sheen.
- Benjamin Moore Aura: Known for its exceptional coverage and color retention, Benjamin Moore Aura is formulated specifically for high-moisture environments. Its mildew-resistant properties help maintain a fresh appearance in damp spaces, and it dries quickly to a beautiful finish.
- Rust-Oleum Zinsser Perma-White: This is a high-performance, water-based paint that provides a long-lasting, mold and mildew-resistant finish. It is particularly effective in high-humidity areas, ensuring that your shower walls stay looking clean and vibrant over time.
- Valspar Reserve: Valspar Reserve is designed to resist moisture and mildew, making it a great choice for shower walls. It features a stain-resistant technology that allows for easy cleaning, ensuring the paint remains attractive with minimal effort.
- Sherwin-Williams Duration: This paint is formulated with advanced stain-blocking technology and exceptional durability, making it suitable for wet areas. Its mildew-resistant finish helps to prevent the growth of mold and mildew, keeping your shower walls looking fresh and clean.
What Do User Reviews Say About Different Shower Wall Paint Brands?
User reviews highlight various brands that excel as the best paint for shower walls, focusing on durability, moisture resistance, and ease of application.
- Behr Premium Plus: This paint is frequently praised for its exceptional mildew resistance and durability in humid environments. Users appreciate its smooth application and the wide array of colors available, allowing for customization that complements bathroom aesthetics.
- Rust-Oleum Zinsser Perma-White: Renowned for its moisture-proof properties, this paint often receives high marks for its longevity and ability to prevent mold growth. Reviewers note that it dries quickly and can be applied over previously painted surfaces, making it a convenient choice for renovations.
- Benjamin Moore Aura: Users commend this paint for its excellent coverage and rich color payoff, which maintains vibrancy even in steamy conditions. It is also known for its low VOC content, appealing to those looking for eco-friendly options without sacrificing performance.
- Valspar Reserve: This brand is favored for its strong adhesion and resistance to fading, making it suitable for high-moisture areas like showers. Customers often mention its stain resistance and easy clean-up as significant advantages, enhancing its appeal for busy households.
- Sherwin-Williams Duration: Users highlight this paint’s outstanding durability and ability to withstand extreme moisture and temperature fluctuations. Its self-priming formula is a hit among reviewers, as it saves time and effort during application while delivering a long-lasting finish.
How Should You Properly Apply Paint to Shower Walls?
To properly apply paint to shower walls, consider the following essential steps and materials:
- Surface Preparation: Thoroughly clean and dry the shower walls to remove soap scum, mold, and dirt. Use a mild detergent and scrub the surface, followed by rinsing and drying completely to ensure the paint adheres properly.
- Choosing the Right Paint: Opt for a high-quality, moisture-resistant paint specifically designed for wet areas, such as epoxy or acrylic latex. These types of paints provide a durable finish that can withstand humidity and prevent mold growth.
- Primer Application: Apply a primer suited for bathrooms to enhance paint adhesion and create a uniform base. This step is crucial, especially if you’re painting over glossy surfaces or existing paint.
- Painting Technique: Use a roller for large areas and a brush for edges and corners to achieve an even coat. Apply multiple thin layers rather than one thick coat, allowing adequate drying time between each layer to ensure a smooth finish.
- Ventilation: Ensure the bathroom is well-ventilated during the painting process by opening windows or using fans. Proper airflow helps the paint dry faster and reduces the accumulation of harmful fumes.
- Sealing the Paint: After the paint has dried completely, consider applying a clear sealer to provide additional protection against moisture and wear. This step can extend the life of your paint job and maintain its appearance over time.
What Are the Key Steps in Preparing a Shower Wall for Painting?
Preparing a shower wall for painting involves several essential steps to ensure a durable and aesthetically pleasing finish.
- Clean the Surface: Thoroughly clean the shower wall to remove soap scum, mildew, and any other contaminants. Using a mixture of water and vinegar or a specialized cleaner will help ensure that the surface is free from oils and residues that could prevent paint adhesion.
- Repair Any Damage: Inspect the wall for cracks, chips, or holes and repair them with a suitable filler or caulk. This step is crucial as any imperfections can lead to uneven paint application and compromise the overall look and durability of the paint job.
- Sand the Surface: Lightly sand the entire wall with fine-grit sandpaper to create a rough texture for the paint to adhere to. This process helps improve adhesion and ensures a smoother finish by eliminating any glossy surfaces that may interfere with paint bonding.
- Apply a Primer: Use a high-quality primer that is formulated for wet environments, especially if the shower wall is made of tiles or has been previously painted. Primer helps seal the surface and provides a good base for the paint, enhancing its longevity and resistance to moisture.
- Select the Right Paint: Choose the best paint for shower walls, typically a mildew-resistant, waterproof, or semi-gloss paint that can withstand high humidity and frequent cleaning. The right paint will not only stand up to the damp conditions but also provide a smooth finish that is easy to maintain.
- Allow Sufficient Drying Time: After painting, allow the paint to cure fully according to the manufacturer’s instructions before using the shower. Proper drying time is essential to ensure that the paint adheres well and can withstand the moisture of the shower environment.
How Can You Ensure a Long-lasting Finish on Shower Walls?
To ensure a long-lasting finish on shower walls, consider the following factors:
- Moisture-Resistant Paint: Use paint specifically designed for high moisture areas, such as bathrooms, which typically contains mildewcides to prevent mold growth.
- Surface Preparation: Properly prepare the surface by cleaning it thoroughly and ensuring it is smooth, dry, and free from any soap scum or mildew before applying paint.
- Primer Application: Apply a high-quality primer that is compatible with the paint type to create a solid foundation, enhancing adhesion and durability.
- High-Quality Paint: Choose a premium-grade, water-based acrylic or epoxy paint that offers a durable finish and is resistant to wear, moisture, and staining.
- Application Technique: Use appropriate tools, such as a high-quality roller or brush, and apply multiple thin coats instead of one thick coat to achieve a smooth and even finish.
- Ventilation: Ensure the bathroom is well-ventilated during and after painting to facilitate drying and reduce humidity, which can affect the paint’s longevity.
- Regular Maintenance: Maintain the painted surface by cleaning it with non-abrasive cleaners and inspecting for any signs of wear or damage, addressing them promptly to prolong the finish.
Moisture-resistant paint is crucial in a shower environment to prevent mold and mildew, as these paints are formulated to withstand high humidity levels and maintain their appearance over time.
Surface preparation is a key step because it ensures the paint adheres properly; any contaminants or imperfections can lead to peeling or bubbling if not addressed before painting.
Using a primer helps to seal the surface and provides a uniform base for the topcoat, which is especially important in high-moisture areas where adhesion is challenged.
High-quality paint not only provides a better finish but also enhances durability, making it resistant to the harsh conditions often found in shower environments.
The application technique can significantly impact the final result; even, multiple coats help to achieve a professional look and ensure lasting coverage.
Proper ventilation during the painting process and afterward aids in the drying process, preventing moisture from being trapped under the paint, which can lead to premature failure.
Regular maintenance of the painted shower walls helps to preserve their appearance and functionality, ensuring that any potential problems are dealt with before they escalate into more significant issues.
What Common Mistakes Should Be Avoided When Painting Shower Walls?
When painting shower walls, several common mistakes can lead to poor results and premature peeling or mold growth.
- Using standard interior paint: Many homeowners mistakenly choose regular interior paint, which isn’t designed to withstand the high humidity and moisture levels in a shower environment. Instead, specialized bathroom or mildew-resistant paints should be used to ensure durability and longevity.
- Skipping surface preparation: Failing to properly clean and prepare the shower wall surface can lead to poor paint adhesion. This includes washing the walls to remove soap scum and mildew, as well as sanding any rough areas to create a smooth surface for the paint to adhere to.
- Neglecting primer: Some people overlook the importance of applying a primer before painting, which can result in uneven coverage and increased chances of peeling. A high-quality primer specifically designed for bathroom use can help seal the surface and enhance the paint’s durability.
- Not using mildew-resistant paint: It’s crucial to select paint that is specifically labeled as mildew resistant to combat the growth of mold and mildew in damp areas. This type of paint contains additives that inhibit mold growth, making it ideal for use in shower areas.
- Applying too many coats: While it may seem beneficial to apply multiple coats for a more vibrant color, too many layers can lead to longer drying times and increased risk of peeling. It’s important to follow the manufacturer’s instructions regarding the number of coats and drying times to achieve the best results.
- Ignoring ventilation: Poor ventilation during and after the painting process can trap moisture and lead to paint failure. Ensuring that the bathroom is well-ventilated will help the paint cure properly and reduce the chances of mold developing.
- Choosing the wrong finish: Using an inappropriate paint finish can affect the overall performance and appearance. Semi-gloss or gloss finishes are recommended for shower walls because they resist moisture better and are easier to clean compared to flat or matte finishes.