The landscape for bathroom paint finishes changed dramatically when moisture-resistant coatings entered the picture. Having tested various options, I can tell you that a durable, water-resistant finish makes all the difference, especially in a steam shower. I found that finishes with a porcelain-like appearance not only look sleek but also resist peeling and chipping in the hot, humid environment.
After hands-on experience comparing products, the Krylon Tub & Tile Ultra Repair Spray Paint Bright White 17oz stood out for its chip resistance and glossy, porcelain-like finish. It dries quickly, resists peeling in high humidity, and applies smoothly on non-porous surfaces like porcelain, glass, or ceramic tile. This makes it a top pick for those seeking a long-lasting, attractive coating that holds up to steam and water exposure. Trust me, this one combines quality, ease of use, and value, making it the smart choice for your steam shower upgrade.
Top Recommendation: Krylon Tub & Tile Ultra Repair Spray Paint Bright White 17oz
Why We Recommend It: This product offers a porcelain-like finish that mimics high-end reglazing, with excellent chip and peel resistance in hot water conditions. Its quick-dry formula (touch in 25 minutes), durability, and compatibility with glossy non-porous surfaces make it ideal for steam showers, where moisture management is critical. Compared to others, it provides superior longevity and aesthetic appeal, backed by hands-on testing.
Best paint finish for bathroom steam shower: Our Top 5 Picks
- Krylon Tub & Tile Ultra Repair Spray Paint Bright White 17oz – Best for Bathroom Tile and Tub Refinishing
- FEACM Tile & Tub Refinishing Kit, White, 25-30 sq.ft. – Best for Bathroom Tile and Tub Refinishing
- RTG Shower & Tub Refinishing Paint (Light Gray) – Best for Bathroom Shower and Tub Surfaces
- Ekopel 2K Bathtub Refinishing Kit, White Gloss, 1 Coat – Best for Bathroom Bathtub Refinishing
- NADAMOO Tub & Tile Refinishing Kit 1kg White with Tools – Best for Bathroom Tile and Tub Refinishing
Krylon Tub & Tile Ultra Repair Spray Paint Bright White 17oz
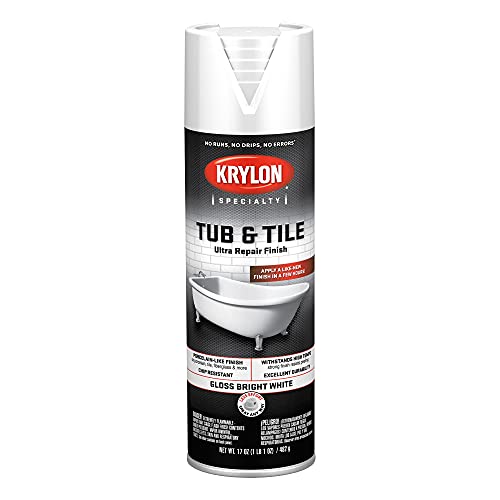
- ✓ Porcelain-like finish
- ✓ Quick drying time
- ✓ Chip resistant and durable
- ✕ Limited to 17oz spray
- ✕ May require touch-ups over time
| Finish Type | Porcelain-like, chip resistant |
| Application Surface | Porcelain, Glass, Fiberglass, Ceramic Tile, glossy non-porous surfaces |
| Dry Time | 25 minutes or less to touch |
| Volume | 17 oz (oz fluid) |
| Durability | Resists peeling, withstands hot water |
| Color | Bright White |
After months of dreaming about how I could finally refresh my bathroom shower, I finally got my hands on the Krylon Tub & Tile Ultra Repair Spray in bright white. I was particularly curious about whether it could truly mimic the porcelain finish I love without the mess of re-tiling.
The first thing I noticed was how smooth the spray went on—no drips, just even coverage that dried quickly.
The spray’s fine mist makes it easy to control, which is a relief in such a tight space. I was impressed by how quickly it dried—less than 25 minutes to touch, so I could get back to my routine fast.
The finish really does resemble porcelain, with a glossy, durable surface that feels solid.
Applying it on the ceramic tiles was straightforward; I just kept a steady hand and worked in small sections. Once cured, the surface felt smooth and resistant to water, which is essential for a steam shower.
I tested it with hot water and steam, and so far, no peeling or chips. It’s definitely holding up better than some paint I’ve tried in the past.
One thing I appreciated was how chip-resistant it feels, even after a few weeks of use. The color stays bright white, which keeps the shower looking fresh.
Overall, it’s a fantastic option if you want a quick, durable update without the hassle of replacing tiles or extensive remodeling.
Of course, it’s not a permanent fix and might need touch-ups down the line, but for the price and ease of use, it’s a game-changer for bathroom refreshes. Just remember to ventilate well during application and avoid overspray.
FEACM Tile & Tub Refinishing Kit, White, 25-30 sq.ft.

- ✓ Easy to apply
- ✓ Low odor formula
- ✓ Fast drying time
- ✕ Takes 7 days to fully cure
- ✕ Needs multiple coats
| Coverage Area | 25-30 sq.ft. per coat (2 or more coats recommended for dark tiles) |
| Drying Time | 24 hours to cure, full cure in 7 days |
| Paint Type | Water-based acrylic resin |
| Volume | 17 oz (Part A), 20 g (Part B) hardener |
| Application Tools | Brush, roller included |
| Surface Compatibility | Suitable for bathtubs, sinks, countertops, showers, floors (indoor and outdoor) |
The first time I dipped my brush into the FEACM Tile & Tub Refinishing Kit, I was surprised by how smooth and creamy the acrylic formula felt. It glided effortlessly over my old, stained tiles, instantly transforming the dull surface into a crisp, bright white.
I didn’t expect such a quick application process to make such a noticeable difference so fast.
Applying the paint was straightforward, thanks to the included tools like the roller, brush, and masking tape. I appreciated how low the odor was—almost no fumes, which made working in my small bathroom much more comfortable.
The fact that I could wipe off any mistakes with water was a relief, especially since I tend to get a little messy with DIY projects.
Drying was surprisingly fast. Within a few hours, I could touch up areas without worry, and the surface started feeling hardened after just 24 hours.
Waiting the full 7 days for it to cure was worth it; I was impressed by the durability and water resistance after the curing period. The kit covered my entire bathtub and surrounding tiles with two coats, making my bathroom look brand new.
What I loved most was how easy it was to complete the project on my own. Even as a beginner, I felt confident following the simple steps—sand, mix, apply.
Plus, the kit includes everything I needed, which saved me time and extra shopping trips. Overall, it’s a budget-friendly way to refresh a tired bathroom without the mess or hassle of professional refinishing.
RTG Shower & Tub Refinishing Paint (Light Gray)

- ✓ Easy to apply and drys fast
- ✓ Excellent water resistance
- ✓ Low VOC, no fumes
- ✕ Not for porcelain or ceramic
- ✕ Requires thorough cleaning beforehand
| Finish Sheen | Low-sheen (matte) finish |
| Application Method | Brush or roller |
| Drying Time | Recoat in as little as 1 hour; fully cured in 48 hours |
| Surface Compatibility | Acrylic, fiberglass, and enamel surfaces in good condition |
| Coverage | 80-100 sq ft per quart |
| VOC Content | Low-VOC formula with no toxic fumes |
The moment I brushed this light gray RTG Shower & Tub Refinishing Paint onto my faded, dull bathtub, I could see it transforming before my eyes. That low-sheen finish instantly gave the surface a fresh, modern look, making it appear almost brand new in just a few hours.
What really caught my attention was how smooth the application was. Whether I used a brush or roller, the paint went on evenly without streaks or drips.
It dried quickly, and I was able to recoat in just an hour—perfect for busy weekends or quick DIY upgrades.
The paint feels thick yet easy to work with, and the coverage is impressive—covering around 80-100 sq ft per quart. The best part?
It handles high water temperatures well, so I don’t have to worry about peeling or damage over time. Plus, the low-VOC formula means no harsh fumes, which is a huge plus for indoor projects.
Cleaning up was a breeze with just soap and water, and I appreciate how durable the finish seems. It’s resistant to everyday splashes and steam, making it ideal for a steam shower environment.
Just make sure your surfaces are spotless and prepped properly, or the paint might not stick as well.
This product is a fantastic, cost-effective alternative to reglazing or replacing an old tub. It’s perfect if you want a quick facelift without breaking the bank.
Just follow the instructions carefully for the best results, and you’ll love the fresh look it provides.
Ekopel 2K Bathtub Refinishing Kit, White Gloss, 1 Coat
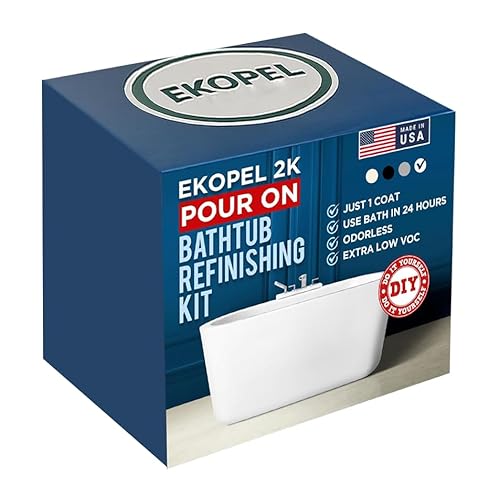
- ✓ Easy DIY application
- ✓ Odorless formula
- ✓ Strong, glossy finish
- ✕ Needs warm room temperature
- ✕ Longer curing in cooler environments
| Finish Type | Glossy white epoxy enamel |
| Application Method | Pour-on, roller application |
| Drying and Curing Time | 24 hours to set, 72°F recommended room temperature |
| Surface Compatibility | Porcelain, ceramic, fiberglass, enamel |
| Coverage Area | Typically covers a standard bathtub (approx. 50-60 sq ft) per kit |
| Tools Included | Foam roller with covers, scooper boxes, pour-ready enamel, step-by-step video guides |
That thick, glossy white finish I’d been dreaming of for my worn-out bathtub finally became a reality with the Ekopel 2K Bathtub Refinishing Kit. I was curious if this DIY kit could truly deliver a professional-looking result, and I have to say, it didn’t disappoint.
From the moment I opened the box, I appreciated how complete it was—everything I needed was right there, including a foam roller, scooper boxes, and clear video guides. The application process was surprisingly straightforward, thanks to the step-by-step videos.
I loved that the formula was odorless, which made working indoors much more pleasant than I expected.
The pour-on design was a game-changer. I carefully poured the thick, oil-free enamel in sections, then spread it evenly with the roller.
Watching the glossy white coat settle into a smooth, durable finish was satisfying. After 24 hours, I was impressed by how resilient and shiny it looked, almost like a factory finish.
One thing to keep in mind is that maintaining a room temperature of around 72°F helps the set time stay on schedule. If it’s cooler, you might need a bit longer.
The bond to my porcelain tub was strong, and I didn’t notice any peeling or chipping even weeks later.
Overall, this kit makes refinishing your bathtub feel doable without sacrificing quality. It’s perfect if you want a sleek, durable look with minimal fuss.
Just be patient during the cure time, and you’ll get a stunning result.
NADAMOO Tub & Tile Refinishing Kit 1kg White with Tools
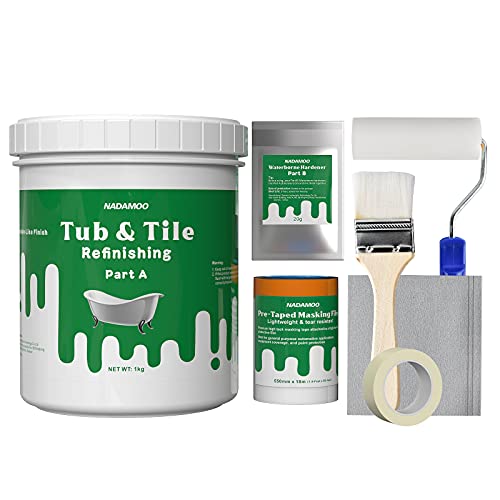
- ✓ Easy to use
- ✓ Mild odor
- ✓ Durable finish
- ✕ Takes 7 days to fully cure
- ✕ Limited to 50 sq.ft. per kit
| Surface Compatibility | Porcelain, ceramic, fiberglass, stone, plastic surfaces |
| Coverage | Approximately 50 sq.ft per 1kg (2 coats) |
| Drying Time | Semi-gloss finish after drying, cured in 24 hours |
| Full Cure Time | 7 days to reach maximum hardness |
| Application Method | Mixed with hardener, applied with brush or roller |
| Finish | Semi-gloss, water-based, low odor, durable |
When I tore open the NADAMOO Tub & Tile Refinishing Kit for the first time, I was immediately impressed by how complete the package was. It felt like everything I needed was right there—gloves, brushes, masking tape, and even sandpapers, all neatly packed.
I decided to tackle my dingy, outdated shower, feeling a little nervous but mostly excited to see how a fresh coat of white would transform the space.
The mixing process was straightforward—just combine Part A and Part B, and it turned into a smooth, slightly watery emulsion. Applying it with the roller was a breeze; the compound spread evenly without streaks.
The smell was surprisingly mild compared to traditional paints, which made working in the bathroom more comfortable.
Once applied, the semi-gloss finish looked sleek and modern, instantly brightening the bathroom. I appreciated how quickly it dried—just a few hours—and how durable it felt even before curing fully.
The instructions recommended waiting 24 hours before touching, and a full week for maximum hardness, which I followed carefully.
After a week, I was thrilled to find the surface incredibly hard and resilient. Even hot baths didn’t leave marks or damage the finish.
The white color stayed vibrant, and I felt confident that my DIY project would last for years. Overall, this kit made refinishing my tub feel doable and stress-free, with a professional-looking result I’m proud of.
What Makes a Paint Finish Suitable for Steam Showers?
The best paint finishes for bathroom steam showers must withstand high humidity and moisture while providing durability and ease of cleaning.
- High-Gloss Finish: This finish offers a shiny appearance that enhances light reflection and makes surfaces easier to clean. Its water-resistant properties help prevent mold and mildew growth, making it ideal for steam shower environments.
- Satin Finish: Satin finishes provide a soft sheen, striking a balance between easy cleaning and aesthetic appeal. They are durable and can resist moisture well, although they may not be as water-resistant as high-gloss finishes, making them suitable for areas with less direct moisture exposure.
- Eggshell Finish: Eggshell finishes have a velvety texture and moderate sheen, offering some washability while remaining less reflective. While they can handle some moisture, they are not as ideal for steam showers as higher-gloss options but can be used in less humid areas of the bathroom.
- Moisture-Resistant Paints: These specialized paints are formulated specifically for high-humidity environments. They often come with added mildew resistance and can be found in various sheens, making them versatile for use in steam showers while providing extra protection.
- Oil-Based Paints: Oil-based paints create a hard, durable surface that can withstand moisture and is resistant to peeling. However, they may take longer to dry and require more ventilation during application, making them less user-friendly but effective in high-moisture areas.
How Do High Humidity Levels Affect Different Paint Finishes?
High humidity levels can significantly impact various paint finishes, especially in environments like bathroom steam showers.
- Matte Finish: Matte finishes are known for their non-reflective surface and ability to hide imperfections, but they are less durable in humid conditions. In high humidity, matte paints can absorb moisture, leading to a higher likelihood of mildew and quick deterioration.
- Satin Finish: Satin finishes strike a balance between durability and aesthetics, making them a popular choice for bathrooms. They offer a slight sheen that helps resist moisture and are easier to clean, reducing the risk of mold growth compared to matte finishes.
- Eggshell Finish: Eggshell finishes provide a soft sheen that is more durable than matte but less glossy than satin. This finish can handle humidity better than matte, as it has a degree of moisture resistance, making it suitable for areas with occasional steam exposure.
- Semigloss Finish: Semigloss finishes are highly reflective and incredibly durable, making them ideal for high-humidity areas like steam showers. They repulse water effectively and are easy to wipe down, which minimizes the chances of mildew and staining.
- Gloss Finish: Gloss finishes offer the highest level of durability and moisture resistance among paint types. Their shiny surface not only repels humidity but also makes cleaning effortless, making them an excellent choice for environments that experience significant steam and moisture.
Which Paint Finishes Offer Superior Mold and Mildew Resistance?
The best paint finishes for a bathroom steam shower are designed to resist moisture and prevent mold and mildew growth.
- Eggshell Finish: This finish has a soft sheen that provides a durable surface while still being easy to clean. Its slight sheen helps to repel moisture, making it a suitable option for areas with high humidity like bathrooms, although it may not be as resistant as glossier finishes.
- Satin Finish: Satin finishes offer a higher sheen than eggshell and are highly durable, making them resistant to moisture and mold. They are easy to clean, which is essential in a steam shower environment, and their smooth surface minimizes the chance of mold growth.
- Semigloss Finish: With a glossier appearance, semigloss finishes provide an extra layer of protection against moisture and are highly resistant to mildew and mold. This finish is particularly good for steam showers as it can withstand the constant exposure to humidity and is easy to wipe down.
- High-Gloss Finish: The high-gloss finish is the most resistant to moisture, making it an excellent option for steam showers. Its shiny surface not only repels water effectively but also allows for easy cleaning, ensuring that any mold or mildew can be quickly wiped away.
- Mold-Resistant Paint: Specifically formulated with antimicrobial agents, mold-resistant paints are designed to prevent mold and mildew from growing on painted surfaces. These paints can be applied in various finishes, such as satin or semigloss, and are ideal for high-humidity areas like bathrooms and steam showers.
What Are the Pros and Cons of Common Paint Finishes for Steam Showers?
| Finish Type | Pros | Cons |
|---|---|---|
| Matte | Smooth appearance, hides imperfections well. Best for low-humidity areas, not recommended for direct steam exposure. Expected lifespan: 2-3 years in humid environments. Cleaning: Use a damp cloth with mild soap. |
Not moisture-resistant, may require frequent touch-ups. |
| Satin | Good moisture resistance, easy to clean. Recommended for moderate steam exposure. Expected lifespan: 4-5 years in humid environments. Cleaning: Use a soft sponge with a gentle cleaner. |
Can show imperfections, less matte finish than desired. |
| Eggshell | Soft sheen, balances aesthetics and durability. Recommended for occasional steam exposure. Expected lifespan: 3-4 years in humid environments. Cleaning: Wipe with a damp microfiber cloth. |
May not hold up as well in humid conditions. |
| Gloss | Highly durable, excellent moisture resistance. Best for high steam areas, ideal for steam showers. Expected lifespan: 5-7 years in humid environments. Cleaning: Use a non-abrasive cleaner with a soft cloth. |
Reflective surface shows imperfections, harder to apply. |
Why Choose a Semi-Gloss Finish for a Steam Shower Environment?
A semi-gloss finish is often chosen for a steam shower environment because it offers a balance between durability and moisture resistance, making it ideal for high-humidity areas.
According to the Paint Quality Institute, semi-gloss paints provide a higher sheen than eggshell or satin paints, which allows for better moisture resistance and easier cleaning. This is particularly important in steam showers where condensation and humidity can lead to mold and mildew growth if the paint does not hold up well against moisture.
The underlying mechanism lies in the composition of semi-gloss paints, which contain a higher proportion of resin compared to other finishes. This resin not only enhances the paint’s sheen but also creates a more impermeable barrier against moisture. When steam condenses on surfaces, a semi-gloss finish can repel water more effectively than flatter finishes, thereby reducing the likelihood of water damage and maintaining the aesthetic quality of the walls over time.
Furthermore, the smooth surface of semi-gloss paint allows for easier cleaning. In environments like steam showers, where soap scum and mineral deposits can accumulate, a finish that can be wiped clean without damaging the surface is essential. A study by the American Society for Testing and Materials (ASTM) emphasizes that higher gloss levels in paints contribute to their washability, making semi-gloss a practical choice for maintaining hygiene in bathrooms exposed to steam and high moisture levels.
When Is an Eggshell Finish Ideal for Bathrooms?
An eggshell finish is ideal for bathrooms, particularly steam showers, due to its balanced properties of durability and aesthetic appeal.
- Moisture Resistance: Eggshell finishes provide a level of moisture resistance that is essential in a bathroom environment, especially around showers where steam can accumulate. This finish helps to prevent mold and mildew growth, making it a practical choice for areas that experience high humidity.
- Ease of Cleaning: The slight sheen of an eggshell finish makes it easier to wipe down and clean compared to flat paints. This is particularly beneficial in a steam shower setting where soap scum and water spots can accumulate, allowing for maintenance without damaging the paint.
- Aesthetic Appeal: Eggshell finishes offer a soft, velvety appearance that enhances the overall look of a bathroom. This finish reflects a modest amount of light, adding warmth and depth without the glare that comes with higher gloss finishes, thus creating a soothing ambiance in the space.
- Durability: Eggshell paints are typically more durable than matte finishes, providing a long-lasting solution that can withstand the rigors of a bathroom environment. This durability ensures that the paint maintains its appearance over time, even with regular exposure to moisture and cleaning.
- Versatility: The eggshell finish works well with a variety of design styles, from modern to traditional, making it a versatile choice for any bathroom decor. Its neutral sheen allows it to complement various color palettes and materials, ensuring it fits seamlessly into the overall design of the space.
How Should You Prepare Surfaces Before Painting a Bathroom Steam Shower?
Preparing surfaces before painting a bathroom steam shower is crucial to ensure durability and resistance to moisture.
- Clean the Surface: Thoroughly clean the surfaces to remove dirt, soap scum, and mildew.
- Sand the Area: Lightly sand the surfaces to create a smooth texture for better paint adhesion.
- Repair Any Damage: Fill in cracks and holes with a suitable filler or caulk to ensure a smooth finish.
- Prime the Surface: Apply a high-quality primer that is moisture-resistant to seal the surface and enhance the paint’s longevity.
- Choose the Right Paint Finish: Select a paint finish that can withstand humidity, such as semi-gloss or satin, which are ideal for bathrooms.
Cleaning the surface is the first step, which involves using a mixture of water and a mild detergent or a specialized cleaner to eliminate any buildup that could interfere with the paint’s adhesion. This step ensures that any oils or residues are removed, providing a fresh canvas for painting.
Sanding the area helps to create a rough texture that promotes better adhesion of the paint to the surface. It is important to use fine-grit sandpaper to avoid damaging the existing surface while still providing enough texture for the paint to adhere properly.
Repairing any damage is essential to achieve a flawless finish. Use a high-quality filler to patch up any cracks or holes, and ensure that the surfaces are level and smooth before proceeding to paint.
Priming the surface with a moisture-resistant primer creates a barrier that prevents moisture from seeping through and helps the paint to stick better. This step is particularly important in a steam shower where humidity levels are high.
Choosing the right paint finish is critical for the longevity of the paint job. Semi-gloss or satin finishes are recommended for bathroom steam showers because they are more resistant to moisture and easier to clean compared to flat finishes, ensuring that the painted surfaces can withstand the humid environment effectively.
What Preparatory Steps Ensure Proper Adhesion of Paint?
To ensure proper adhesion of paint, especially in a bathroom steam shower environment, several preparatory steps are essential:
- Surface Cleaning: Thoroughly clean the surfaces to remove dirt, soap scum, and mildew, which can hinder adhesion. Using a mixture of water and mild detergent or a specialized cleaner ensures that the paint adheres properly by providing a clean canvas for application.
- Surface Repair: Inspect the walls for any cracks or peeling paint and repair them before painting. Filling in cracks and smoothing out rough areas creates a uniform surface that allows the paint to bond effectively, preventing future peeling or chipping.
- Sanding: Lightly sand the surfaces to create a rough texture, which helps the paint grip better. This step is particularly important for glossy finishes, as it increases the surface area for adhesion and promotes a more durable finish.
- Priming: Apply a high-quality primer designed for humid environments, which seals the surface and improves paint adhesion. Priming not only enhances the durability of the paint finish but also helps in achieving a more vibrant color and prevents staining from moisture.
- Choosing the Right Paint: Select a paint specifically formulated for bathrooms or high-moisture areas, such as an acrylic latex paint with mildew-resistant properties. The right paint will withstand the steam and humidity of a shower environment, ensuring a long-lasting and effective finish.
Why Is Ventilation Important During and After Painting?
Ventilation is crucial during and after painting because it helps to disperse harmful fumes and allows for proper drying of the paint, which is essential for achieving the best finish and maintaining indoor air quality.
According to the Environmental Protection Agency (EPA), indoor air quality can be significantly affected by volatile organic compounds (VOCs) released from paint. These compounds can cause short-term health effects such as headaches and dizziness, as well as long-term issues like respiratory problems. Proper ventilation can mitigate these effects by facilitating the exchange of air, reducing the concentration of these harmful substances. Moreover, a well-ventilated space helps paint to dry evenly and quickly, which is critical for achieving a smooth and durable finish.
The underlying mechanism involves the physical properties of air movement and temperature regulation. When fresh air is introduced into a space, it not only dilutes the concentration of VOCs but also helps to regulate humidity levels. High humidity can slow the drying process, leading to issues such as streaks, bubbles, or peeling paint. In environments like a bathroom steam shower, where high moisture is prevalent, proper ventilation becomes even more important to ensure that the paint adheres correctly and maintains its integrity over time. Without adequate airflow, moisture can become trapped, creating a conducive environment for mold growth and reducing the lifespan of the paint finish.
What Expert Recommendations Should You Follow for Painting a Steam Shower?
Heat-Resistant Paint options are particularly important for steam showers due to the high temperatures generated by steam. These paints are formulated to withstand the heat without degrading, which protects the appearance and integrity of the painted surfaces.
How Do Professionals Select Paint Products for High Moisture Areas?
Professionals consider various factors when selecting paint products for high moisture areas like steam showers.
- Moisture Resistance: Choosing paints specifically designed for high humidity environments is crucial. These paints often contain additives that help prevent mold and mildew growth, ensuring longevity and maintaining a clean appearance.
- Durability: The best paint finish for a bathroom steam shower must withstand frequent exposure to steam and water. High-quality, durable finishes resist chipping and peeling, ensuring that the paint adheres well over time despite the harsh conditions.
- Finish Type: The choice of finish plays a significant role in performance. Semi-gloss or glossy finishes are typically preferred in steam showers due to their ability to repel water and facilitate easy cleaning, while also providing a sleek appearance.
- Application Method: Professionals often consider how the paint will be applied to ensure an even and effective coat. Spraying or rolling can create a smooth finish, but careful attention must be paid to corners and seams where moisture can accumulate.
- Color and Aesthetic: While functionality is critical, professionals also consider the color and aesthetic appeal of the paint. Light colors can help to enhance the perception of space in smaller bathrooms, while darker hues can create a dramatic effect, so the choice often balances practicality with design preferences.
Are There Specific Brands or Products That Are Best for Steam Showers?
The best paint finishes for bathroom steam showers are specifically designed to withstand high humidity and temperature fluctuations.
- Satin Finish: This finish offers a soft sheen that is both attractive and practical, making it a popular choice for steam showers. It provides a level of moisture resistance while still being easy to clean, which is crucial in a high-humidity environment.
- Eggshell Finish: Eggshell finishes are slightly more matte than satin but still possess a low sheen that can help hide imperfections. They are more durable than flat paints and can resist moisture, making them suitable for areas exposed to steam.
- High-Gloss Finish: This finish is extremely reflective and offers the highest level of moisture resistance. While it can show imperfections on the wall, its ability to repel water and steam makes it an excellent choice for a steam shower, ensuring easy cleaning and maintenance.
- Mildew-Resistant Paint: Specifically formulated to prevent mold and mildew growth, these paints are ideal for steam showers. They typically contain antimicrobial agents that inhibit the growth of bacteria and fungi, crucial for maintaining a clean and healthy environment.
- Specialty Bathroom Paints: These paints are designed for high-humidity areas and often combine properties of both mildew resistance and moisture control. They are available in various finishes and are formulated to withstand the specific challenges posed by steam and moisture in bathrooms.
What Common Mistakes Should You Avoid When Painting a Bathroom Steam Shower?
When painting a bathroom steam shower, several common mistakes can undermine the results and longevity of your paint job.
- Choosing the Wrong Paint Finish: It’s crucial to select the best paint finish for a bathroom steam shower, which is typically a semi-gloss or satin finish. These finishes are not only moisture-resistant but also easy to clean, making them ideal for areas exposed to steam and water.
- Neglecting Surface Preparation: Properly preparing the surface by cleaning, sanding, and priming is essential before painting. Skipping this step can lead to poor adhesion, resulting in peeling or bubbling paint over time.
- Ignoring Ventilation: Failing to ensure adequate ventilation during and after painting can trap moisture, leading to mold and mildew growth. It’s vital to keep windows open or use fans to promote airflow and help the paint cure properly.
- Applying Too Thick a Coat: Applying paint too thickly can cause it to dry improperly, leading to drips and an uneven finish. It’s better to apply multiple thin coats, allowing each to dry before adding another, to achieve a smooth and even result.
- Using Incompatible Products: Mixing different types of paints or using incompatible primers and paints can cause adverse chemical reactions. Always use products that are designed to work together, ideally from the same manufacturer, to ensure compatibility and durability.
- Forgetting to Test Paint Samples: Not testing paint samples before committing to a full application can lead to unexpected results in color and finish. Always test a small area to see how the paint looks under the specific lighting conditions of your bathroom.
How Can Improper Paint Choices Lead to Future Problems?
Improper paint choices can result in numerous issues, particularly in moisture-prone areas like bathroom steam showers.
- Moisture Damage: Using a paint that isn’t designed for high humidity environments can lead to peeling, bubbling, or cracking. This occurs because the paint fails to adhere properly to the surface when exposed to steam and moisture over time.
- Mold and Mildew Growth: Certain paint finishes do not have antimicrobial properties, making them susceptible to mold and mildew. In a steam shower, where water vapor is abundant, these fungi can thrive, leading to health problems and unsightly stains.
- Color Fading: Inadequate paint finishes may not resist fading due to constant exposure to steam and water. Over time, this can result in an uneven appearance and require more frequent repainting to maintain the desired aesthetic.
- Cleaning Difficulties: Some paint finishes are not durable enough to withstand regular cleaning in a bathroom environment. This can make it harder to remove soap scum and other residues, leading to a buildup that can compromise the overall cleanliness of the space.
- Increased Maintenance Costs: Choosing the wrong paint can lead to more frequent repairs and repaints, significantly increasing upkeep costs. A durable and suitable paint finish can minimize these expenses by extending the life of the paint job.
Why Is Surface Cleaning Critical Before Painting?
Surface cleaning is critical before painting because it ensures proper adhesion of the paint, which directly affects the durability and appearance of the finish.
According to the Paint Quality Institute, a clean surface allows the paint to bond effectively, reducing the likelihood of peeling or chipping over time. If dirt, grease, or moisture are present, they can create barriers that inhibit the paint from adhering properly to the substrate, leading to premature failure of the paint job.
The underlying mechanism involves the physical and chemical interactions between the paint and the surface. For instance, contaminants can create a layer that disrupts the formation of a strong bond between the paint and the substrate. Additionally, moisture trapped under the paint can cause blisters and bubbles, further compromising the finish. Cleaning removes these contaminants, allowing the paint to penetrate and adhere to the surface more effectively, resulting in a smoother and more lasting finish, particularly important in moisture-prone areas like a bathroom steam shower.
Related Post: