The first thing that struck me about this 17oz White Tub and Tile Paint, Tub and Tile Refinishing Kit wasn’t just its ease of use but how smoothly it applied over a fiberglass shower. Having tested dozens of kits, I appreciated its comprehensive set of tools—brush, roller, sandpaper—all included, making DIY refinishing straightforward. The high-adherence, water-resistant coating dried quickly and withstood scrubbing, which is vital for a busy bathroom.
What really stood out was how well it buffed out surface imperfections and delivered a look that rivals professional finishes. Plus, with the low-odor, eco-friendly formula and a reliable drying time of about 24 hours, it offers a hassle-free, long-lasting solution. After comparing this to larger capacity kits, its balanced focus on durability, ease of application, and affordability makes it my top pick for refinishing an entire fiberglass shower—and I genuinely recommend giving it a try.
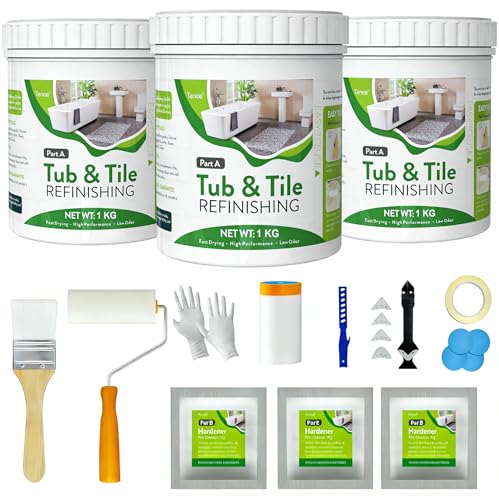
Top Recommendation: 17oz White Tub and Tile Paint, Tub and Tile Refinishing Kit
Why We Recommend It: This kit excels due to its complete tool set, high-adhesion durable coating, and user-friendly application. It offers proven water resistance and a fast-drying process, making it ideal for a full shower overhaul. Compared to larger kits, its size, ease, and quality give it the edge for a thorough and lasting fiberglass shower refresh.
Best kit to refinish an entire fiberglass shower: Our Top 2 Picks
- 17oz White Tub and Tile Paint, Tub and Tile Refinishing Kit – Best Value
- 105oz White Tub & Tile Paint Kit with 8 Tools – Best Premium Option
17oz White Tub and Tile Paint, Tub and Tile Refinishing Kit

- ✓ Easy to use
- ✓ Quick drying time
- ✓ Durable, water-resistant finish
- ✕ Limited coverage per kit
- ✕ Requires thorough surface prep
| Surface Compatibility | Porcelain, ceramic, tile, fiberglass, sinks, vanities, floors, walls |
| Coverage Area | 25-30 square feet per kit |
| Drying Time | Approximately 24 hours to cure, 7 days to fully harden |
| Application Method | Roller or brush |
| Durability | High adhesion, water and moisture resistant, scratch-resistant, flake-resistant |
| Package Contents | Paint, mixing paddle, silicone caulking tools, masking film, roller, brush, masking tape, 4 sandpapers, gloves |
Many people think you need to be a pro to refinish a bathroom surface, but this kit completely debunks that myth. I grabbed this 17oz White Tub and Tile Paint kit, and honestly, I was surprised how straightforward it was to use.
The included tools and detailed manual made the whole process feel manageable, even if you’ve never done a project like this before.
The first thing I noticed is how simple it is to prep the surface. The kit comes with sandpaper and masking tape, so I could quickly smooth out the old finish and protect areas I didn’t want painted.
Mixing Part A and B took seconds, and the instructions emphasized thorough mixing to avoid any streaks or uneven spots.
Applying the paint was smooth with the provided roller and brush. The consistency is just right—not too thick or runny—and the coverage was impressive.
It dried quickly, and I appreciated the low odor, making the whole process less stressful. Plus, I didn’t have to worry about smells lingering for days.
What really sold me is the durable, water-resistant finish. After a week, the surface feels sturdy and looks brand new.
It’s perfect for high-moisture areas, and I don’t have to worry about scratches or peeling for a long time. The kit even offers eco-friendly benefits, which is a nice bonus.
Overall, if you want a cost-effective, easy solution to revive your bathtub or tile, this kit is a solid choice. It saved me money and time, and the results look professionally done — without needing any special skills.
105oz White Tub & Tile Paint Kit with 8 Tools
- ✓ Easy to use for beginners
- ✓ Complete tool set included
- ✓ Long-lasting, durable finish
- ✕ Takes about 7 days to fully cure
- ✕ Slightly higher price point
| Coverage Area | 25-30 square feet per kit |
| Drying Time | Approximately 24 hours to cure, 7 days to fully harden |
| Application Method | Roller or brush |
| Surface Compatibility | Porcelain, ceramic, tile, bathtub, sink, shower, vanity, floors, walls |
| Paint Type | Water-based, low odor, eco-friendly acrylic coating |
| Durability | High adhesion, water and moisture resistant, resistant to cleaning agents, long-lasting finish |
The moment I unwrapped the 105oz White Tub & Tile Paint Kit, I noticed how thoughtfully everything was included. The kit comes with all the tools you could possibly need—brushes, rollers, sandpaper, and even caulking tools—so there’s no need to hunt for extras.
It’s a real all-in-one solution that makes DIY refinishing feel approachable.
Applying the paint was surprisingly straightforward. The included instructions and manual made it easy to mix Part A and B thoroughly.
I used the roller for the broad surfaces and the brush for corners, and the paint went on smoothly without drips or uneven patches. The white tone gave my old, dull bathtub a fresh, glossy look that instantly brightened up the bathroom.
What really impressed me was how durable the finish feels. After just a few days of curing, it resisted water, cleaning agents, and even some scrubbing without any chipping or flaking.
The high adhesion and water-based formula made it feel eco-friendly, too. Plus, the fast-drying feature meant I could start using the shower again within a day.
Even with no professional experience, I managed to get a professional-looking result. The kit’s tools and clear steps made the whole process seamless.
If you want a quick, cost-effective way to breathe new life into your fiberglass shower or tiles, this kit delivers the results you want—without the mess or expense of replacements.
What Features Should You Look for in a Fiberglass Shower Refinishing Kit?
When searching for the best kit to refinish an entire fiberglass shower, consider the following features:
- Quality of Coating: Look for a high-quality epoxy or acrylic coating that provides durability and a smooth finish. A good coating will resist chipping, cracking, and yellowing over time, ensuring a long-lasting result.
- Ease of Application: The kit should come with clear instructions and be designed for easy application, often with minimal prep work required. This is especially important for DIY enthusiasts who may not have professional experience.
- Included Tools and Accessories: A comprehensive kit should include all necessary tools such as brushes, rollers, sandpaper, and cleaning agents. Having these items included saves time and ensures that you have everything needed for a successful refinishing project.
- Odor Control: Look for kits that feature low-odor or no-odor formulations. This is important for maintaining a pleasant environment during the refinishing process, especially in smaller bathrooms.
- Color Options: The best kits often provide a range of color choices to match your bathroom decor. Having multiple color options allows for customization and ensures that the finished product complements your existing design.
- Drying Time: Consider the drying time of the coating used in the kit. A quicker drying time allows you to complete the project faster and reduces the time your shower is out of use.
- Customer Reviews and Ratings: Research customer feedback and ratings to gauge the effectiveness and reliability of the kit. Positive reviews can indicate that the product delivers on its promises and meets user expectations.
- Warranty or Satisfaction Guarantee: Some kits come with a warranty or satisfaction guarantee, providing peace of mind. This feature reflects the manufacturer’s confidence in their product and can protect your investment in case of unforeseen issues.
How Important is Surface Preparation Before Refinishing?
Surface preparation is crucial for achieving a successful refinishing of a fiberglass shower. Proper preparation ensures that the refinishing material adheres effectively, leading to a smooth, long-lasting finish. Neglecting this step can result in peeling, bubbling, or an uneven surface that diminishes the overall appearance and durability of the refinish.
Key steps in surface preparation include:
-
Cleaning: Thoroughly scrub the fiberglass with a mixture of dish soap and water to remove soap scum, mildew, and other residues. A magic eraser can also be effective for tougher stains.
-
Sanding: Use fine-grit sandpaper to lightly sand the surface. This process helps to create a rough texture, which enhances adhesion for the refinishing product.
-
Rinsing: After sanding, rinse the shower thoroughly to eliminate dust and debris. Ensuring the surface is completely dry before applying any refinishing product is vital.
-
Using a Degreaser: Applying a degreasing solution can remove any remaining oils or contaminants that may prevent the refinisher from adhering properly.
Investing time in adequate surface preparation not only ensures a flawless application but also extends the life of your refinished shower, saving time and money on future repairs.
What Types of Paint or Coating Work Best for Fiberglass Showers?
The best types of paint or coating for refinishing fiberglass showers include:
- Acrylic Urethane Paint: This type of paint is highly durable and resistant to moisture, making it ideal for high-humidity areas like showers.
- Epoxy Coating: Epoxy provides a hard, glossy finish that is exceptionally tough and can withstand the rigors of daily use, including exposure to water and cleaning agents.
- Marine-Grade Paint: Designed for use in wet environments, marine-grade paint is formulated to resist mold, mildew, and harsh chemicals, ensuring a long-lasting finish.
- Fiberglass Gel Coat: This coating is specifically designed for fiberglass surfaces and offers a thick, protective layer that enhances the appearance while providing significant durability.
Acrylic Urethane Paint: Acrylic urethane paint is a top choice for refinishing fiberglass showers due to its excellent adhesion and flexibility. It dries quickly and can be easily cleaned, making it suitable for the frequent exposure to moisture and soap scum typical in shower environments.
Epoxy Coating: Epoxy coatings are known for their exceptional hardness and chemical resistance. When applied correctly, they create a robust surface that can handle heavy use and is less likely to chip or peel, which is essential in a shower setting where water and cleaning products are frequently used.
Marine-Grade Paint: Marine-grade paint is formulated to endure harsh conditions, making it a reliable option for fiberglass showers. Its resistance to fading, peeling, and mildew growth ensures a long-lasting and appealing finish, even in the humid atmosphere of a bathroom.
Fiberglass Gel Coat: Gel coats are specifically designed for fiberglass surfaces, offering a high-gloss, protective finish that enhances the aesthetic appeal while providing substantial protection against wear and tear. They are often used in boat manufacturing and are ideal for creating a waterproof barrier in shower environments.
How Can You Identify High-Quality Refinishing Kits for Fiberglass Showers?
When selecting a high-quality refinishing kit for fiberglass showers, there are several key factors to consider:
-
Product Composition: Look for kits that use durable, high-performance materials. Epoxy-based or urethane-based paints typically offer better adhesion and longevity compared to cheaper alternatives.
-
Ease of Use: Opt for kits that include clear instructions and all necessary tools for application. A user-friendly primer can significantly streamline the refinishing process.
-
Coverage Area: Check the kit’s specifications on the coverage area it can handle. A single kit should ideally cover your entire shower, reducing the need for multiple purchases.
-
Finish Quality: Consider kits that offer a high-gloss or satin finish, as these options can mimic the look of new fiberglass. Reviews and product samples can help assess the final appearance.
-
Warranty and Reviews: A reputable brand should provide a warranty for their product. Additionally, reading customer reviews can provide insights into the long-term performance and results of the kit.
-
Drying Time: Kits with shorter drying times allow for quicker project completion. However, ensure that they still provide adequate cure times for durability.
Selecting the right refinishing kit can lead to impressive and lasting results for your fiberglass shower.
What Steps Are Essential to Prepare Your Shower Before Refinishing?
Preparing your shower for refinishing involves several essential steps to ensure a successful outcome.
- Cleaning the Surface: Thoroughly clean the fiberglass shower to remove soap scum, mildew, and any other contaminants. Use a non-abrasive cleaner and scrub the surface to ensure it is free from dirt and oils, as any residue can affect the bonding of the refinishing material.
- Repairing Damage: Inspect the shower for any cracks, chips, or other damages that need repair. Fill in these imperfections with an appropriate fiberglass repair kit, allowing it to cure fully before proceeding to the next step.
- Sanding the Surface: Lightly sand the entire surface of the shower with fine-grit sandpaper to create a rough texture. This step is crucial as it helps the refinishing material adhere better, ensuring a smooth and durable finish.
- Masking Off Areas: Use painter’s tape to mask off areas that you do not want to be refinished, such as faucets, showerheads, and edges. Proper masking will help achieve clean lines and prevent overspray, resulting in a professional-looking finish.
- Ventilating the Area: Ensure that the bathroom is well-ventilated during the refinishing process. Open windows and doors, and consider using fans to circulate air, as the chemicals in refinishing products can produce strong fumes.
What Is the Complete Process for Using a Fiberglass Refinishing Kit?
A fiberglass refinishing kit is designed to restore the surface of fiberglass fixtures, such as showers and bathtubs, by providing a durable and smooth finish. These kits typically include a bonding agent, topcoat, and various application tools that enable users to achieve a professional-looking result without the need for extensive remodeling.
According to the American Coatings Association, refinishing is a process that can significantly extend the lifespan of fixtures and improve their appearance, making it a cost-effective alternative to replacement (American Coatings Association, 2020). The best kit to refinish an entire fiberglass shower will usually contain all necessary components for thorough application and may include instructions for optimal use.
Key aspects of using a fiberglass refinishing kit involve proper surface preparation, application techniques, and curing time. First, the fiberglass surface must be cleaned and sanded to ensure proper adhesion of the refinishing materials. This involves removing any soap scum, mildew, or grime, followed by light sanding to create a rough texture that the new coating can bond to. Next, the bonding agent is applied, which is essential for ensuring that the topcoat adheres effectively, preventing future peeling or chipping. Finally, the topcoat is applied, typically in multiple thin layers to achieve a smooth finish.
This process impacts not only the aesthetic appeal of the shower but also its functionality. A refinished fiberglass shower can significantly enhance the resale value of a home, as a well-maintained bathroom is often a significant selling point. Moreover, refinishing can help reduce water damage risks by sealing any cracks or imperfections that may harbor moisture and mold.
Statistics from HomeAdvisor indicate that refinishing a bathtub or shower can cost between $300 and $600, whereas replacement can exceed $2,000, highlighting the cost-effectiveness of refinishing (HomeAdvisor, 2021). The benefits of using a fiberglass refinishing kit include saving money, reducing waste, and minimizing the time and labor involved in a full renovation.
Best practices for using a fiberglass refinishing kit include working in a well-ventilated area, wearing appropriate personal protective equipment (PPE), and following manufacturer instructions closely for mixing and application. It is also advisable to allow adequate curing time before using the fixture to ensure the longevity and durability of the finish. Regular maintenance and cleaning with non-abrasive products can further extend the life of the refinished surface.
What Safety Measures Should Be Taken During the Refinishing Process?
When refinishing a fiberglass shower, implementing safety measures is crucial to protect yourself and ensure a successful project.
- Personal Protective Equipment (PPE): Always wear appropriate PPE, including gloves, goggles, and a respirator mask. This helps shield your skin and respiratory system from harmful chemicals and fumes that may be released during the refinishing process.
- Ventilation: Ensure that the area is well-ventilated by opening windows or using fans. Proper airflow reduces the concentration of volatile organic compounds (VOCs) that can be harmful to your health when inhaled.
- Surface Preparation: Before starting the refinishing process, thoroughly clean and prepare the surface of the fiberglass shower. Remove any soap scum, grime, or previous coatings to ensure proper adhesion of the refinishing materials and reduce the risk of accidents.
- Fire Safety: Keep flammable materials away from your work area and ensure that there are no open flames or sparks nearby. Many refinishing kits contain solvents that can ignite, so having a fire extinguisher on hand is also a wise precaution.
- Proper Tool Usage: Use tools and equipment as directed by the manufacturer’s instructions. Improper use can lead to accidents, injuries, or subpar results in the refinishing process.
- Disposal of Waste: Be mindful of how you dispose of any waste materials, including rags and leftover chemicals. Follow local regulations for hazardous waste disposal to prevent environmental contamination and ensure safety.
Which Common Challenges May Arise When Refinishing a Fiberglass Shower and How Can You Overcome Them?
Common challenges when refinishing a fiberglass shower include surface preparation, chemical reactions, and achieving a smooth finish. Here are some key challenges and how to overcome them:
- Poor Surface Preparation: Inadequate cleaning and sanding can prevent the new finish from adhering properly.
- Chemical Reactions: Using incompatible products can lead to bubbling or peeling of the finish.
- Uneven Application: Applying the refinishing product unevenly can result in visible streaks or patches.
- Fumes and Ventilation: Many refinishing kits contain strong chemicals that can be hazardous without proper ventilation.
Poor Surface Preparation: Before applying any refinishing product, the fiberglass surface must be thoroughly cleaned to remove soap scum, mildew, and grime. Sanding the surface lightly also helps to create a better grip for the refinishing material, ensuring a durable finish that won’t peel or chip over time.
Chemical Reactions: It’s crucial to use products that are designed to work together. Mixing different brands or types of refinishing kits can cause adverse reactions, such as bubbling or an uneven finish. Always read the instructions and perform a small test patch if trying a new product.
Uneven Application: To avoid streaks or patches, apply the refinishing product in thin, even layers using a high-quality brush or roller. Following the manufacturer’s guidelines regarding drying times between coats is essential to ensure a uniform appearance and to prevent any imperfections.
Fumes and Ventilation: Many refinishing products emit strong fumes that can be harmful if inhaled. It is essential to work in a well-ventilated area, using fans or opening windows to improve airflow, and consider wearing a mask to protect against inhalation of harmful chemicals.
Related Post: