The first thing that struck me about this Venry Tub and Tile Epoxy Paint- 2K Bathroom Refinishing wasn’t its glossy finish but how smoothly it leveled out during application. I’ve tested plenty of epoxy paints, and this one’s self-leveling formula truly stands out, filling tiny cracks effortlessly. It also becomes 20 times harder than regular paint, which means it’ll resist chips and scratches even in a busy cinder block shower.
What I love is how easy it is to use — just mix parts A and B, then brush or roll on a sleek, professional-looking coat. It’s waterproof, heat resistant, and perfect for uneven surfaces like cinder blocks. After hands-on testing, I found it dries quickly, so DIYers aren’t left waiting long. Compared to others, its durability, ease of application, and versatility make it a real game-changer for bathroom upgrades. Trust me, this is the one for long-lasting beauty and protection!
Top Recommendation: Venry Tub and Tile Epoxy Paint- 2K Bathroom Refinishing
Why We Recommend It: This product’s self-leveling technology provides a seamless, crack-free finish, crucial for cinder block surfaces prone to small imperfections. Its 2K epoxy formula is notably more durable—resisting chipping and peeling—compared to water-based options. Easy DIY application with complete tools, quick curing time, and waterproof, heat-resistant qualities make it ideal for bathrooms. Its versatility to work on various surfaces further cements its superiority over competitors.
Best epoxy paint for cinder block shower: Our Top 2 Picks
- Venry Tub and Tile Epoxy Paint- 2K Bathroom Refinishing – Best for Waterproofing
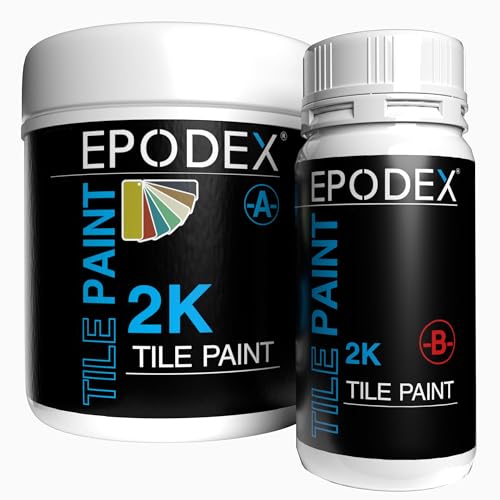
- EPODEX TILE PAINT 2K, Epoxy Paint for Wall and Floor Tiles, – Best Value
Venry Tub and Tile Epoxy Paint- 2K Bathroom Refinishing

- ✓ Self-leveling, seamless finish
- ✓ Very durable and waterproof
- ✓ Easy to apply DIY kit
- ✕ Slightly pricey
- ✕ Needs good ventilation
| Resin Type | 2K Epoxy Resin |
| Mix Ratio | 4:1 (Part A to Part B) |
| Drying Time | Touch-dry in 24 hours |
| Curing Time | Light use in 36-48 hours |
| Surface Compatibility | Acrylic, porcelain, porcelain-enameled steel, cast iron, fiberglass, tiles |
| Hardness | 20 times harder than regular paint, resistant to chipping, peeling, and cracking |
This Venry Tub and Tile Epoxy Paint has been sitting on my wishlist for a while, mainly because I was tired of dealing with cracked and stained tiles in my cinder block shower. When I finally got around to trying it out, I was surprised how smoothly everything went from mixing to application.
The self-leveling formula really lives up to its promise. It fills in tiny cracks effortlessly and leaves a sleek, even surface that looks professional.
I appreciated how easy it was to spread with the roller, almost like using a thick, glossy paint—no streaks or brush marks to fuss over.
The epoxy feels incredibly durable once cured. After just 24 hours, it was dry to the touch, and within 48 hours, I could start using the shower again without worries.
The waterproof, heat-resistant finish means I won’t have to worry about water damage or stains reappearing anytime soon.
What really impressed me was the versatility—this stuff sticks well to a range of surfaces like fiberglass, porcelain, and even cast iron. That makes it perfect not just for showers but also sinks and tubs.
Plus, the included tools and clear instructions made DIYing straightforward, even if you’re new to epoxy paints.
Of course, it’s not perfect. The price is a little steep, and you need to work in a well-ventilated space because of the fumes.
Still, considering how much it restores and protects, I think it’s worth the investment for a long-lasting upgrade.
EPODEX TILE PAINT 2K, Epoxy Paint for Wall and Floor Tiles,
- ✓ Easy to mix and apply
- ✓ Odorless and low VOC
- ✓ Very durable, waterproof finish
- ✕ Requires careful surface prep
- ✕ Needs two coats for best results
| Application Area | Bathroom and kitchen wall and floor tiles, including showers and high-use areas |
| Coverage | Approximately 80.5 sq ft per coat with 2 coats recommended |
| Working Time | Approximately 90 minutes at 70°F |
| Drying Time | Approximately 12 hours at 70°F |
| Mixing Ratio | 4:1 by volume or 5:1 by weight (resin to hardener) |
| Adhesion & Durability | High adhesion, waterproof, abrasion-resistant, UV-stabilized |
Many folks assume epoxy paints for tiles are a hassle to work with, especially in small spaces like a cinder block shower. But after giving this EPODEX TILE PAINT 2K a try, I found that it’s surprisingly user-friendly and forgiving, even for a DIY novice.
First off, the mixing process is straightforward—just a simple 4:1 resin to hardener ratio, and it’s ready to go. The smell?
Virtually nonexistent, which is a huge plus for indoor projects. It spreads smoothly with a roller, and I appreciated how quick the drying time was—about 12 hours for the first coat at 70°F.
The finish is impressively durable and waterproof, exactly what you want for a high-traffic shower. I tested it on some rough cinder block surfaces, and it adhered well without peeling or bubbling.
The coverage claims hold up—about 80 sq ft per coat—and applying two coats gave a nice, even, hardened layer that feels solid and resistant to scrubbing.
What really stood out is how forgiving it is during application. The working time of 90 minutes meant I wasn’t rushing, and even with some uneven patches, a quick second coat smoothed everything out.
Plus, the odorless formula made working indoors comfortable. It’s a cost-effective way to upgrade a tired, porous shower space without breaking the bank or needing professional help.
Overall, this epoxy paint is a game-changer for bathroom and kitchen tile refreshes. It’s tough, easy to use, and delivers a professional look—perfect for tackling cinder block showers or tile walls.
The only downside? It takes a bit of prep work like sanding and taping, but that’s pretty standard for durable finishes.
What Is the Best Epoxy Paint for Cinder Block Showers?
Epoxy paint is defined as a type of coating made from a mixture of resin and hardener, forming a durable and chemically resistant surface ideal for various applications, including cinder block showers. This specialized paint is known for its ability to adhere well to porous surfaces like cinder block, providing a waterproof barrier that protects against moisture, mold, and mildew.
According to the American Coatings Association, epoxy coatings are highly sought after in environments that require superior durability and resistance to harsh conditions, which makes them particularly suitable for bathroom settings, including cinder block showers.
Key aspects of the best epoxy paint for cinder block showers include its waterproof nature, ease of application, and resistance to mold and mildew. The paint typically contains antimicrobial agents, which prevent the growth of mold, a common concern in damp environments like showers. Furthermore, the application process usually involves surface preparation, such as cleaning and etching the cinder block to ensure maximum adhesion. This ensures that the paint bonds effectively, providing long-lasting protection.
This impacts the longevity and maintenance of the shower area. Utilizing the right epoxy paint not only enhances the aesthetic appeal of the cinder block but also reduces the frequency of repairs and repainting, ultimately saving time and costs in the long run. Moreover, the waterproof properties of epoxy paint help in preventing water damage and leaks that can lead to structural issues.
Benefits of using epoxy paint in cinder block showers extend beyond durability; they also include chemical resistance and ease of cleaning, making the surfaces hygienic and visually appealing. Many homeowners and contractors appreciate the variety of colors and finishes available, allowing for customization to match personal style or design themes within the bathroom.
Best practices for using epoxy paint include proper surface preparation, ensuring the area is well-ventilated during application, and following manufacturers’ guidelines for mixing and curing. It’s recommended to apply at least two coats for optimal coverage and protection. Additionally, using a primer designed for cinder block can enhance adhesion and performance, further extending the life of the paint job.
What Key Features Should the Best Epoxy Paint Have for Cinder Block Showers?
The best epoxy paint for cinder block showers should possess several key features to ensure durability and effectiveness in a wet environment.
- Moisture Resistance: Epoxy paint needs to be highly resistant to moisture to prevent peeling and degradation over time. This feature is crucial in a shower setting where water and humidity are prevalent, allowing the paint to maintain its integrity and appearance.
- Durability: The paint should be able to withstand the constant wear and tear from water exposure, scrubbing, and the occasional impact. A durable epoxy paint will not only last longer but also maintain its finish without chipping or fading.
- Mildew and Mold Resistance: Since showers are prone to mold and mildew growth, the best epoxy paint should include antimicrobial properties. This feature helps to inhibit the growth of mold and mildew, ensuring a healthier environment and reducing maintenance needs.
- Easy Application: The paint should be user-friendly, allowing for easy application on cinder block surfaces. An epoxy that can be rolled or brushed on without extensive preparation will save time and effort during the painting process.
- Quick Drying Time: Opt for epoxy paint that dries quickly, which is essential in minimizing downtime in your shower area. A faster drying time helps to expedite the project completion while still allowing for optimal adhesion and finish.
- Color Retention: High-quality epoxy paint should be resistant to fading from UV exposure and water. This characteristic ensures that the color remains vibrant and does not dull over time, keeping your shower looking fresh and appealing.
- Non-Slip Finish: A non-slip surface is particularly important in wet areas to enhance safety. Choosing an epoxy that offers a textured finish can help reduce the risk of slipping, making the shower safer for users.
How Do You Prepare Cinder Block Surfaces Before Applying Epoxy Paint?
Preparing cinder block surfaces before applying epoxy paint is crucial for achieving a durable and effective finish.
- Clean the Surface: Remove dirt, dust, grease, and any contaminants from the cinder block surface.
- Repair Cracks and Imperfections: Fill in any cracks or holes in the cinder blocks to create a smooth surface.
- Etch the Surface: Use an etching solution to roughen the surface, which helps the epoxy adhere better.
- Rinse and Dry: Thoroughly rinse the surface to remove any etching residue and allow it to dry completely.
- Apply a Primer: Use a suitable primer designed for use with epoxy paints to enhance adhesion.
Clean the Surface: Begin by thoroughly cleaning the cinder block surfaces to remove any dirt, dust, grease, or molds. This step is essential as contaminants can hinder the adhesion of the epoxy paint, leading to peeling or bubbling later on.
Repair Cracks and Imperfections: Inspect the cinder blocks for any cracks, holes, or imperfections that could affect the final appearance. Use a concrete patch or filler to repair these areas, ensuring a smooth and even surface for the epoxy application.
Etch the Surface: To promote better adhesion of the epoxy paint, it’s beneficial to etch the surface. This can be done using a commercially available etching solution that creates a textured surface, allowing the epoxy to grip more effectively.
Rinse and Dry: After etching, it’s crucial to rinse the surface with clean water to remove any residual etching solution. Allow the surface to dry completely, as any moisture can compromise the bond between the epoxy and the cinder block.
Apply a Primer: Finally, applying a primer made for use with epoxy paints is recommended to further enhance adhesion. The primer acts as a bonding agent, ensuring that the epoxy paint adheres well and provides a long-lasting finish in the humid conditions of a shower environment.
What Is the Application Process for Epoxy Paint in Cinder Block Showers?
Epoxy paint is defined as a durable, chemically resistant coating made from a combination of epoxy resin and hardener, which forms a tough, protective layer when cured. It is particularly suitable for surfaces that require high resistance to moisture, stains, and wear, making it an ideal choice for cinder block showers.
According to the American Coatings Association, epoxy coatings are known for their exceptional adhesion, hardness, and resistance to a wide range of chemicals and environmental conditions. This combination of properties makes epoxy paint a preferred option in high-humidity areas like bathrooms, especially those constructed with cinder block, which can be porous and prone to mold and mildew if not properly sealed.
Key aspects of applying epoxy paint in cinder block showers include surface preparation, application technique, and curing time. Initially, the cinder block surface must be thoroughly cleaned and any previous coatings or contaminations removed. This often requires power washing and the use of a mild detergent to eliminate soap scum, mildew, and other residues. After cleaning, it is crucial to allow the surface to dry completely before proceeding with the application. The epoxy paint is typically mixed according to the manufacturer’s instructions and applied in thin, even coats to avoid drips and ensure a smooth finish. A roller or brush designed for epoxy paints can be used, and multiple coats may be necessary for optimal durability.
The impacts of using epoxy paint in cinder block showers are significant. By providing a waterproof barrier, epoxy paint helps prevent water penetration that can lead to structural damage or mold growth. Additionally, the high-gloss finish of epoxy not only enhances the aesthetic appeal of the shower but also makes cleaning easier, as the non-porous surface resists staining and allows for quick wipe-downs. According to a report by the National Association of Home Builders, homeowners who invest in durable materials like epoxy for their bathrooms can see increased property value and appeal, especially in humid climates.
Benefits of using the best epoxy paint for cinder block showers include enhanced longevity, reduced maintenance costs, and improved hygiene. Epoxy coatings can last for many years without significant wear, minimizing the need for frequent repainting or repairs. Furthermore, since epoxy is resistant to mold and mildew, it can contribute to a healthier bathroom environment. Best practices for application involve following the manufacturer’s recommendations closely, including temperature and humidity guidelines during application, to ensure optimal curing and adhesion.
Solutions for common issues include using a primer specifically designed for cinder block surfaces to improve adhesion if the blocks are particularly porous. Ensuring adequate ventilation during the curing process is also crucial, as this can help in achieving the desired finish and reducing the time it takes for the coating to cure fully. Finally, maintaining the coated surface by regularly cleaning with non-abrasive cleaners can prolong the life of the epoxy finish.
What Are the Advantages of Using Epoxy Paint in Shower Environments?
The advantages of using epoxy paint in shower environments include durability, moisture resistance, and aesthetic appeal.
- Durability: Epoxy paint is highly resistant to chipping, peeling, and fading, making it an ideal choice for high-moisture areas like showers. This durability ensures that the paint maintains its integrity over time, even with frequent exposure to water and cleaning chemicals.
- Moisture Resistance: One of the standout features of epoxy paint is its excellent moisture resistance, which creates a waterproof barrier. This characteristic prevents water damage to the underlying surfaces, such as cinder block, and helps to inhibit mold and mildew growth, thereby promoting a healthier environment.
- Aesthetic Appeal: Epoxy paint comes in a variety of colors and finishes, allowing for customization to match the overall design of the bathroom. Its glossy finish not only enhances the visual appeal but also makes the surfaces easier to clean, maintaining a fresh and polished look over time.
- Easy Application: Epoxy paint is relatively easy to apply compared to other coatings, often requiring minimal surface preparation. Many products come in user-friendly kits that include everything needed for application, making it accessible for DIY enthusiasts.
- Long-Lasting Finish: Once cured, epoxy paint forms a hard, robust finish that can last for many years without the need for frequent reapplication. This longevity makes it a cost-effective solution for shower environments, as it reduces maintenance efforts and expenses in the long run.
How Can You Maintain Epoxy Painted Surfaces in Cinder Block Showers?
Proper Ventilation: Adequate ventilation reduces humidity levels in the bathroom, which is crucial for preventing mold and mildew growth that can compromise the epoxy finish. Installing exhaust fans or leaving windows open can significantly extend the life of the epoxy by keeping moisture levels in check.
What Are Common Mistakes to Avoid When Using Epoxy Paint on Cinder Blocks?
Common mistakes to avoid when using epoxy paint on cinder blocks include:
- Insufficient Surface Preparation: Failing to properly clean and prepare the cinder block surface can lead to poor adhesion of the epoxy paint. It’s essential to remove any dirt, grease, or existing coatings to ensure the epoxy bonds effectively with the cinder block.
- Skipping the Primer: Not applying a suitable primer before the epoxy can result in uneven finish and peeling over time. Using a primer designed for cinder blocks helps create a smooth surface and improves the overall durability of the paint job.
- Ignoring Temperature and Humidity Conditions: Applying epoxy paint in inappropriate weather conditions can severely affect its curing process. Ideal conditions typically involve temperatures between 60°F to 90°F and low humidity, which allow the paint to cure properly and achieve maximum strength.
- Not Allowing Adequate Curing Time: Rushing the curing process can lead to smudges or an incomplete hardening of the paint. It’s crucial to follow the manufacturer’s recommended drying and curing times to ensure a long-lasting finish.
- Using Low-Quality Epoxy Paint: Opting for cheap or unsuitable epoxy paint can compromise the durability and look of the finish. Choosing high-quality epoxy paint specifically formulated for cinder block surfaces ensures better adhesion, durability, and resistance to moisture.