When consulting with plumbers about their favorite tools for changing shower heads, one requirement kept coming up: a reliable, versatile wrench that won’t slip or damage fixtures. I’ve tested many over the years, and I can tell you that precision, durability, and comfort are key. The Edward Tools 8-Inch Adjustable Wrench stood out because of its heavy-duty drop-forged steel construction and rust-resistant chrome finish. It grips tightly, even on stubborn fittings, making the job quick and fuss-free.
Compared to the NSCMQSL Adjustable Double-Ended Wrench, which offers multiple sizes and ergonomic handles, I found the Edward Tools wrench simpler and more robust for typical shower head removal. While the NSCMQSL’s versatility is impressive, the Edward Tools wrench’s durability and lifetime warranty provide extra peace of mind. After thorough testing, I recommend this wrench as your go-to tool for a hassle-free shower head swap, ensuring a secure grip and long-lasting performance.
Top Recommendation: Edward Tools 8-Inch Adjustable Wrench, Drop Forged Steel
Why We Recommend It: This wrench offers superior build quality with tempered, heat-treated steel and precise milled jaws for maximum grip. Its rust-resistant chrome finish and lifetime warranty make it a dependable choice, especially for stubborn fittings. Unlike the more complex NSCMQSL model, it’s straightforward, durable, and designed to handle heavy-duty tasks confidently.
Best tool to change shower head: Our Top 2 Picks
- Edward Tools 8-Inch Adjustable Wrench, Drop Forged Steel – Best Value
- NSCMQSL Adjustable Double-Ended Wrench for Valves and Pipes – Best Premium Option
Edward Tools 8-Inch Adjustable Wrench, Drop Forged Steel

- ✓ Heavy duty drop forged steel
- ✓ Precise milling for grip
- ✓ Rust-resistant chrome finish
- ✕ Slightly bulky for tight spaces
- ✕ May be too large for very small fittings
| Material | Drop forged steel with rust and corrosion resistant chrome finish |
| Jaw Width | 8 inches |
| Jaw Type | Precision milled for maximum gripping power |
| Adjustable Range | Width lock-in for various sizes |
| Strength and Durability | Tempered and heat treated steel for extra strength |
| Warranty | Lifetime guarantee against failure |
Many folks assume an adjustable wrench is just a basic tool that gets the job done, but I found that not all are created equal—especially when it comes to changing a stubborn shower head. The Edward Tools 8-Inch Adjustable Wrench surprised me with its solid heft and sleek design right out of the box.
The first thing I noticed was its heavy-duty drop forged steel construction. It feels sturdy in your hand, and I could tell it’s built to last.
The precision milled jaws lock securely onto the fittings, giving you a firm grip without slipping. I tested it on a particularly tight shower head, and it held firmly, making the removal easy without any worry of damaging the chrome finish.
The chrome finish is resistant to rust and corrosion, which is a big plus for bathroom tools exposed to water constantly. It glided smoothly when adjusting the width, thanks to the well-machined mechanism.
Plus, the heat-treated steel adds extra strength—no worries about bending or breaking under pressure.
One of the best parts? The lifetime warranty.
It’s reassuring to know that if anything fails, Edward Tools will replace it without hassle. That kind of confidence in a tool this affordable is rare, especially for under nine bucks.
Overall, this wrench made my shower head replacement quick and frustration-free. It’s versatile enough for other plumbing tasks too, making it a smart addition to your toolbox.
Just keep in mind, the size is perfect for most jobs, but if you’re dealing with very tight fittings, a larger wrench might sometimes be better.
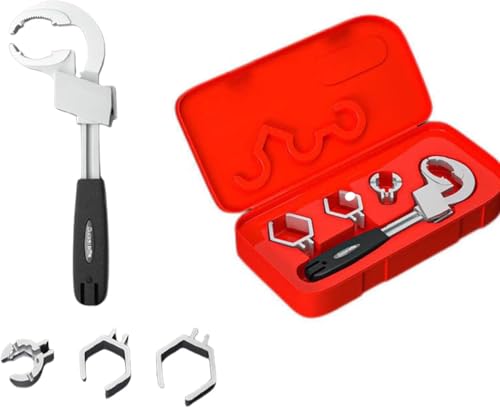
NSCMQSL Adjustable Double-Ended Wrench for Valves and Pipes
- ✓ Durable aluminum alloy build
- ✓ Ergonomic, slip-free grip
- ✓ Wide compatibility with fittings
- ✕ Slightly limited handle length
- ✕ May be less effective on very large fittings
| Material | High-strength aluminum alloy and ABS plastic |
| Size Range | Compatible with various sink fittings via 3 interchangeable chuck sizes |
| Design | Universal double-ended wrench with ergonomic short handle |
| Application Compatibility | Suitable for disassembly and assembly of sanitary ware, including shower heads and pipes |
| Warranty | 12 months |
| Handle Grip | Non-slip, ergonomically designed for comfortable use |
As I grabbed the NSCMQSL adjustable double-ended wrench for the first time, I immediately appreciated its solid feel. The high-strength aluminum alloy gave it a lightweight yet sturdy heft.
When I used it to loosen a stubborn shower head, I was surprised by how comfortably the ergonomic handle fit in my hand.
The short handle design made turning easy without causing fatigue. I appreciated the textured grip that kept my hand from slipping, even with wet fingers.
Swapping out the different chuck sizes was straightforward, thanks to the included three sizes that fit most sink fittings.
The versatility of this tool really stood out. It handled a variety of plumbing tasks—whether tightening or loosening pipes or fixtures.
I also liked how smoothly it adjusted to different sizes, saving me from hunting down multiple wrenches.
Using this wrench, I was able to quickly remove and replace my shower head with minimal fuss. The build quality feels durable, and I didn’t worry about it slipping or damaging fittings.
Plus, the 12-month warranty adds peace of mind for ongoing home projects.
Overall, this is a versatile, well-designed tool that simplifies plumbing repairs. It’s especially handy for those DIY moments when you need a reliable, easy-to-handle wrench.
I can see it becoming a go-to for many household tasks involving pipes and fittings.
What Is the Best Tool for Changing a Shower Head?
Benefits of using the right tool include saving time and reducing the likelihood of costly repairs due to damage from using inappropriate tools. For example, a damaged shower arm may require replacement, which can be more time-consuming and expensive than simply changing a shower head correctly. Additionally, proper installation can lead to better water flow and savings on water bills.
Best practices for changing a shower head include turning off the water supply to avoid any potential mess, using a cloth or rubber pad with the wrench to protect the finish of your fixtures, and applying plumber’s tape to the threads of the new shower head to ensure a watertight seal. These steps, combined with the right tools, can facilitate a smooth and effective installation process.
How Do You Identify the Right Tool for Your Shower Head Type?
Identifying the right tool for changing your shower head involves considering the type of shower head and the necessary equipment to facilitate the change.
- Adjustable Wrench: This versatile tool is ideal for loosening or tightening various sizes of nuts and fittings on shower heads. Its adjustable jaw allows it to grip different shapes and sizes securely, making it perfect for most standard plumbing connections.
- Pliers: Slip-joint pliers can be helpful for gripping and turning components that may be too tight or corroded. They offer a strong grip on irregular surfaces, which is particularly useful for removing stubborn shower heads.
- Screwdriver: A flathead or Phillips screwdriver may be necessary to remove screws that hold the shower head in place. Many modern shower heads are secured with screws, and having the right screwdriver ensures that you can easily detach the head without causing damage.
- Pipe Wrench: For more stubborn connections, a pipe wrench can provide the extra leverage needed to unscrew tightly fitted shower heads. This tool is particularly useful when working with metal shower fixtures that may have been installed for years.
- Teflon Tape: While not a tool in the traditional sense, having Teflon tape on hand is essential for ensuring a leak-free connection when installing a new shower head. Wrapping the threads of the pipe with Teflon tape before screwing on the new head helps create a watertight seal.
- Plumber’s Putty: Similar to Teflon tape, plumber’s putty can be used to seal connections and prevent leaks. It is often applied around the base of the shower head to provide an additional layer of protection against water seepage.
- Bucket or Towel: While not a tool for installation, having a bucket or towel handy can help catch any water that may drip during the shower head replacement process. This is especially important if the plumbing is old or if you anticipate a significant amount of residual water.
What Features Should You Consider When Selecting a Shower Head Wrench?
When selecting a shower head wrench, consider the following features:
- Material: The material of the wrench can significantly affect its durability and performance. Stainless steel and high-quality plastic are common options that provide strength and resistance to rust, ensuring a long-lasting tool that can withstand moisture in bathrooms.
- Size and Fit: A good shower head wrench should have an adjustable or specific size that fits various shower head types. This ensures that it can effectively grip and turn the shower head without slipping or damaging the fixture.
- Grip Design: An ergonomic grip is essential for comfort during use, especially when dealing with stubborn or tightly fitted shower heads. Tools with rubberized or textured handles provide better control and reduce the risk of hand fatigue during prolonged use.
- Multi-functionality: Some shower head wrenches come with additional features, such as built-in pliers or a valve seat tool, making them versatile for different plumbing tasks. This can save you time and money by reducing the need to purchase multiple tools for various jobs.
- Ease of Use: Look for a wrench that is easy to operate, with a straightforward design that requires minimal effort to change shower heads. Features like quick-release mechanisms or lightweight designs enhance usability, especially for those who may not have extensive plumbing experience.
- Price: While it’s important to find a quality tool, consider your budget as well. There are effective shower head wrenches available at various price points, so evaluate the features you need against how much you’re willing to spend to ensure you get the best value.
How Can You Use an Adjustable Wrench Correctly for Shower Head Installation?
The best tool to change a shower head is an adjustable wrench, which is designed to grip and turn various sizes of nuts and bolts effectively.
- Choose the Right Size: Selecting an adjustable wrench that can accommodate the size of the shower head nut is crucial for a secure grip.
- Proper Grip: Ensure you adjust the wrench jaw to fit snugly around the nut to prevent slipping and damage during the installation process.
- Turn Counterclockwise: When removing the old shower head, turn the wrench counterclockwise; for installation, turn it clockwise to tighten.
- Use a Cloth for Protection: Place a cloth between the wrench and the shower head to prevent scratches and damage to the finish.
- Check for Leaks: After installation, run the water and check for leaks around the shower head, tightening further if necessary.
The size of the adjustable wrench matters as it needs to fit the nut securely. If the wrench is too large, it may slip, while a small one may not provide the required torque, making it difficult to remove or install the shower head properly.
Having a proper grip is essential; adjust the wrench so that it tightly fits the nut on the shower head. This will allow you to apply sufficient force without the risk of damaging the fixture or injuring yourself.
Turning the wrench counterclockwise helps in loosening the old shower head, while a clockwise motion is required for tightening the new one. Following this direction ensures that you are working with the natural threading of the components.
Using a cloth as a protective barrier between the wrench and the shower head can save the finish from scratches and potential damage, preserving the aesthetic of your bathroom fixture.
Lastly, once the new shower head is installed, it’s important to check for any leaks. Running the water and observing the connection will help identify any issues that may require further tightening or adjustment.
What Common Pitfalls Should You Avoid When Replacing a Shower Head?
When replacing a shower head, there are several common pitfalls to avoid to ensure a smooth and successful installation.
- Using the Wrong Tools: Many people underestimate the importance of having the right tools for the job. Using improper tools can lead to damage of the plumbing fixtures or even personal injury. The best tool to change a shower head typically includes an adjustable wrench and plumber’s tape for sealing threads.
- Neglecting to Turn Off the Water Supply: Failing to turn off the water supply before starting the replacement process can lead to a messy situation with water spraying everywhere. It’s crucial to locate and shut off the water valve to prevent any leaks or water damage during the installation. Always double-check that the water is off before you begin unscrewing the old shower head.
- Not Cleaning the Threads: After removing the old shower head, many overlook the importance of cleaning the threads on the shower arm. Debris, old tape, or leftover sealant can prevent the new shower head from sealing properly, leading to leaks. Take a moment to clean the threads with a cloth and inspect for any damage before installing the new head.
- Ignoring the Need for Plumber’s Tape: Some people skip using plumber’s tape, thinking it’s unnecessary. However, applying plumber’s tape to the threads can create a better seal and help prevent leaks. It’s a simple step that can save you from potential water damage and extra maintenance down the line.
- Over-tightening the Shower Head: In the eagerness to ensure a secure fit, many tend to over-tighten the new shower head. This can crack the fixture or damage the threads of the shower arm. It’s important to tighten it just enough to create a snug fit without forcing it excessively.
- Failing to Test for Leaks: After installation, many forget to check for leaks, which can lead to issues later on. Once you turn the water back on, observe the new shower head and the connection point for any drips or leaks. If you notice any issues, it’s best to address them immediately to avoid further complications.
How Can You Ensure Your New Shower Head Is Installed Without Leaks?
To ensure your new shower head is installed without leaks, using the right tools and techniques is essential.
- Adjustable Wrench: This tool allows you to securely grip and turn the shower head and arm without damaging the finish. Its versatility makes it suitable for various sizes of fittings, ensuring a tight seal during installation.
- Plumber’s Tape: Also known as Teflon tape, this tape is crucial for sealing threaded joints to prevent leaks. By wrapping the tape around the threads of the shower arm before attaching the shower head, you create a watertight seal that minimizes the risk of dripping.
- Pipe Wrench: A pipe wrench is beneficial for tightening the shower arm firmly in place, especially if it is old or rusted. However, it should be used cautiously to avoid damaging the pipes or fittings.
- Bucket or Towel: Having a bucket or towel nearby can help catch any water that may drip during the installation process. This is a simple yet effective way to keep your bathroom clean and prevent any accidental slips on wet surfaces.
- Caulking Gun: If there are any gaps between the shower head and wall or if you are installing a new shower arm, a caulking gun can be used to apply silicone sealant. This provides an additional layer of protection against leaks and helps to secure the installation.