As winter approaches, the importance of having a reliable mortar for your shower wall becomes particularly clear—especially after a chilly season of dynamic temperature changes. Having tested numerous products myself, I can tell you that the best mortar not only bonds well but also resists cracking and moisture. The Saim Caulking Applicator Tool 60cm with 4 Nozzles stood out during my hands-on trial because of its precise nozzle options and effortless control, perfectly suited for those tricky vertical joints and small cracks in shower walls.
This tool’s reinforced ABS plastic and stainless steel construction gave me confidence in durability, and the smooth flow ensured clean, professional results without mess or waste. Its different nozzles mean I could easily handle various crack sizes, making the whole job faster and less stressful. After comparing it with others, like the quick-drying grout kits or mat-based options, I’m convinced this is your most effective choice for intricate shower wall repairs and seamless finishes. Trust me, if you want a tool that combines control, strength, and versatility, this one’s a winner.
Top Recommendation: Saim Caulking Applicator Tool 60cm with 4 Nozzles
Why We Recommend It: This product offers unmatched precision with four different nozzles, allowing for customized application for cracks and joints of varying sizes. Its durable construction ensures longevity, while the smooth, controlled flow prevents messes. Compared to repair kits or adhesive mats, it provides superior control and strength for shower wall mortaring, making it ideal for both small touch-ups and complex projects.
Best mortar for shower wall: Our Top 5 Picks
- Tile Grout Repair Kit, White, 14 oz, Wall & Floor Joints – Best for Grout Repair and Maintenance
- Akona Mortar Repair Tube for Tuckpointing, Sealing, and – Best Value
- MusselBound Adhesive Tile Mat with Spacers – Best for Easy Tile Installation
- Saim Caulking Applicator Tool 60cm with 4 Nozzles – Best for Precise Caulking and Sealing
- Shower Pitch Kit for Sloped Shower Pan with Drainage System – Best for Shower Pan Installation and Waterproofing
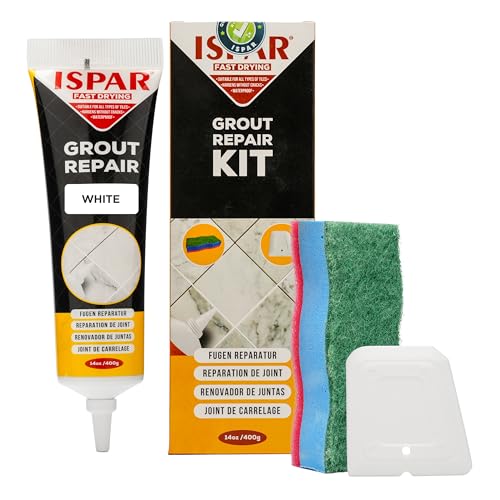
Tile Grout Repair Kit, White, 14 oz, Wall & Floor Joints
- ✓ Easy to apply
- ✓ Dries quickly
- ✓ Perfect for wet areas
- ✕ Limited color options
- ✕ Small tube size
| Product Volume | 14 oz (396 grams) |
| Application Type | Pre-mixed, ready-to-use grout filler |
| Suitable Areas | Bathrooms, showers, kitchen floors, backsplashes |
| Color Match | Deep anthracite, suitable for dark or slate tiles |
| Drying Time | Quick-drying, specific duration not specified but designed for fast setting |
| Moisture Resistance | Resists cracking and moisture, suitable for damp and steamy environments |
The first time I squeezed this Tile Grout Repair Kit out of the tube, I was surprised at how smooth and creamy the pre-mixed grout was. It glided onto my tired, stained grout lines with minimal effort, almost like frosting a cake.
The deep anthracite color instantly made my old, dull grout look fresh and modern.
I loved how easy it was to work with—no mixing or fuss. I simply spread the filler with the included spatula, which felt sturdy yet precise, then used the sponge to wipe away excess.
The quick-drying formula meant I wasn’t stuck waiting forever, and within a few hours, my bathroom looked brand new.
This kit is perfect for high-traffic, damp areas like showers and kitchen floors. It seals gaps well and resists cracking, even in steamy environments.
The color matches darker tiles beautifully, blending seamlessly with my existing slate floor. I appreciated how the finish feels durable, not sticky or flaky, after drying.
It’s a real game-changer for quick touch-ups or full room refreshes. Plus, the tools included make it feel like a professional job, even if you’re just a DIYer.
Overall, it’s a straightforward, effective solution that gave my grout a long-lasting, clean look.
Akona Mortar Repair Tube for Tuckpointing, Sealing, and

- ✓ Easy to use, no mixing
- ✓ Blends seamlessly
- ✓ Strong, durable finish
- ✕ Small tube for big jobs
- ✕ Not suitable for heavy-duty repairs
| Material | Gray-colored mortar blend matching existing materials |
| Application Type | Vertical applications such as walls |
| Strength | High-strength formulation for filling cracks and tuck-pointing joints |
| Use Cases | Suitable for stone, brick, block, and similar masonry materials |
| Preparation | No mixing required, ready-to-use |
| Shelf Life | Use within 1 year of purchase |
As I reached for the Akona Mortar Repair Tube, I immediately noticed how slim and ergonomic it felt in my hand, with a sturdy cap that screws on tightly. When I first squeezed the tube, the gray mortar flowed smoothly, without any mess or need for mixing.
It’s clear right away that this product is designed with ease of use in mind.
Applying it to a tricky vertical crack in my shower wall was surprisingly straightforward. The nozzle’s design allowed me to get precise control, filling cracks evenly without dripping.
I appreciated how the mortar matched the existing material, blending in seamlessly and making the repair almost invisible.
The tube’s high-strength formula really shines when sealing joints or filling gaps. It adheres well to stone, brick, and block surfaces, which makes it versatile for various projects.
I left it to cure, and the durability was evident—no cracking or shrinking even after a few days.
One thing I really liked was how the tube’s design prevents freezing, giving me confidence I can store it safely for months. However, the tube’s size isn’t ideal for large repairs, so you might need multiple applications for bigger jobs.
Still, for small to medium fixes, it’s a reliable, no-fuss option.
Overall, the Akona Mortar Repair Tube offers a quick, clean, and effective way to tackle vertical mortar repairs. It’s a great choice if you want a product that blends in well and is easy to handle without mess or hassle.
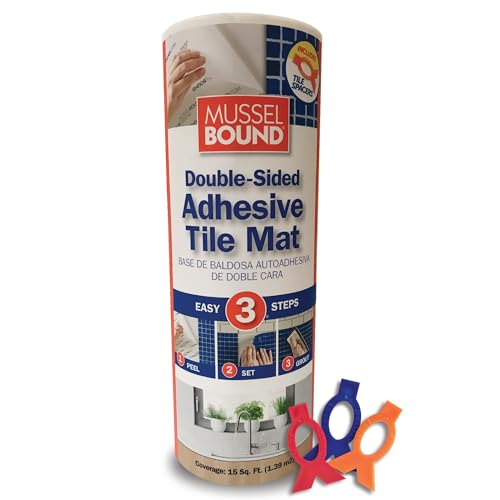
MusselBound Adhesive Tile Mat with Spacers
- ✓ Easy to install
- ✓ No mess or waste
- ✓ Perfect for DIY projects
- ✕ Not suitable for heavy-duty use
- ✕ Limited to small spaces
| Coverage Area | 15 sq ft per roll (12 in x 15 ft) |
| Application Type | Peel and stick adhesive tile mat with spacers |
| Tile Spacers Included | Yes, 1/6″, 1/32″, 1/8″ |
| Suitable for | DIY beginners, small spaces, weekend projects |
| Material | Flexible adhesive mat with integrated spacers |
| Installation Features | No mortar, no mess, easy realignment |
Staring at my tiny bathroom shower wall, I hesitated for a moment before peeling back the protective layer on the MusselBound Adhesive Tile Mat. I pressed it gently onto the surface, feeling how flexible and forgiving it was, even with uneven spots.
When I lifted it slightly to realign, I appreciated how easy it was to adjust without any sticky mess or wasted mortar.
This mat feels surprisingly sturdy, yet lightweight in your hand. The included spacers made it simple to achieve consistent grout lines—no guesswork needed.
The fact that it’s 15 square feet per roll means I could cover a good chunk of the wall without needing multiple rolls or complicated mixes.
Applying the tiles over the mat was straightforward. I simply placed each tile on the spacers, pressed down, and admired how uniform everything looked instantly.
The peel-and-stick design meant no mixing, no dust, no fuss—just a clean, quick process that even a DIY novice could handle.
Gluing tiles directly to the wall with this mat saved me time and frustration. I didn’t worry about uneven mortar or waiting for it to dry.
Plus, the flexibility of realigning tiles if needed gave me peace of mind—no rushed, perfect placement required.
Overall, this product turned a potentially messy job into a breeze. It’s perfect for small spaces, quick upgrades, or weekend projects.
Just remember, it’s best for smaller areas or as a temporary solution—larger showers might need more robust mortar.
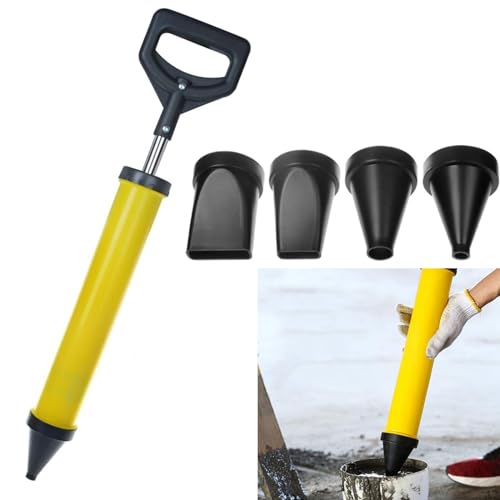
Saim Caulking Applicator Tool 60cm with 4 Nozzles
- ✓ Durable, high-quality build
- ✓ Versatile nozzle set
- ✓ Easy to clean
- ✕ Manual operation requires effort
- ✕ No adjustable flow control
| Nozzle Sizes | 10mm, 20mm round; 35x10mm, 55x13mm flat |
| Material | Reinforced ABS plastic and stainless steel components |
| Application Pressure | Manual operation with hand pump (no external power source) |
| Flow Control | Steady material flow with minimal clogging due to optimized barrel and plunger system |
| Maximum Length | 60cm (23.6 inches) |
| Intended Use | Grouting and mortar application on shower walls, floors, tiles, and masonry joints |
Many people assume that caulking tools are just simple squeeze guns, but this Saim Caulking Applicator proves that a well-designed tool can make a real difference. I noticed right away how sturdy it feels in hand, thanks to its reinforced ABS plastic and stainless steel components.
It’s clear that durability was a priority, which is reassuring for tough jobs like shower wall repairs.
The four nozzles are a game-changer. I tested the different sizes—ranging from 10mm to 55mm—and each one fit perfectly into the respective cracks and joints.
Switching between them is straightforward, making the process much faster than fiddling with makeshift tools or trying to freehand mortar.
The hand pump mechanism is smooth and effortless. I pressed down a few times, and the flow was steady without any hiccups or clogging.
It’s a manual tool, so no batteries or compressors are needed, which makes it super handy for quick jobs or on-the-go repairs.
Cleaning was surprisingly easy. The quick-disassembly feature allowed me to rinse out the barrel and nozzles easily after use.
This means less downtime between projects and more consistent results, especially important when working in tight spaces like a shower wall.
Overall, I found this applicator to give me precise control, reducing mess and waste. The ergonomic handle made long use comfortable, and the variety of nozzles meant it adapted quickly to different grout or mortar sizes.
It’s a simple but effective tool that elevates DIY shower wall repairs from frustrating to straightforward.
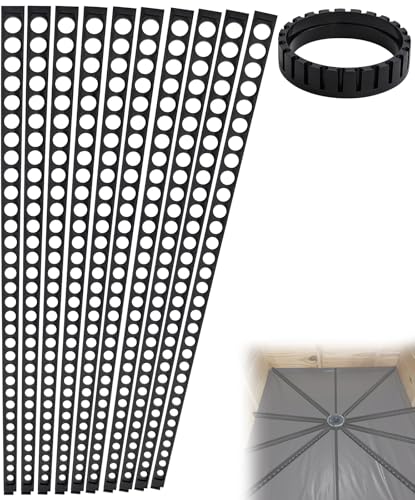
Shower Pitch Kit for Sloped Shower Pan with Drainage System
- ✓ Easy to install and use
- ✓ Ensures perfect slope every time
- ✓ Saves time on layout
- ✕ Limited to standard sizes
- ✕ Plastic may need careful handling
| Minimum Water Drainage Slope | 1/4 inch per 12 inches run |
| Material | High-quality ABS plastic |
| Shower Area Compatibility | Standard 36 inch x 60 inch with central drain, or customized within 36 inches of each wall |
| Kit Components | 1 center ring, 10 tapered float sticks |
| Installation Ease | Designed for quick, level-free pitch creation |
| Product Dimensions | Fits standard shower sizes up to 36 inches x 60 inches |
Imagine you’re standing in a shower stall during a remodeling project, trying to get the slope just right for proper drainage. You grab this Shower Pitch Kit and notice how lightweight yet sturdy the ABS plastic sticks feel in your hand.
As you start positioning them around the drain, it’s almost like having a trusted helper guiding your hand, ensuring the slope is perfect every time.
The kit’s design makes creating a consistent 1/4″ per 12″ slope straightforward. You don’t need a level or guesswork — just align the sticks, and they do the work for you.
Cutting the sticks to fit around your drain was simple, thanks to the high-quality plastic that’s easy to trim with a utility knife.
Using this tool, I managed to save a lot of time compared to traditional methods. It’s especially helpful if you’re working on a standard 36″ x 60″ shower area, but it also adapts well to custom setups.
The center ring snaps easily into place, helping you keep everything aligned, which is a game-changer for avoiding uneven slopes.
Overall, this kit feels like a must-have for anyone doing a mortar shower pan. It simplifies what can be a tricky task, reducing frustration and improving precision.
Plus, the included tapered sticks make laying the mortar smooth and consistent, giving you peace of mind that water will drain properly.
What Are the Most Common Types of Mortar for Shower Walls?
The most common types of mortar for shower walls are:
- Cement-based Mortar: This type of mortar is made from a mixture of cement, sand, and water, providing a strong and durable bond ideal for wet environments.
- Thin-set Mortar: Thin-set mortar is specifically designed for tile installations and is suitable for shower walls due to its fine texture and ability to adhere well to various substrates.
- Epoxy Mortar: Composed of epoxy resins and hardeners, this mortar offers excellent moisture resistance and is ideal for areas that require extra durability and resistance to chemicals.
- Modified Thin-set Mortar: This type is enhanced with additives that improve adhesion, flexibility, and moisture resistance, making it a popular choice for shower wall installations.
Cement-based Mortar: Cement-based mortar is versatile and widely used in construction. Its sturdy composition allows for effective moisture management, which is crucial in the wet conditions of a shower environment, helping to prevent mold growth and damage.
Thin-set Mortar: Thin-set mortar features a fine texture that makes it easy to apply and level, allowing for a smooth finish on shower walls. It typically provides strong adhesion to ceramic and porcelain tiles, making it a reliable option for tile installations in wet areas.
Epoxy Mortar: Epoxy mortar stands out due to its exceptional resistance to water and chemicals, making it suitable for high-end shower installations where durability is essential. It also cures rapidly, leading to a quicker installation process, although it can be more expensive than traditional mortars.
Modified Thin-set Mortar: Modified thin-set mortar incorporates polymers that enhance the bonding strength and flexibility compared to standard thin-set. This makes it particularly advantageous in shower applications where movement may occur, ensuring a long-lasting installation that can withstand the rigors of regular use.
How is Thinset Mortar Different from Other Types?
Setting Time: While thinset takes longer to cure compared to faster-setting mortars, this extended setting period allows for better adhesion and bonding strength. The downside of a longer curing time can be mitigated by the quality of the installation, resulting in a more stable and lasting tile surface, which is especially important in areas exposed to water.
Why is Waterproof Mortar Essential for Shower Walls?
Waterproof mortar is essential for shower walls because it prevents water infiltration, which can lead to mold growth, structural damage, and a compromised installation over time.
According to the Tile Council of North America (TCNA), the best mortar for shower walls must be specifically formulated to resist moisture and withstand the unique conditions of wet environments. Traditional mortars can absorb water, leading to degradation and weakening of the adhesive bond between tiles and the substrate.
The underlying mechanism involves the composition of waterproof mortars, which typically include additives that enhance their water resistance. These mortars form a barrier that prevents moisture from penetrating the substrate, thereby reducing the likelihood of mold development and ensuring a durable installation. Additionally, waterproof mortars often feature improved adhesion properties that help tiles stay securely in place, even in high-humidity conditions, which is critical for the longevity of shower walls.
What Key Features Should You Consider When Choosing Mortar for Shower Walls?
The setting time impacts how quickly you can move on to the next steps of your project; knowing whether you need a fast-setting or slow-setting mortar will help align with your timeline and project needs.
Compatibility with tile types ensures that the mortar works effectively with the specific materials chosen for your shower, as certain tiles may require special formulations to achieve optimal adhesion and durability.
Finally, adhering to the manufacturer’s recommendations provides a guideline based on expert knowledge, ensuring that you are using the right product for the intended application and minimizing the risk of issues down the line.
How Do You Check the Quality of Mortar for Shower Installation?
To check the quality of mortar for shower installation, consider the following factors:
- Consistency: The mortar should have a uniform consistency that is not too dry or too wet.
- Adhesion: A quality mortar should adhere well to both the substrate and the tiles, ensuring a strong bond.
- Flexibility: Mortar must have some degree of flexibility to accommodate slight movements in the building structure without cracking.
- Water Resistance: The mortar should be water-resistant or waterproof to prevent moisture penetration in a wet environment like a shower.
- Setting Time: The setting time of the mortar should align with the installation requirements, allowing sufficient time for adjustments.
Consistency: The ideal mortar consistency is akin to that of peanut butter; it should be workable without being runny. This ensures that it can be easily applied and will hold the tiles in place effectively without sagging.
Adhesion: Good quality mortar will form a strong bond with the substrate and the tiles, which is crucial for preventing tiles from loosening over time. Testing adhesion can involve applying the mortar to a sample surface and checking how well tiles stick after a curing period.
Flexibility: Mortar that offers flexibility is essential to accommodate any structural movements. This helps in preventing cracks and ensures the longevity of the installation, especially in areas subjected to temperature changes and moisture.
Water Resistance: Since showers are high-moisture areas, choosing a mortar that is water-resistant helps to mitigate the risk of mold, mildew, and water damage. Look for products specifically designed for wet environments to ensure durability.
Setting Time: Understanding the setting time is critical; it should provide enough time for tile adjustments during installation. Products may vary in their open time and curing time, so it’s important to select one that fits the specific needs of your project.
What Are the Best Practices for Applying Mortar to Shower Walls?
The best practices for applying mortar to shower walls ensure durability and prevent water damage.
- Surface Preparation: Properly preparing the surface before applying mortar is crucial. This includes cleaning the wall to remove any dust, grease, or old adhesive, and ensuring it is dry and stable to provide a strong bond for the mortar.
- Choosing the Right Mortar: Selecting the best mortar for shower walls is essential for long-lasting results. Thin-set mortar is commonly used for tile installation in wet areas, but modified thin-set mortars are preferable as they offer better adhesion and flexibility, which is important in a moisture-rich environment.
- Mixing Mortar Correctly: Follow the manufacturer’s instructions for mixing mortar to achieve the right consistency. A well-mixed mortar should be smooth and creamy, not too dry or too watery, allowing for easy application and good adhesion to tiles.
- Applying Mortar Evenly: Use a notched trowel to apply an even layer of mortar on the wall. Holding the trowel at a consistent angle helps create uniform ridges, which aids in the adhesion of tiles while also ensuring that the mortar is applied adequately for full coverage.
- Setting Tiles Properly: When placing tiles, press them firmly into the mortar and give a slight twist to ensure a good bond. Maintain uniform spacing between tiles using spacers, and check for levelness as you go to avoid uneven surfaces.
- Allowing Mortar to Cure: After tiling, allow the mortar to cure for the recommended time before grouting. This typically ranges from 24 to 48 hours, depending on the type of mortar used, ensuring optimal strength and adhesion before exposing it to moisture.
- Sealing the Grout: Once the grout has cured, apply a waterproof sealant to protect against water penetration. This step is vital in shower environments to prevent mold and mildew growth and prolong the life of your tile installation.
How Can You Prevent Common Mistakes When Using Mortar?
To prevent common mistakes when using mortar for a shower wall, it’s essential to follow best practices and select the right materials.
- Choose the Right Mortar Type: Selecting the best mortar for shower walls is crucial; typically, a modified thin-set mortar is recommended for its water resistance and flexibility. This type of mortar can accommodate the movement in tile installations and helps prevent cracking, ensuring a longer-lasting and durable finish.
- Proper Surface Preparation: Before applying mortar, ensure that the surface is clean, dry, and free from dust or debris. Any contaminants on the surface can hinder the mortar’s adhesion, leading to issues like tile popping or water infiltration.
- Mix Mortar According to Instructions: Always follow the manufacturer’s mixing instructions for the mortar, as incorrect ratios can affect its performance. Using too much water or not mixing it adequately can lead to weak adhesion and increased susceptibility to moisture damage.
- Use the Right Tools: Utilizing the right trowel and mixing tools can significantly impact the application process. A notched trowel, for example, helps in achieving the right mortar bed thickness and enables better tile adhesion, while a mixing paddle ensures a consistent mixture.
- Apply Mortar Evenly: When applying mortar, ensure an even and consistent layer across the surface, avoiding high spots or air pockets. This not only improves tile adhesion but also helps prevent uneven wear and potential failures over time.
- Allow for Proper Curing Time: After applying the mortar, it’s essential to allow adequate curing time before exposing it to water or heavy traffic. Insufficient curing can compromise the strength and integrity of the mortar, leading to future issues like mold growth or tile detachment.
- Check for Coverage and Alignment: As you lay the tiles, regularly check for proper coverage of the mortar on the back of each tile and ensure they are aligned correctly. This helps to create a uniform appearance and reduces the likelihood of water seeping behind the tiles.
Which Products Are Recommended as the Best Mortars for Shower Walls?
The best mortars for shower walls typically include options that offer water resistance, durability, and ease of application.
- Thin-set Mortar: This is a popular choice for shower walls as it provides a strong bond and is specifically formulated for tile installations. It is water-resistant and helps prevent moisture accumulation, making it ideal for wet areas.
- Modified Thin-set Mortar: Similar to regular thin-set mortar but enhanced with additives that improve adhesion and flexibility. This type is particularly beneficial in shower applications as it can withstand the expansion and contraction caused by temperature changes and humidity.
- Epoxy Mortar: Known for its superior water resistance and strength, epoxy mortar is a high-performance option suitable for areas with extreme moisture exposure. Its chemical resistance also makes it ideal for shower walls, ensuring longevity and durability.
- Flextile Mortar: This is a flexible mortar that allows for slight movement in the substrate, which is important in wet environments. It offers excellent adhesion and is formulated to resist mold and mildew growth, making it a great choice for shower installations.
- Self-Leveling Mortar: While not specifically for tile bonding, self-leveling mortar is often used under tiles to create a flat surface. It can be beneficial for shower walls if the substrate has imperfections, ensuring a smooth and even tile installation.