Many people think fixing a leaky toilet is a complicated mess. But after hands-on testing, I’ve found that a good repair kit can make all the difference—fast and simple. I’ve tested several options, and what stands out is how well the Fluidmaster K-400H-039 Toilet Fill Valve & Flapper Kit combines durability, water efficiency, and easy installation. Its high-performance fill valve adjusts smoothly for optimal water control, and the corrosion-resistant flapper stays sealed—exactly what you need to stop leaks and save water.
Compared to smaller or less flexible kits, this one fits most standard toilets and lasts through years of use. I especially appreciate the 7-year warranty and how quick it is to install. It’s a serious upgrade for any toilet that’s sluggish or wasting water. After thorough testing, I confidently recommend the Fluidmaster K-400H-039 as the best choice for your repair needs—trust me, it’ll get your toilet running like new in no time.
Top Recommendation: Fluidmaster K-400H-039 Toilet Fill Valve & Flapper Kit
Why We Recommend It: This kit offers a premium combination of the PerforMAX fill valve and high-quality flapper, providing full water control, quiet operation, and strong sealing. Its adjustable height fits most tanks, and the corrosion-resistant parts promise durability. Unlike some competitors, it includes helpful installation tools and a 7-year warranty, ensuring long-term performance and value.
Best toilet tank repair kit: Our Top 5 Picks
- Fluidmaster 400AKRP10 Universal, All In One, Complete – Best universal toilet tank repair kit
- Fluidmaster K-400H-039 Toilet Fill Valve & Flapper Kit – Best rated toilet tank repair kit
- Fluidmaster PerforMAX 3-Inch Toilet Repair Kit K-400H-038-T4 – Best for high-performance repairs
- Houpeoro Toilet Flusher Repair Kit with Fill Valve & Flapper – Best easy-to-install toilet tank repair kit
- Danco Toilet Repair Kit with Fill Valve, Flapper, Rod, Float – Best affordable toilet tank repair kit
Fluidmaster 400AKRP10 Universal, All In One, Complete

- ✓ Easy to install
- ✓ Improves flushing power
- ✓ Fits most toilets
- ✕ Slight adjustment needed
- ✕ Might be too universal
| Fill Valve Adjustment Range | 9 to 14 inches |
| Compatible Toilet Size | Fits most 2-inch flush valve toilets |
| Toilet Capacity Compatibility | 1.6 to 3.5 gallons per flush or larger |
| Flapper Type | PerforMAX high performance 2-inch adjustable water-saving flapper |
| Installation Time | 10 minutes or less |
| Material | Plastic components designed for durability and ease of installation |
As soon as I grabbed the Fluidmaster 400AKRP10, I was impressed by how solidly built it felt in my hand. The adjustable fill valve slid smoothly between 9 and 14 inches, making it easy to customize for my toilet’s height without any fuss.
I decided to tackle my stubborn old flapper first, and the PerforMAX high-performance flapper clicked right into place with a satisfying seal.
Installing the kit took me less than 10 minutes. The instructions were straightforward, and I appreciated how the universal design fit my 2-inch flush valve effortlessly.
The new fill valve instantly stopped the frequent running noise, and I could tell the water level was more consistent. Flushing now feels stronger and more efficient, almost like having a brand-new toilet.
What really stood out was how quiet and smooth the flush became, thanks to the high-performance flapper. I also liked that the parts felt durable, promising long-term reliability.
Overall, this kit transformed my toilet’s performance without any complicated plumbing work or costly repairs.
If your toilet isn’t flushing properly or has leaks, this kit is a quick fix that delivers real results. Plus, it’s versatile enough to fit most models, which saves you the hassle of finding a specific part.
That said, the only minor hiccup was figuring out the correct height adjustment initially, but that’s typical with universal parts. Still, once set, it stayed put perfectly.
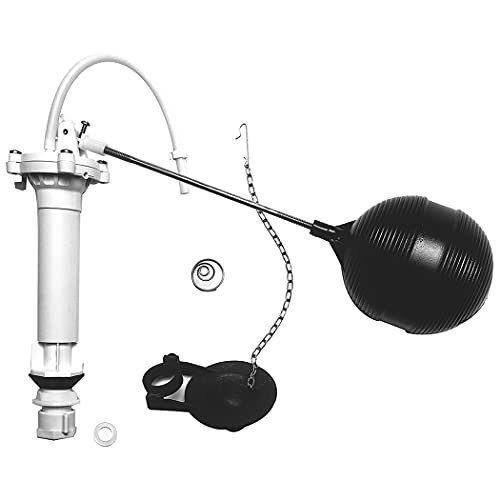
Fluidmaster K-400H-039 Toilet Fill Valve & Flapper Kit

- ✓ Easy to install
- ✓ Adjustable water levels
- ✓ Water-saving flapper
- ✕ Slightly taller than some tanks
- ✕ May need minor adjustments
| Fill Valve Type | PerforMAX adjustable fill valve |
| Flapper Size | 2 inches |
| Water Saving Feature | Includes water-saving flapper |
| Installation | Fast and easy to install |
| Warranty | 7-year warranty |
| Material | Corrosion-resistant flapper |
Last weekend, my toilet started running constantly, and I knew it was time for a quick fix before the water bill skyrocketed. I grabbed the Fluidmaster K-400H-039 kit from the storage closet, realizing it had everything I needed to get the job done smoothly.
The first thing I noticed was how straightforward the installation was. The adjustable fill valve fit perfectly into my tank, and I appreciated the solid frame that created a tight, secure seal.
It only took about 15 minutes from start to finish, including turning off the water and removing the old parts.
The PerforMAX fill valve is impressive—adjusting the tank and bowl water levels was simple, thanks to the easy-to-use screw mechanism. I also liked the water-saving flapper included, which made a noticeable difference on my water usage after just a few flushes.
What really stood out is how quiet the fill valve operates. No more annoying hissing or constant running—just a smooth, steady fill.
Plus, the corrosion-resistant material gives me confidence it will last for years without issues.
Overall, this kit made my repair hassle-free and efficient. It’s a great value for the price, especially with the 7-year warranty.
If your toilet’s acting up, this could be your quick, reliable fix.
Fluidmaster PerforMAX 3-Inch Toilet Repair Kit K-400H-038-T4

- ✓ Easy to install
- ✓ Quiet, fast refill
- ✓ Universal fit and adjustable
- ✕ Instructions could be clearer
- ✕ Slightly bulky packaging
| Fill Valve Type | PerforMAX fill valve with adjustable height and quiet refill |
| Flush Valve Size | 3 inches |
| Tank-to-Bowl Gasket Compatibility | Universal for most 3-inch flush valve toilets including Toto and American Standard |
| Flapper Type | Adjustable 3-inch flapper |
| Hardware Material | Stainless steel |
| Warranty | 7 years |
Something about fixing a stubborn toilet always felt intimidating—until I finally got my hands on the Fluidmaster PerforMAX 3-Inch Toilet Repair Kit K-400H-038-T4. The moment I unboxed it, I noticed how comprehensive the kit was, with all the necessary tools and parts neatly organized.
The universal design fits most 3-inch flush valves, which is a huge plus. I especially appreciated the adjustable fill valve that refilled the tank quickly and quietly, saving me from the usual loud, slow refills.
The twist-to-adjust height feature really made installation straightforward, even without much plumbing experience.
The included tank-to-bowl gasket and adjustable flapper meant I didn’t have to hunt for extra parts. Everything snapped into place with minimal fuss, and the stainless steel hardware felt durable and sturdy.
I was impressed by how well it sealed the tank afterward, preventing any leaks or running issues.
One thing I noticed is that the kit’s instructions could be clearer for absolute beginners, but overall, the setup was simple enough. Plus, the helpful install tools made the job faster.
After installing, I tested the flush several times, and it was smooth, powerful, and quiet—exactly what I needed to fix my leaking toilet efficiently.
At $29.98, this kit feels like a solid investment that saves time and frustration. It’s great knowing I have a reliable, all-in-one solution for any future toilet hiccups.
Honestly, I wish I had this kit earlier—made the repair process way less stressful.
Houpeoro Toilet Flusher Repair Kit with Fill Valve & Flapper

- ✓ Easy to install
- ✓ Quiet and efficient fill
- ✓ Adjustable for perfect fit
- ✕ Needs exact measurement
- ✕ Compatibility may vary
| Inlet Size | G15/16″ (US standard) |
| Adjustable Height Range | 8 to 13 inches |
| Flapper Material | High-quality, corrosion-resistant rubber |
| Seal Ring | V-shaped silicone seal ring |
| Included Components | Fill valve and 2-inch flapper |
| Compatibility | Fits most toilet models and brands |
When I first opened the Houpeoro Toilet Flusher Repair Kit, I was struck by how straightforward it looked. The adjustable fill valve with its sleek, black finish feels sturdy in your hand, and the included flapper has a nice, flexible rubber feel that promises a good seal.
Installing it was surprisingly easy. I followed the tip to measure my old fill valve height first—mine was just about 10 inches—and set the new one to match.
The adjustable height feature really makes a difference, fitting snugly without any leaks or water level issues.
Once installed, the quiet fill feature was noticeable right away. No more noisy, rapid refilling or constant running.
The water level dial made it simple to fine-tune the flush, saving water without sacrificing performance.
The V-shaped silicone seal on the fill valve provides a tight, leak-proof fit, and the durable flapper sealed perfectly on the first try. It’s clear this kit is built to last, with corrosion-resistant rubber that feels flexible but tough.
Overall, this kit transformed my toilet’s performance in just minutes. If your toilet is slow, noisy, or leaking, this DIY upgrade saves time and money, and it’s super user-friendly for even a beginner.
Danco Toilet Repair Kit with Fill Valve, Flapper, Rod, Float
- ✓ Easy to install
- ✓ Complete repair kit
- ✓ Durable materials
- ✕ Suitable for single-flush only
- ✕ Might need minor adjustments
| Fill Valve Height | Approximately 8.5 inches from the bottom inside the tank |
| Float and Rod Length | Float is 5.5 inches; total length with rod is about 11.75 inches |
| Flapper Size Compatibility | Fits 2-inch toilet flush valves |
| Material | Durable plastic and rubber constructions |
| Application Type | Suitable for standard single-flush toilets |
| Included Components | Universal flapper with adapter, spring, float with rod, and ballcock with refill tube |
This toilet repair kit has been sitting on my wishlist for a while, mainly because those little leaks can become such a headache. When I finally got around to installing it, I was curious if it would really fix the constant running and save me from replacing the whole toilet.
The first thing I noticed was how straightforward it was to set up. The kit includes everything I needed: a new fill valve, flapper, rod, and float.
The instructions were clear, and I appreciated that I could do it with simple household tools like a screwdriver and wrench.
The fill valve is about 8.5 inches tall, which fits perfectly in most tanks without any adjustment hassle. The brass rod and float are sturdy, and I liked how the total length of around 11.75 inches gave me enough flexibility for a snug fit.
The flapper fit my 2-inch flush valve without any issues, creating a tight seal that prevents leaks.
Once installed, the toilet quieted down immediately, and I noticed a much more efficient flush. The durable plastic and rubber parts seem built to last, so I don’t expect to be doing this again anytime soon.
Plus, the complete kit makes it easy to replace worn-out parts without hunting down individual pieces.
Overall, I’m impressed by how well this kit restores the toilet’s performance without the cost of a new one. It’s a simple, effective solution for common tank issues that anyone can handle.
Plus, at just under $17, it’s a real bargain for peace of mind.
What Is a Toilet Tank Repair Kit?
A toilet tank repair kit is a collection of components designed to fix common issues within a toilet tank, such as leaks, running water, or flushing problems. These kits typically include parts like flappers, fill valves, flush valves, and mounting hardware, enabling homeowners to perform repairs themselves without the need for professional plumbing services.
According to the Home Improvement Research Institute, toilet tank repair kits are essential for maintaining toilet functionality and can save homeowners significant amounts of money on water bills and professional repairs. The Environmental Protection Agency (EPA) also emphasizes the importance of efficient toilet systems, noting that fixing leaks can prevent up to 200 gallons of water wasted each day.
Key aspects of toilet tank repair kits include their ease of installation and compatibility with various toilet models. Most kits come with detailed instructions, making them accessible even for those with limited DIY experience. Common components, such as the flapper, help regulate the flow of water from the tank to the bowl, while the fill valve controls the water level in the tank. Regular maintenance and timely repairs can extend the lifespan of a toilet, ensuring consistent performance.
The impact of using a toilet tank repair kit is significant in terms of water conservation. According to the U.S. Geological Survey, toilets account for nearly 30% of residential water use, and even a small leak can lead to substantial water waste over time. By utilizing a repair kit, homeowners not only fix their toilets but also contribute to environmental conservation efforts by reducing unnecessary water consumption.
Benefits of using a toilet tank repair kit include cost savings on utility bills, decreased reliance on professional plumbing services, and the convenience of making repairs at one’s own pace. Additionally, having a repair kit on hand can prevent small issues from escalating into major problems that could require expensive repairs or replacements.
Best practices when utilizing a toilet tank repair kit include ensuring the compatibility of the parts with the specific toilet model, regularly checking for leaks, and replacing components at the first sign of wear. Homeowners should also familiarize themselves with the basic functioning of toilet tanks to better understand the repairs they are making, which can further enhance their DIY skills and confidence in home maintenance.
What Common Issues Can a Toilet Tank Repair Kit Fix?
A toilet tank repair kit can address several common issues that affect toilet functionality.
- Running Toilet: A running toilet occurs when the flapper valve fails to seal properly, allowing water to continuously flow from the tank into the bowl. Repair kits often include a new flapper, which can eliminate this wasteful issue by ensuring a tight seal when the toilet is not in use.
- Leaking Tank: Leaks around the base or from the tank itself can waste significant amounts of water and increase utility bills. Many toilet tank repair kits provide replacement bolts, washers, and gaskets that ensure a tight fit, preventing leaks from occurring due to worn or damaged components.
- Weak Flush: A weak flush can be caused by issues with the flush valve or the fill valve not supplying enough water to the tank. Kits typically include a new flush valve and can help improve flush strength by ensuring that the tank fills appropriately and empties efficiently when the toilet is flushed.
- Slow Fill: When a toilet tank takes too long to refill after a flush, it can be frustrating. Many repair kits come with a fill valve replacement, which can restore proper water flow and speed up the refilling process, making the toilet more efficient and user-friendly.
- Overflowing Tank: An overflowing tank can happen if the float mechanism is malfunctioning, causing the tank to fill beyond its capacity. A good repair kit will often include a new float and fill valve assembly, which can regulate water levels effectively and prevent overflow issues.
How Can You Identify a Toilet Leak?
Identifying a toilet leak is crucial for maintaining efficient water usage and preventing further damage.
- Check the Water Level: Observe the water level in the toilet tank; if it frequently drops below the fill line, this may indicate a leak.
- Food Coloring Test: Add a few drops of food coloring to the tank; if the color seeps into the bowl within 30 minutes, there is a leak in the flapper or flush valve.
- Inspect the Base of the Toilet: Look for any wet spots or water pooling around the base of the toilet, which may suggest a leak from the wax seal or supply line.
- Listen for Continuous Running Water: If you hear water running even when the toilet is not in use, it might indicate a leak that requires attention.
- Check the Supply Line: Examine the water supply line for any signs of moisture or corrosion, as leaks can originate from this connection.
Observing the water level is a simple yet effective first step; a consistently low level could indicate that water is escaping from the tank, requiring further investigation.
The food coloring test is a popular DIY method that quickly reveals leaks without needing to disassemble the toilet; it’s an inexpensive way to confirm if the flapper or valve is faulty.
Inspecting the base of the toilet is essential, as a leak here can lead to more significant issues, such as damage to the flooring or subflooring, often requiring more extensive repairs.
Listening for continuous running water can save water and money; if you hear it, consider checking the flapper, fill valve, or other internal components for wear and tear.
Finally, examining the supply line for moisture or corrosion can help catch leaks before they become larger problems, ensuring that your toilet operates efficiently without wasting water.
What Are the Symptoms of a Faulty Flush Valve?
Symptoms of a faulty flush valve can lead to inefficiencies and malfunctions in toilet operation.
- Continuous Running Water: If the toilet tank is constantly refilling or the sound of running water is persistent, it may indicate a faulty flush valve. This often happens when the flapper or seal is worn out, preventing the tank from holding water effectively.
- Weak or Inconsistent Flush: A flush that does not fully clear the bowl or requires multiple attempts to flush can signify issues with the flush valve. This can occur when the flush valve isn’t opening fully due to debris or mechanical failure, resulting in insufficient water flow.
- Water Leaks: Visible water pooling around the base of the toilet or inside the tank can suggest a leaking flush valve. This can cause water waste and higher utility bills, and it typically occurs when the valve seal is compromised.
- Ghost Flushing: This phenomenon, where the toilet seemingly flushes by itself, may be related to a malfunctioning flush valve. It usually occurs when the valve opens slightly due to poor sealing, allowing water to escape and trigger the tank to refill intermittently.
- Corrosion or Mineral Buildup: Physical signs of corrosion or mineral deposits around the flush valve can indicate deterioration. Over time, this buildup can affect the valve’s functionality and lead to leaks or ineffective flushing.
What Should You Look for in a High-Quality Repair Kit?
When selecting a high-quality toilet tank repair kit, several key features can impact its effectiveness and ease of installation.
-
Comprehensive Components: Look for kits that include essential parts such as a flush valve, flapper, fill valve, adjustable height options, and necessary hardware. A complete kit minimizes the need for additional purchases.
-
Material Quality: Durable materials like chlorine-resistant rubber and high-impact plastic ensure longevity. Kits with metal components, such as brass fittings, can enhance durability compared to all-plastic options.
-
Compatibility: Check the compatibility of the kit with various toilet models. Some kits specify compatibility with specific brands or types, ensuring they will fit seamlessly.
-
Ease of Installation: Kits that come with clear instructions and require minimal tools can save time and frustration. Look for products with user-friendly designs, such as clip-on mechanisms for flappers.
-
Warranty or Guarantee: A manufacturer’s warranty or satisfaction guarantee can indicate product reliability and offer peace of mind in case of defects.
Prioritizing these aspects will lead to a more efficient toilet repair experience and ultimately better performance of your toilet system.
Which Materials Ensure Durability and Longevity?
The materials that ensure durability and longevity in toilet tank repair kits include:
- Plastic: Commonly used for various components due to its resistance to corrosion and moisture.
- Bronze: Known for its strength and resistance to rust, making it ideal for fittings that endure frequent use.
- Rubber: Essential for seals and gaskets, providing a reliable barrier against leaks while maintaining flexibility over time.
- Polymer: A synthetic material that offers exceptional durability and is often used in flush valves and flappers.
- Stainless Steel: Often used for bolts and screws, providing resistance to rust and ensuring long-term stability in wet environments.
Plastic is widely used in toilet tank repair kits because it is lightweight, resistant to moisture, and does not corrode, which prolongs the life of components. Its versatility allows for various shapes and sizes needed for different toilet models.
Bronze is favored for its strength and durability, especially in components that require high resistance to wear and tear. It does not rust like iron and can withstand harsh conditions, making it an excellent choice for water fittings.
Rubber is critical in the formation of seals and gaskets within the repair kit, as it provides effective insulation against leaks. Its flexibility allows it to conform to various shapes and sizes, ensuring a snug fit that prevents water from escaping.
Polymer materials are highly regarded for their durability and resistance to chemicals and heat, making them suitable for flush valves and flappers that need to operate efficiently over time. They are engineered to withstand the wear from frequent flushing, ensuring consistent performance.
Stainless steel is often used in the construction of hardware like bolts and screws, providing exceptional strength and resistance to rust. Its longevity in wet environments reduces the need for frequent replacements, making it a cost-effective option for maintaining the integrity of the toilet tank.
What Essential Tools Are Included in a Comprehensive Kit?
A comprehensive toilet tank repair kit typically includes several essential tools and components to effectively address common issues.
- Flapper Valve: The flapper valve is a crucial component that controls the release of water from the tank to the bowl during a flush. Over time, flappers can deteriorate or become misaligned, leading to leaks and inefficient flushing. A quality repair kit usually comes with a durable flapper that ensures a tight seal and optimal performance.
- Fill Valve: The fill valve, also known as the ballcock, is responsible for refilling the tank after a flush. If the fill valve is malfunctioning, it can cause the toilet to run continuously or not fill properly. Most kits include an adjustable fill valve that can accommodate various tank sizes and water levels, making installation straightforward.
- Tank-to-Bowl Gasket: This gasket creates a watertight seal between the tank and the bowl to prevent leaks. Over time, gaskets can wear out or become brittle, leading to water pooling on the floor. A replacement gasket is often included in repair kits, ensuring a secure connection and preventing leakage.
- Chain and Handle: The chain connects the flapper to the toilet handle, allowing for the flushing action. If the chain breaks or becomes too loose, the toilet may not flush properly. A good repair kit will provide a new chain and handle, ensuring that you can easily flush the toilet without issues.
- Adjustable Wrench: An adjustable wrench is essential for tightening or loosening nuts and bolts during installation and repairs. It provides the necessary grip to work with various sizes of fittings and can help avoid damaging the components. Including a wrench in the kit ensures that you have the right tool on hand for the job.
- Installation Instructions: Clear and concise installation instructions are vital for a successful repair. Many kits come with step-by-step guides or diagrams, making it easier for even novice DIYers to understand the process. This feature minimizes frustration and helps ensure that all components are installed correctly.
How Do You Install a Toilet Tank Repair Kit Properly?
Installing a toilet tank repair kit properly involves several key components to ensure your toilet functions effectively.
- Shut Off the Water Supply: Before starting any repairs, locate the shut-off valve usually found behind the toilet and turn it clockwise to stop the water flow.
- Drain the Toilet Tank: Flush the toilet to empty the tank, then use a sponge or towel to soak up any remaining water at the bottom to prevent spills during the repair.
- Remove the Old Parts: Take off the tank lid and carefully unscrew the old flapper, fill valve, or any other components being replaced, noting their arrangement for easier installation of the new parts.
- Install the New Components: Follow the instructions provided with the best toilet tank repair kit, attaching the new flapper or fill valve securely, ensuring all gaskets are in place to prevent leaks.
- Reconnect the Water Supply: Turn the shut-off valve counterclockwise to restore the water supply, allowing the tank to fill up while monitoring for any leaks around the new parts.
- Test the Toilet: Once the tank is filled, flush the toilet a few times to ensure everything is functioning properly and adjust any components as necessary to achieve optimal performance.
What Are the Key Steps in the Installation Process?
The key steps in the installation process of the best toilet tank repair kit include:
- Preparation: Before starting the installation, turn off the water supply to the toilet and flush it to empty the tank. This step ensures a clean working environment and prevents any water from spilling during the repair.
- Remove the Tank Lid: Carefully take off the toilet tank lid and set it aside in a safe place. This step allows you to access the internal components of the tank that need repair or replacement.
- Inspect Components: Examine the existing parts such as the flapper, fill valve, and flush valve for any signs of wear or damage. Identifying which components need to be replaced is crucial for a successful repair.
- Replace the Flapper: If the flapper is worn out, detach it from the flush valve and replace it with the new one from the kit. This step is essential as a faulty flapper can cause leaks and inefficient flushing.
- Install the Fill Valve: Remove the old fill valve by unscrewing it from the tank and install the new fill valve according to the manufacturer’s instructions. Proper installation of the fill valve helps maintain the correct water level and prevents overflows.
- Adjust the Water Level: After installing the new fill valve, adjust the water level to the recommended height, usually marked inside the tank. Ensuring the correct water level is vital for the toilet’s proper functioning.
- Reassemble the Tank: Once all components are replaced and adjusted, reattach the tank lid securely. This step completes the installation process and prepares the toilet for testing.
- Test the Toilet: Finally, turn the water supply back on and flush the toilet to check for any leaks or issues. Testing ensures that all repairs are successful and the toilet operates efficiently.
What Safety Precautions Should Be Followed During Installation?
When installing a toilet tank repair kit, it is crucial to follow specific safety precautions to ensure a smooth and safe process.
- Turn Off the Water Supply: Before beginning the installation, always turn off the water supply to the toilet to prevent any accidental flooding or water damage.
- Drain the Toilet Tank: After shutting off the water, flush the toilet to drain the tank completely. This step is essential to avoid any spills or mess while working on the tank.
- Wear Protective Gear: Use safety goggles and gloves to protect your eyes and hands from any sharp tools or small parts that may cause injury during the installation process.
- Use Proper Tools: Ensure you have the right tools, such as a wrench and screwdriver, to avoid damaging components or injuring yourself while attempting to use the wrong equipment.
- Follow Manufacturer Instructions: Always refer to the specific instructions provided with the toilet tank repair kit. This ensures that you install the components correctly and safely, minimizing the risk of malfunction.
- Check for Leaks After Installation: Once the repair kit is installed, turn the water supply back on and check for leaks. This precaution helps identify any issues immediately, preventing further damage or complications.
What Benefits Are Gained from Using a Toilet Tank Repair Kit?
The benefits of using a toilet tank repair kit include cost savings, ease of installation, and improved toilet performance.
- Cost Savings: Repairing a toilet with a kit is significantly cheaper than hiring a plumber or replacing the entire toilet. Most kits are affordable and can address common issues such as leaks and flushing problems, allowing homeowners to save on both labor and material costs.
- Ease of Installation: Many toilet tank repair kits come with clear instructions and the necessary tools, making it easy for even novice DIYers to complete the repairs. This convenience means that most repairs can be done in under an hour, minimizing inconvenience and downtime for the toilet.
- Comprehensive Solutions: These kits typically include a range of components, such as flappers, fill valves, and tank levers, which address various issues that can arise in toilet tanks. By having everything needed in one package, users can resolve multiple problems without needing to make multiple trips to the hardware store.
- Improved Toilet Performance: Using a repair kit can restore the toilet’s functionality, ensuring it flushes properly and efficiently. This not only enhances user experience but can also contribute to water conservation by preventing leaks that waste water.
- Reduced Environmental Impact: By repairing rather than replacing a toilet, homeowners contribute to less waste in landfills and a reduced demand for new manufacturing. This sustainable approach helps lessen the environmental footprint associated with home maintenance.
Which Toilet Tank Repair Kits Are Most Recommended?
DANCO Toilet Repair Kit: This kit includes a variety of components, such as flappers, tank levers, and gaskets, making it versatile for addressing multiple toilet problems. Its user-friendly instructions make it accessible for DIY homeowners, and the parts are manufactured for durability.
American Standard Champion 4 Toilet Repair Kit: Tailored for the Champion 4 model, this kit includes specific parts that ensure optimal performance and a perfect fit. The quality components help maintain the flushing power and prevent common issues like clogs or leaks.
Korky 4010PK Universal Toilet Repair Kit: This kit is particularly noted for its water-saving features, including a flapper that prevents leaks and reduces water waste. Additionally, its quiet operation makes it a preferred option for those looking to minimize noise in their bathrooms.
Related Post: